
Ronen Bekerman is an industry leader in Architectural Visualization who hosts in-depth tutorials on his specialist blog. Architizer is pleased to present a selection of these guides written by some of the world’s best rendering artists.
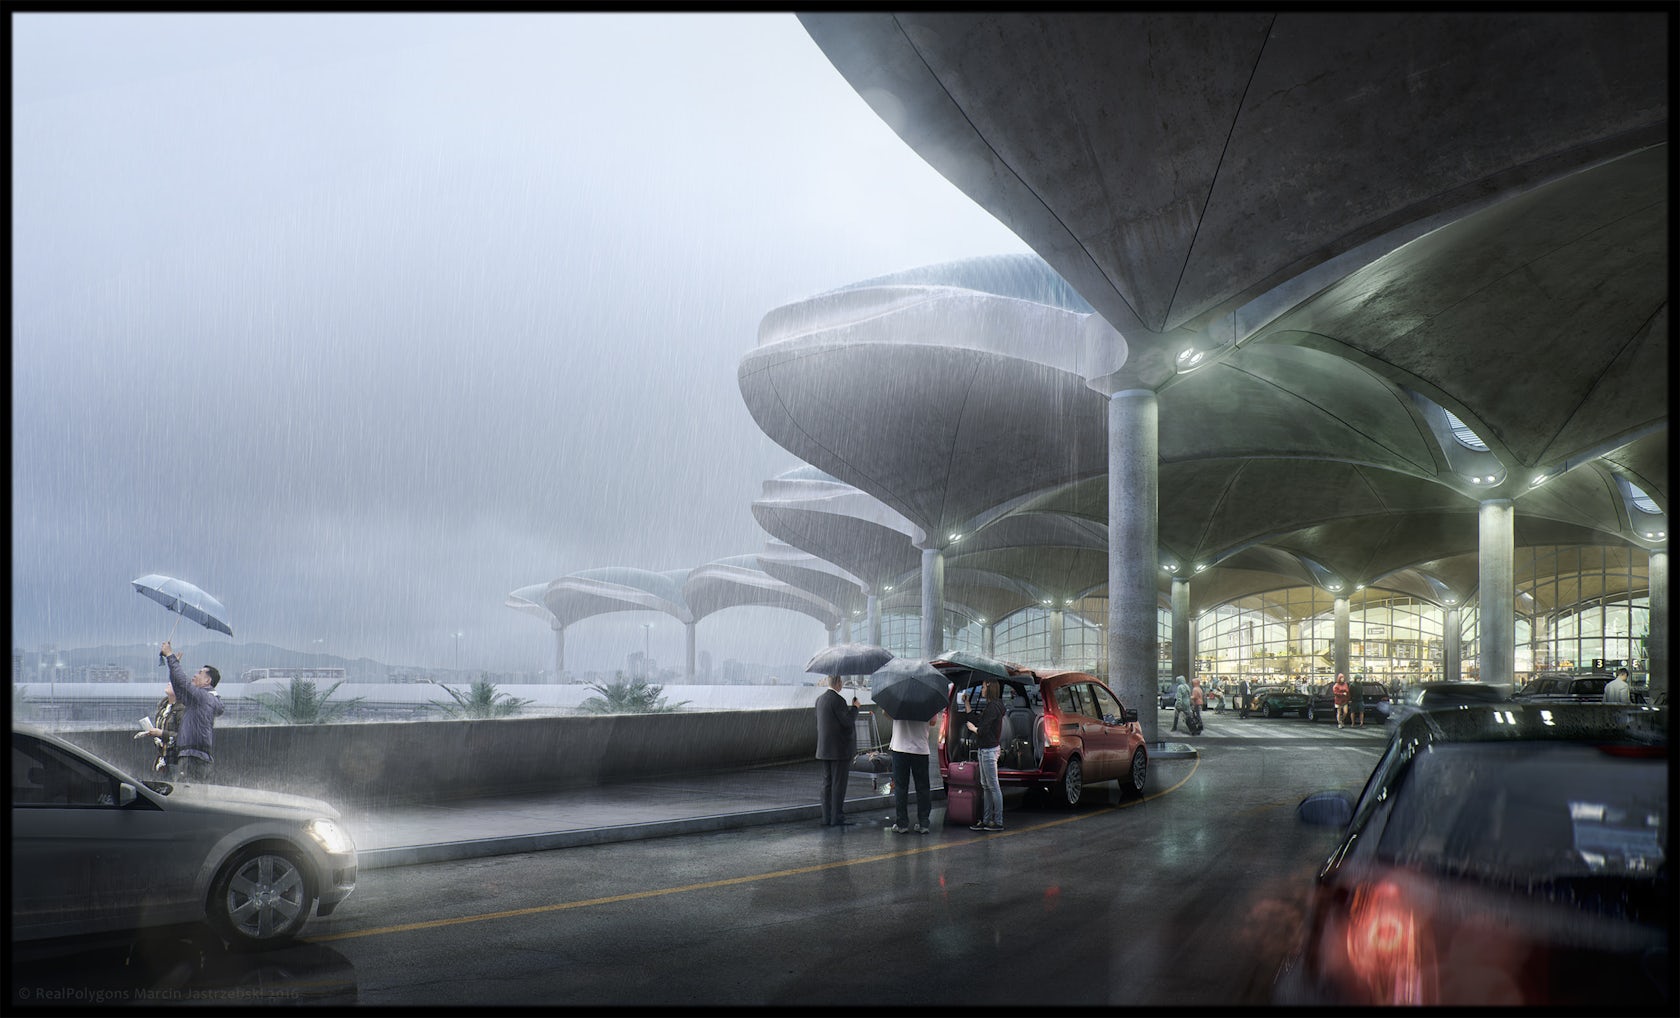
Marcin Jastrzebski’s “Queen Alia Airport” visualization, recreating the real deal designed by Foster + Partners in Amman, Jordan, earned him Best Visualization of the Week for a remarkable CG remake modeled with Modo and Cinema4d, rendered with Corona Renderer and masterfully orchestrated for the final result in Photoshop. Follow this article as Marcin describes his process, focusing on key principles and then the technical aspects. Enjoy!
Introduction
When I started writing this making-of, I was wondering what should I tell about the visualization. Finally, I decided to write about my understanding of the image creation process, not being focused on technical details like modeling, rendering and light setups. As a matter if fact, most questions I receive have to do with more general “large concepts” of any creation process, which are independent of technical aspects.
This was my first real work made with Corona renderer (you can download the v1.3 demo directly here).
When I started working on the Queen Alia Airport project, I had two ideas for the final mood and light:
- A sunset and strong warm light with intense colors.
- A cold rainy mood with heavy rain.
I always try to start a new project with a ready plan for what I want to accomplish with it. By that, I refer to the main concept of the image and main assumptions about the final effect.
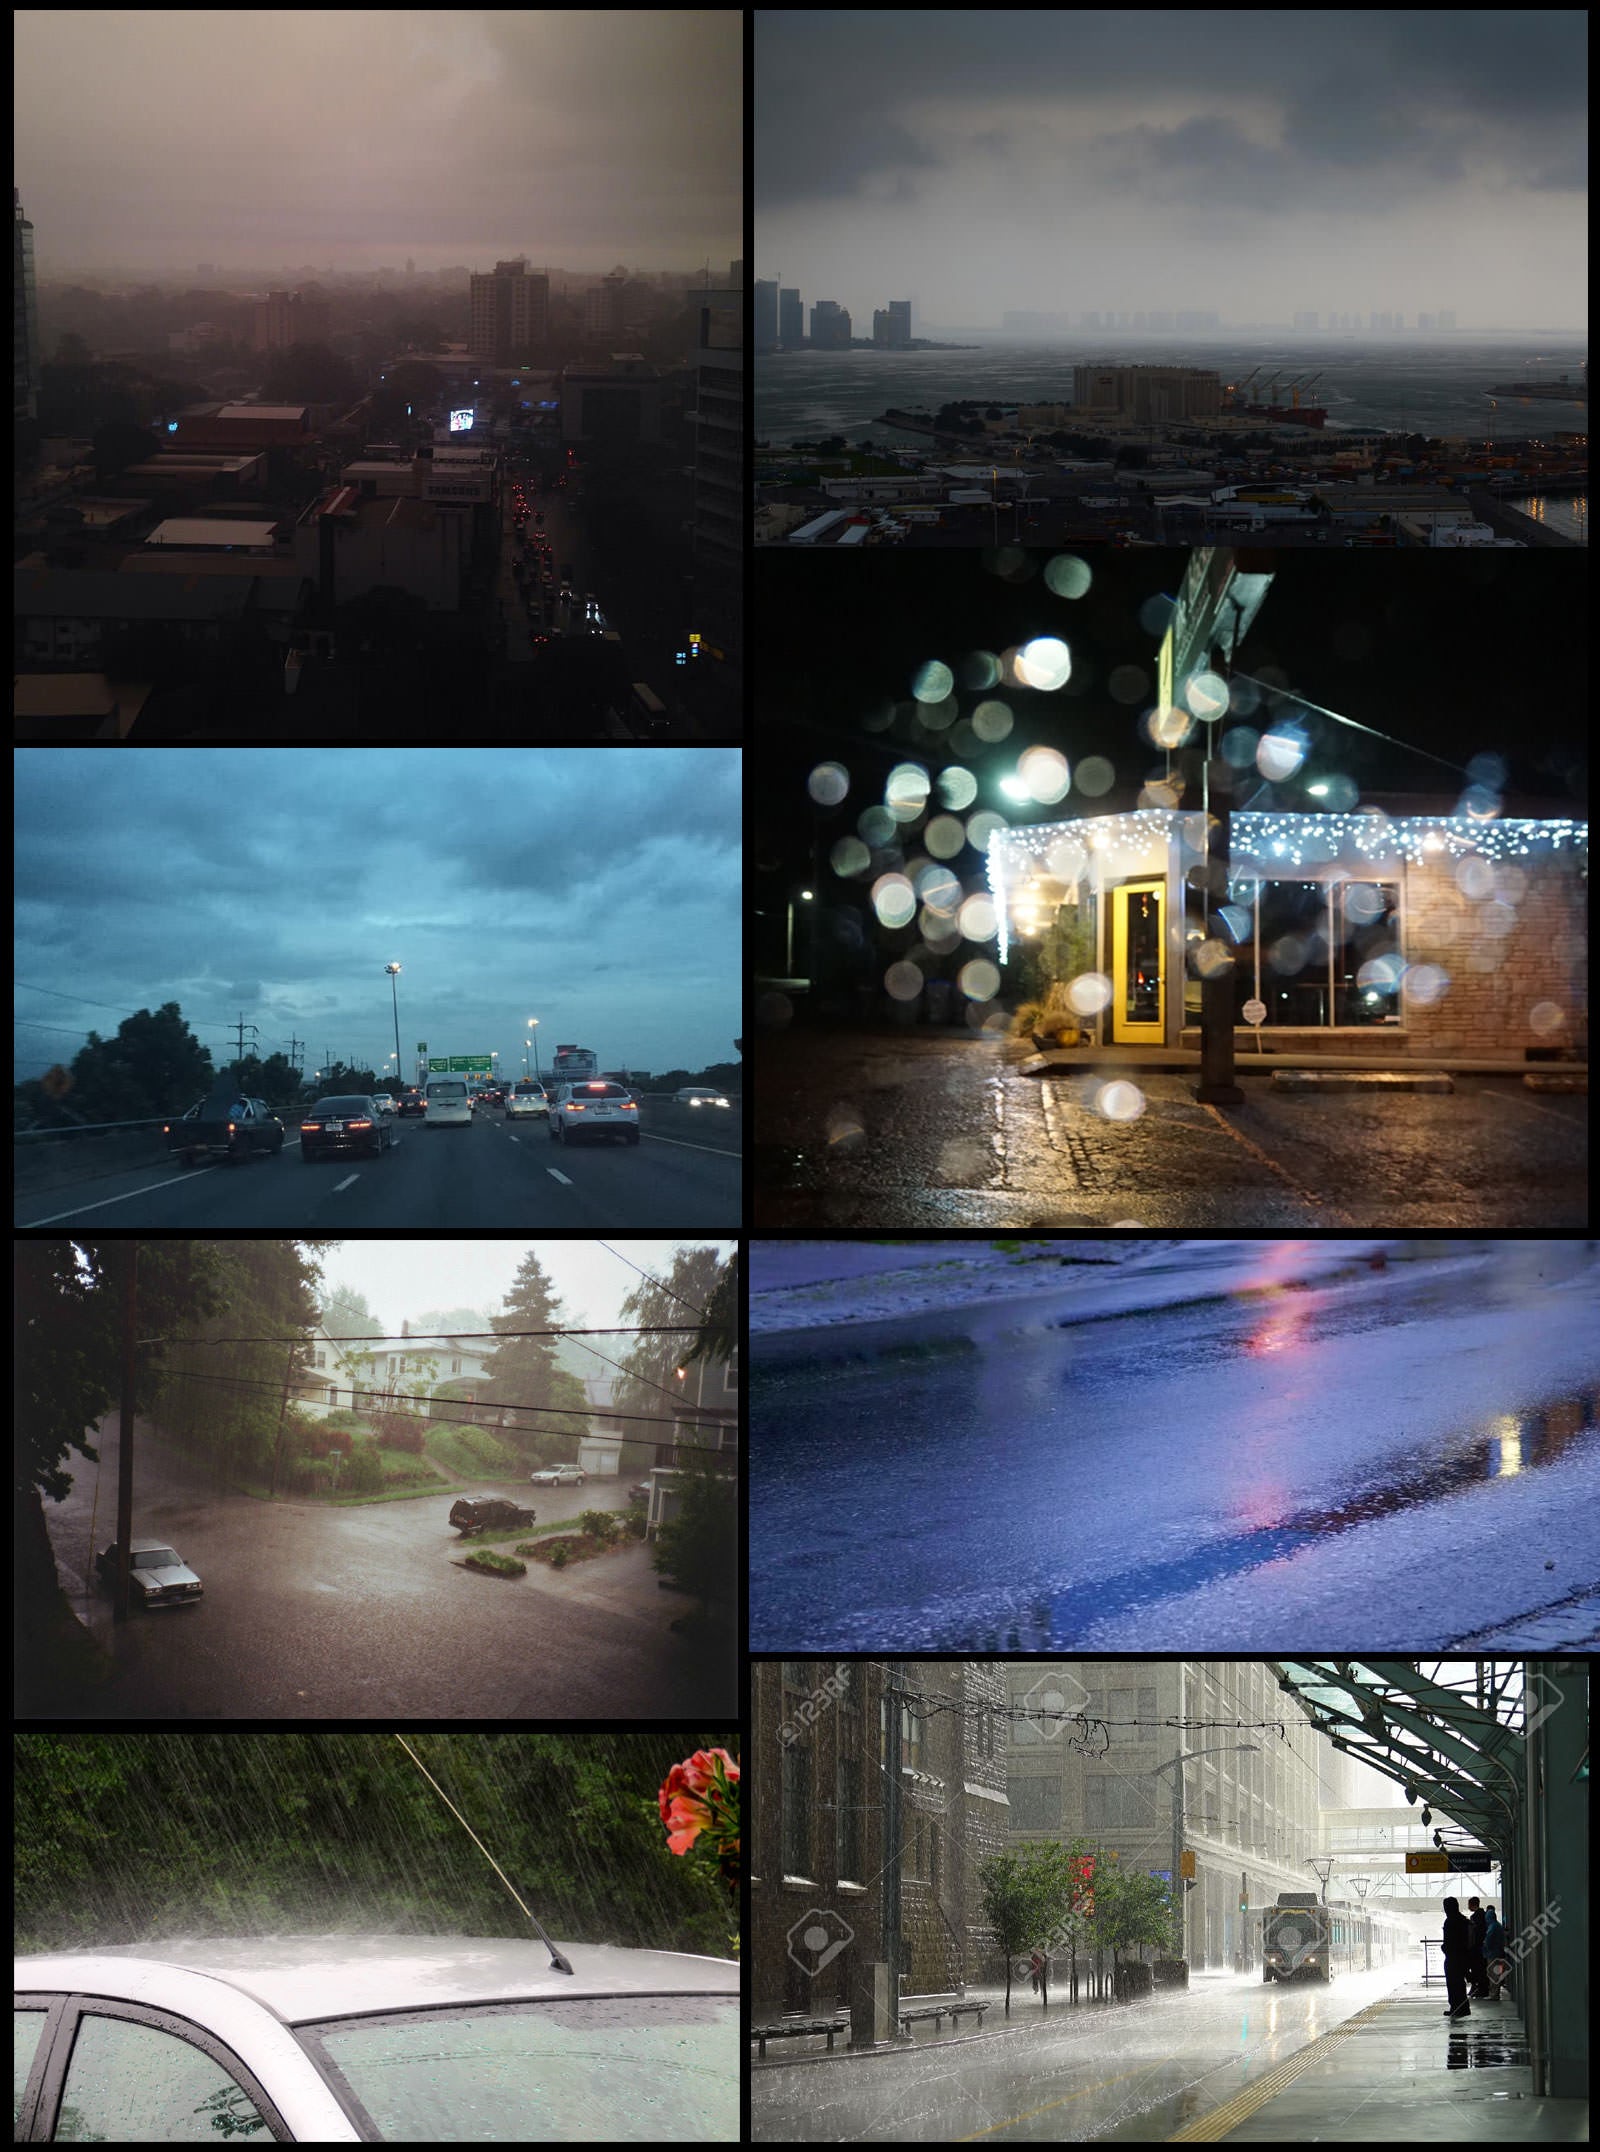
In the end, I decided to make a rainy weather view. I began gathering reference materials for the overall mood, including some for the rain and effects related to this.
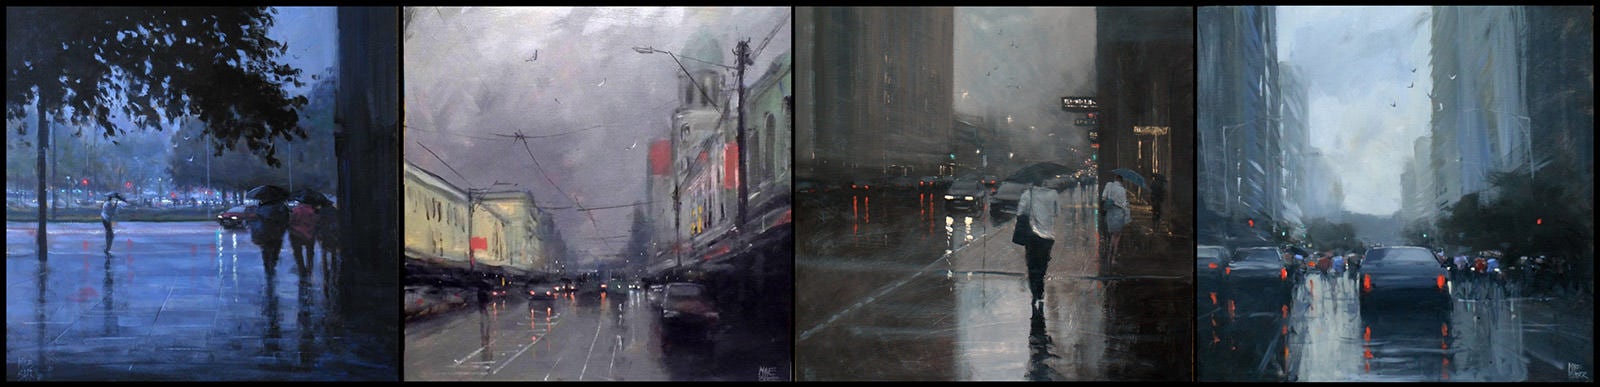
Because I decided to do a lot of work in 2D post-production for this project, I included rain streets paintings by the great artist Mike Barr. I wanted the final image to be color-consistent with a clearly ordered composition, and also make it a dynamic image, reflecting the fact that the airport is a heavy traffic place.
Modeling
I relied on photos and images and image blueprints …
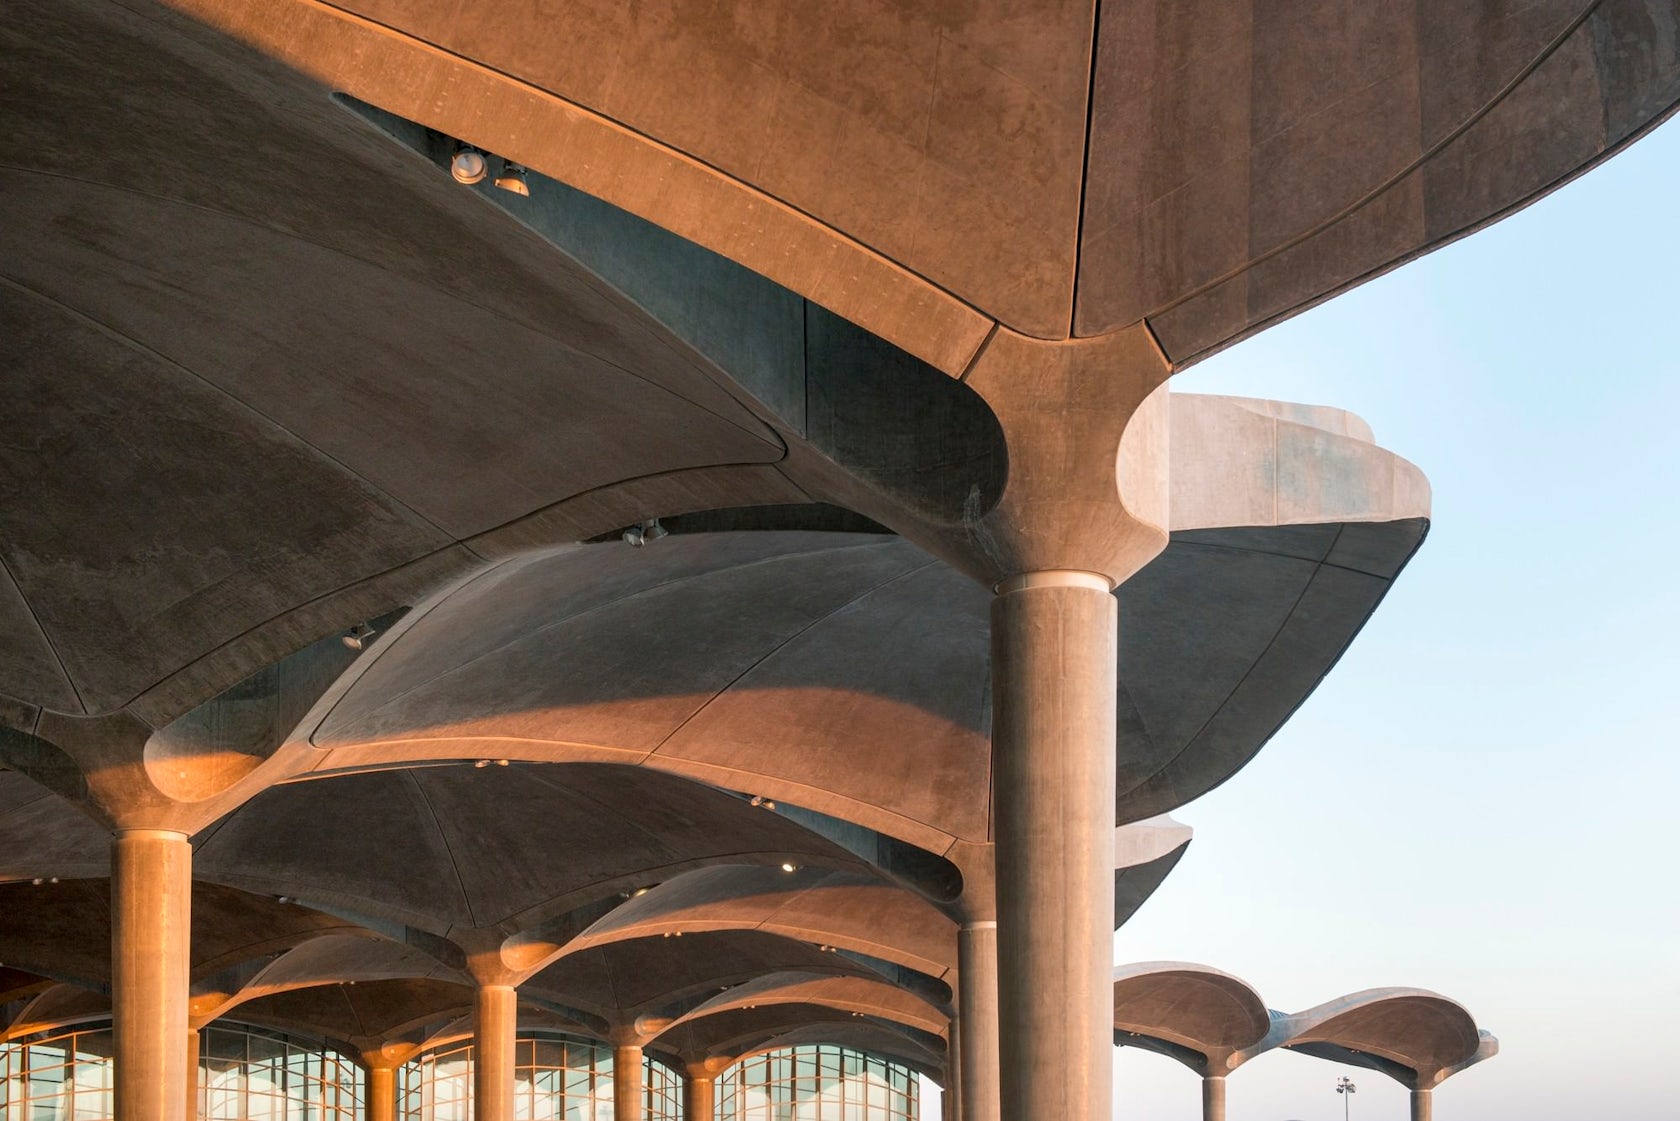

The modeling stage was quite difficult for me due to the fact that I didn’t find better blueprints of the Queen Alia project on the internet. I mainly had problems with the organic shapes of the roof, which is the main feature of this airport.
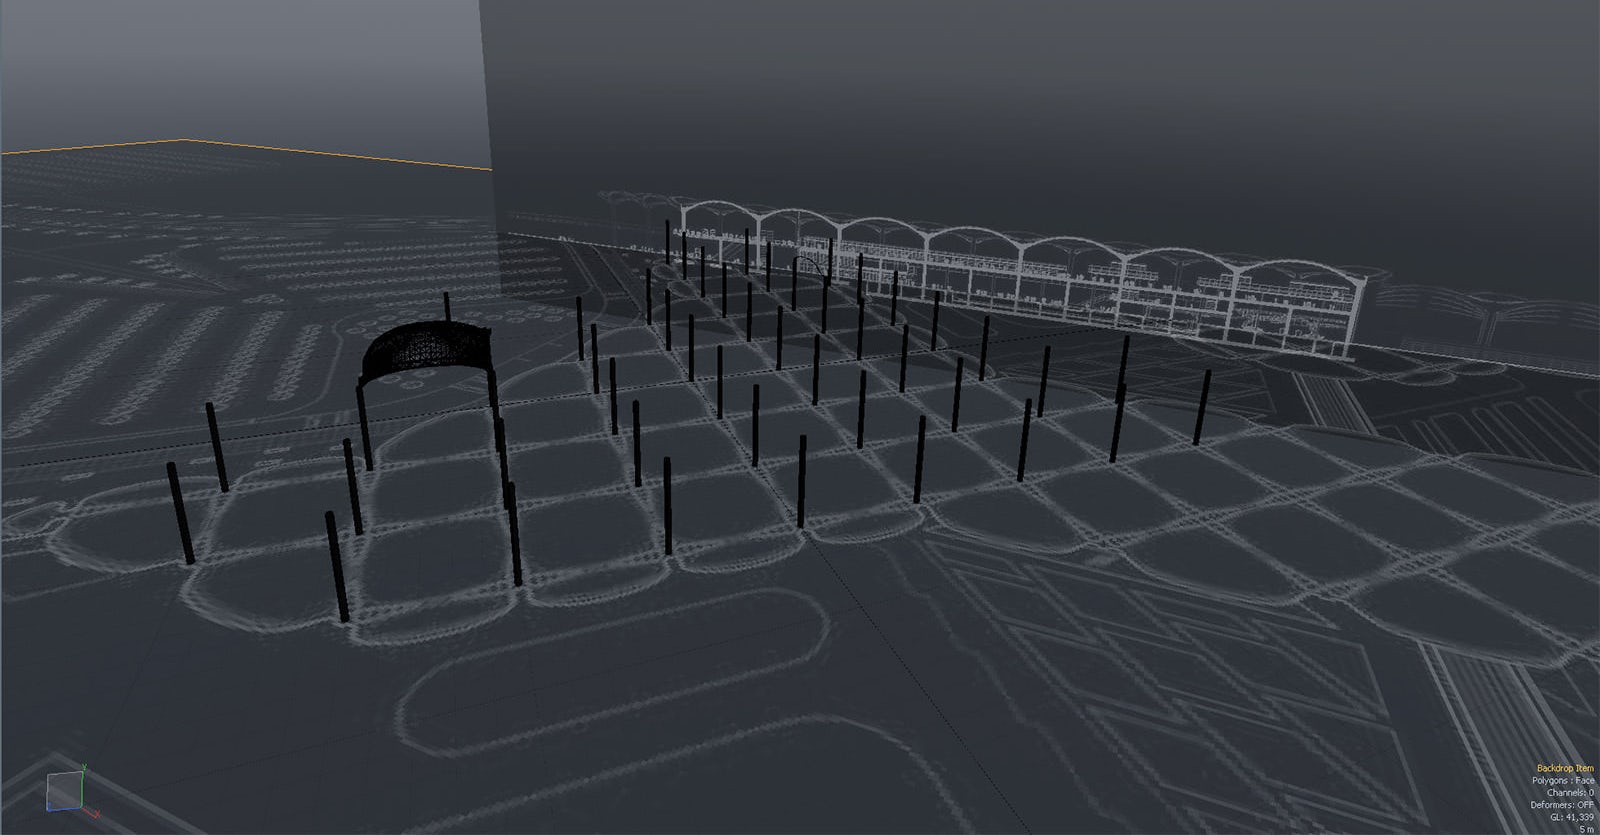
I modeled these elements in Modo using spline patch modeling technique:
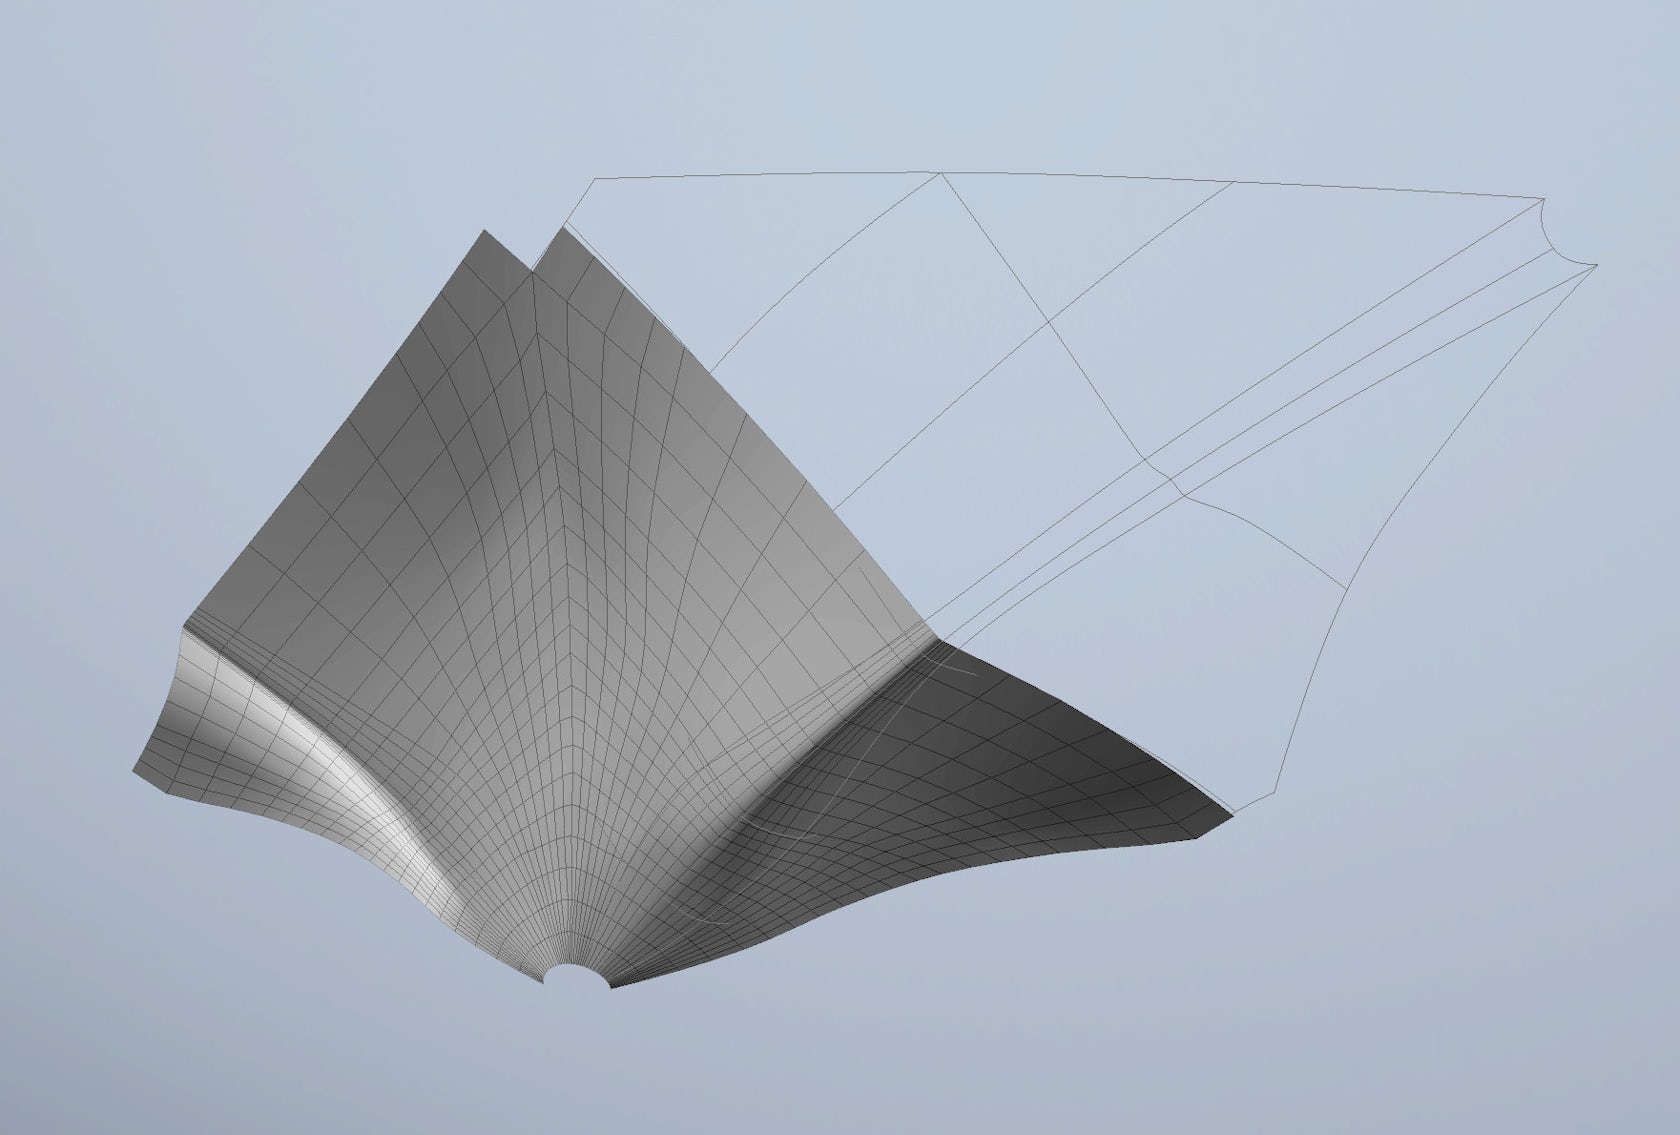
After freezing these shapes, I created splines for the groove lines which exist in the roofing. This provided a base from which to create boolean objects and then cut and divide parts to form the concrete shapes.
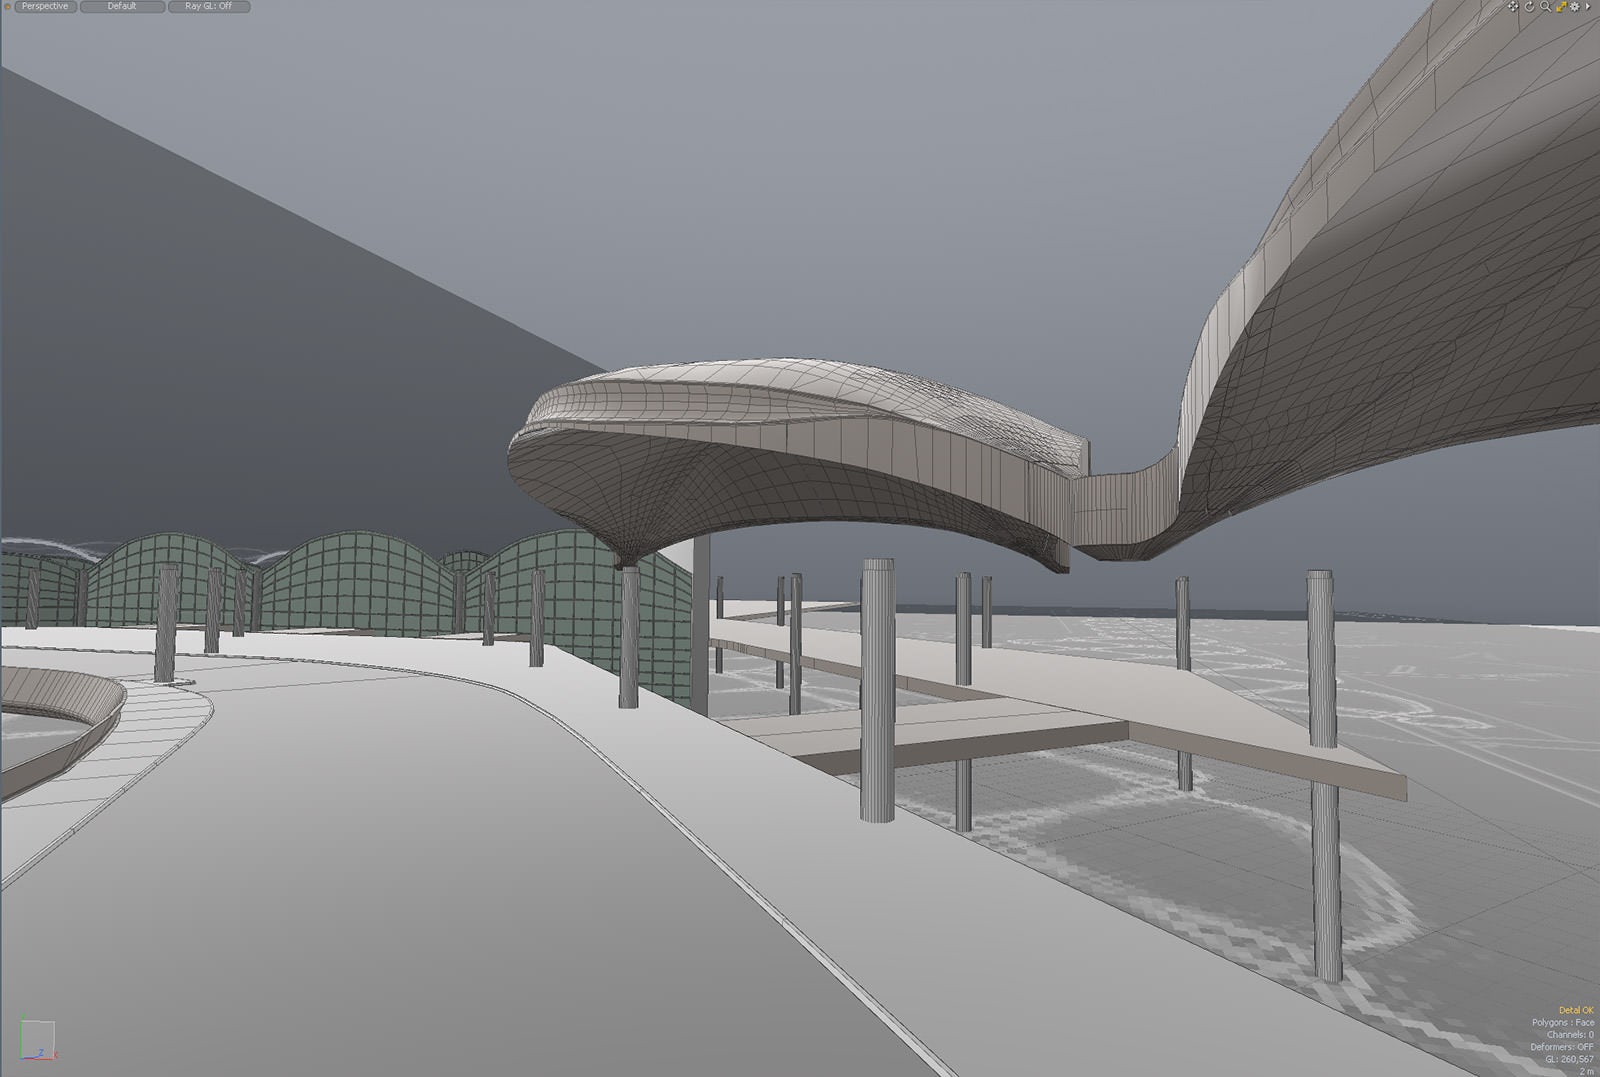
I modeled the rest of the scene very quickly, without too many details, and imported them into Cinema 4D to set the draft scene and make a final decision about camera position. After this important decision, I came back to Modo and finished the modeling stage, but only for the visible parts. I avoided modeling unnecessary things this way.
After importing the finished models again to C4D, I cloned them as instance objects and set the scene for the final view. I planned to make the entire background space in post-production.
Rendering
I made the final render in Corona renderer.
It was my first big project done with this renderer after previously done only small and simple interior test scenes. I’m really impressed how effectively Corona Renderer works on both platforms (I used it on both 3dsmax and C4D). The light setup, material editing, displacement and other features work great and everything is easy to learn and use.
Finally, those factors make the work with Corona Renderer very effective and we can achieve desired effects in render without problems. Corona Renderer material editor looks too simple for me, coming to it from Maxwell Render. But from another side, this is the strong point consistent with the main philosophy of the Corona Renderer creators. They assume to make Corona as a powerful and advanced renderer with easy and effective use which is visible even in the A5 version for Cinema 4D.
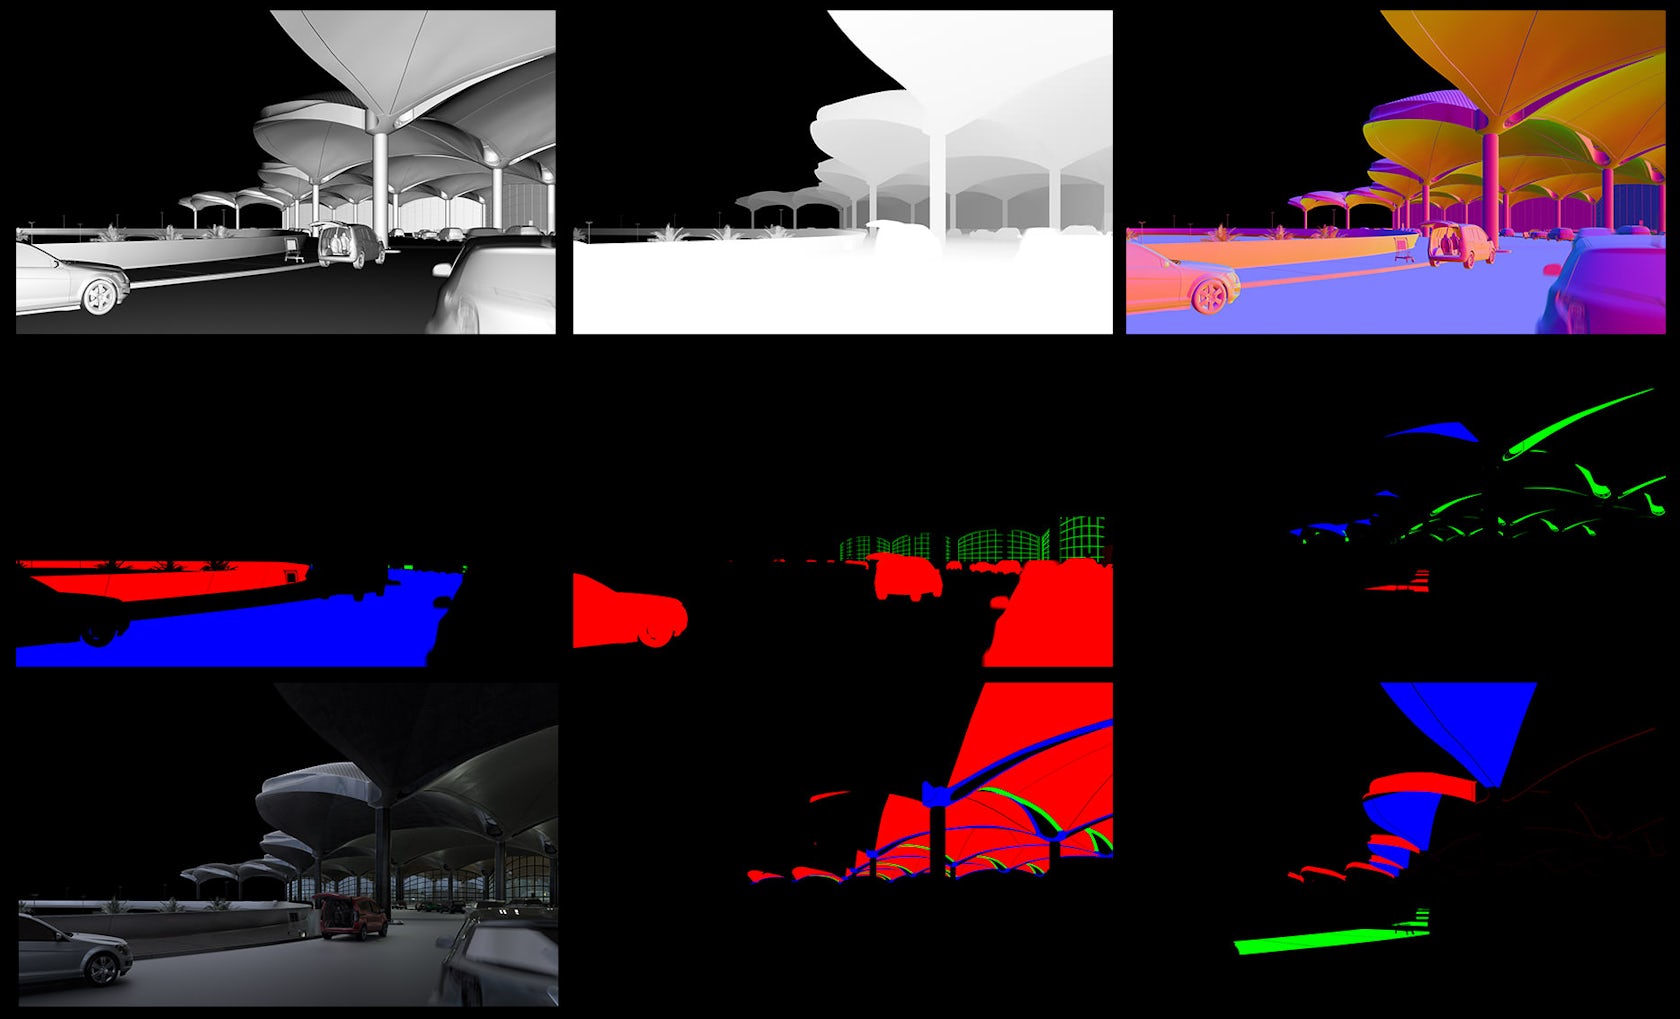
There are a lot of great opinions about Corona Renderer. We can see many great works done with it every day on the internet. Apart from the great quality and fast render, I decided to learn and use Corona Renderer in view of great and expanded multipass system and great antialiasing. Those factors are very desirable in post-production works.
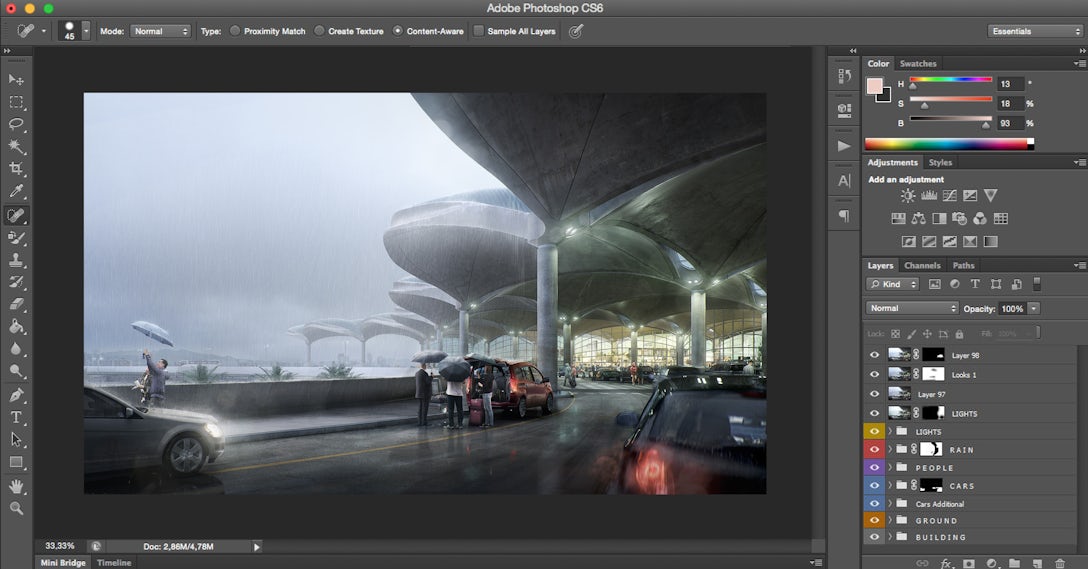
Anti-aliasing quality is crucial if we use a lot of additional channels and masks during post-production stage to separate many image parts. Great quality of rendered additional channels makes our work smooth. My Photoshop layers scheme can be viewed here.
I decided to make the final render at 6000 pixels width resolution despite the fact that I knew that I would present it at half of that resolution version. A high resolution connected with mentioned Corona Renderer quality ensures very comfortable work at the post-production stage. If I remember correctly, no refine masks were needed during the work. That was cool!
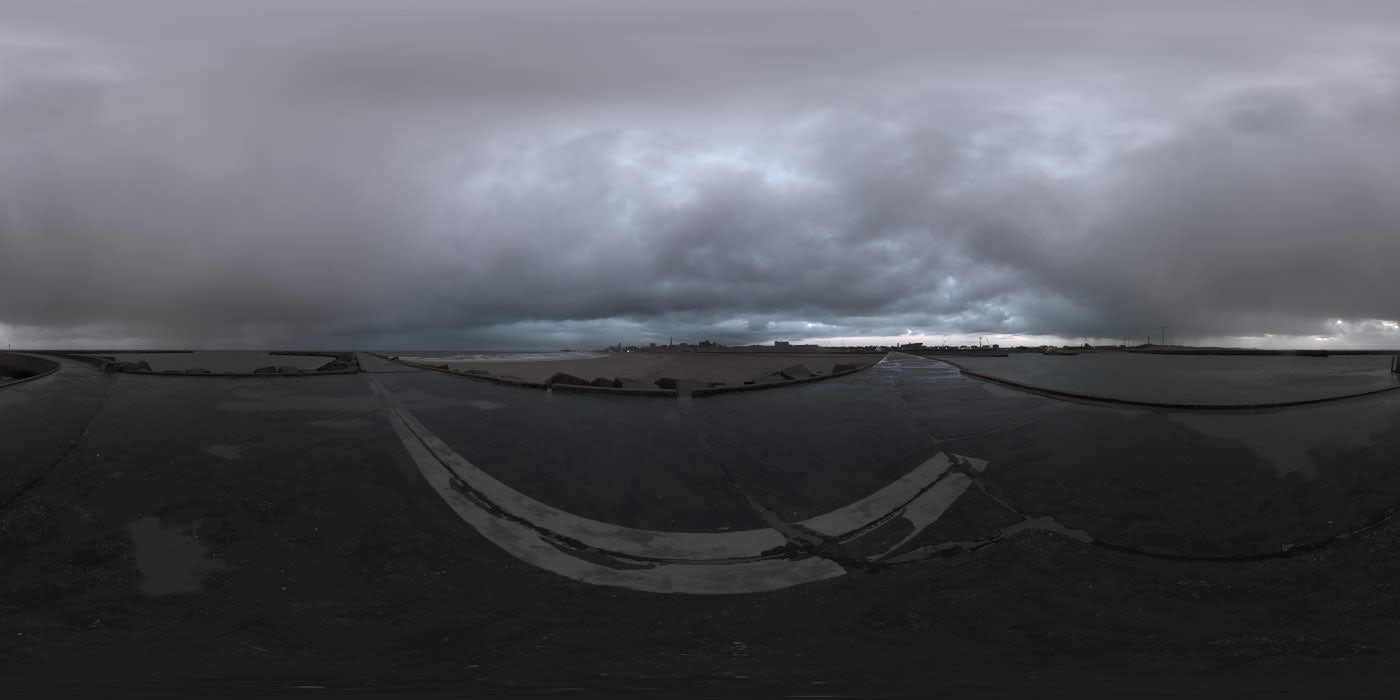
The light setup and render settings were simple. I used a cloudy HDRI image taken from DutchSkies library and loaded it into a standard Corona shader in the diffuse and emission slots. Added it to the sky (the Corona sky tag was removed) and corrected a little by texture filter.
I made simple planes for interior artificial lights (positioned under the ceiling) and used Evermotion objects from lights library for exterior lights. I added to all of them simple emission shaders with warm color for interior lighting and aquamarine color tint for exterior lighting.
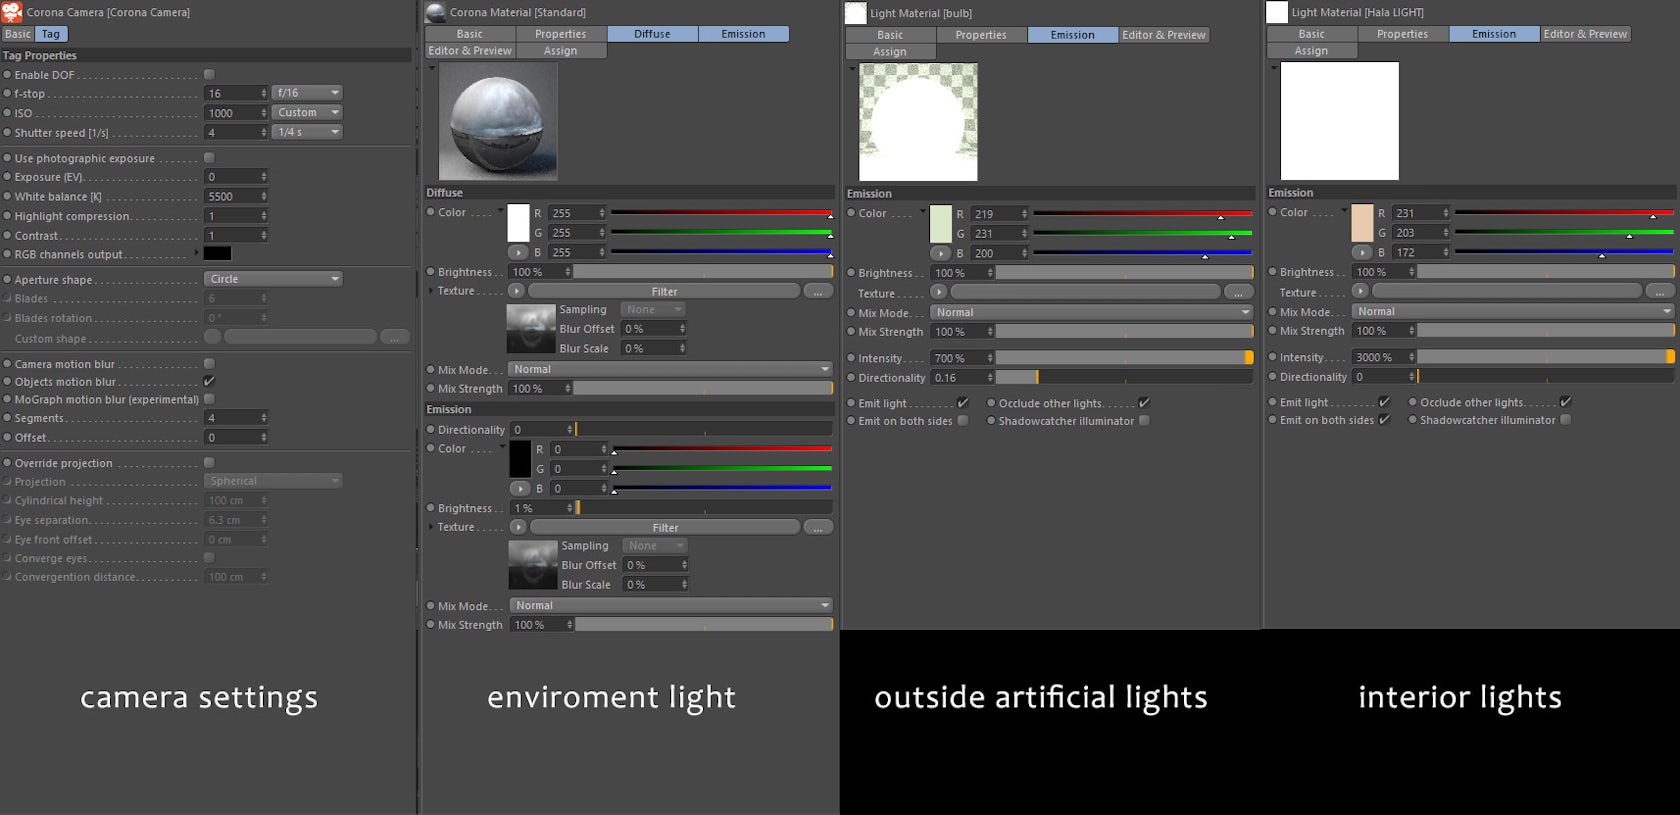
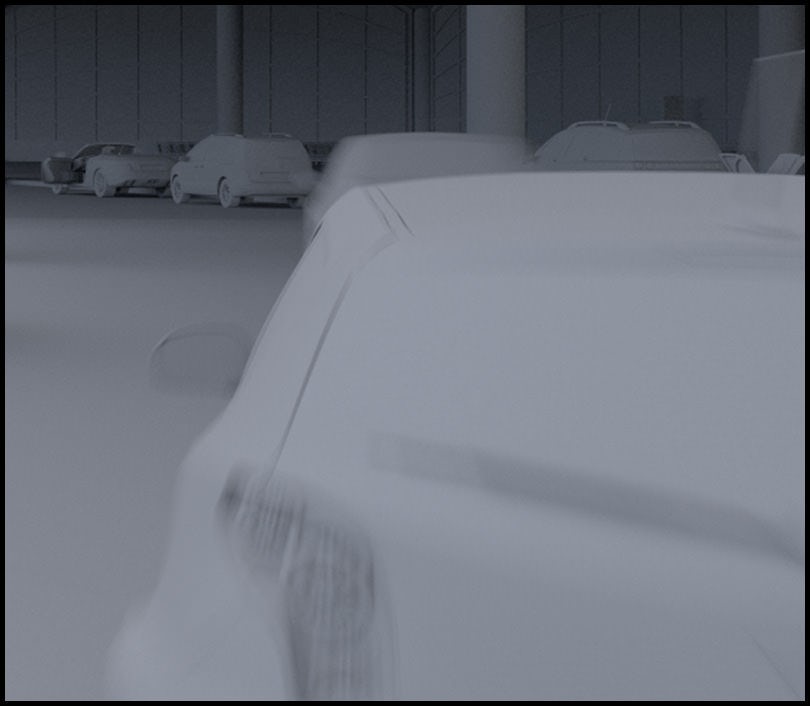
Camera settings were corrected to the environment strength and I changed the white balance value from default 6500 to 5500 to achieve a cold mood. I turned on the camera object motion blur for moving cars objects which I used in this project.
I just animated two cars movement through ten frames, set camera shutter speed such as in the real world to 1/4 sec value and rendered the fifth frame when cars were nicely moving. The result was realistic so I decided to make this effect directly in the rendering and not in post production:
The DutchSkies HDRI map which I used for the environment:
As I mentioned before, I made the dimensions 6000×3600 pixels for the final rendering. I don’t remember the rendering time and how many passes I achieved. I just let it render during the night. If I haven’t a strict deadline, I take every opportunity to reach the best rendering quality possible.
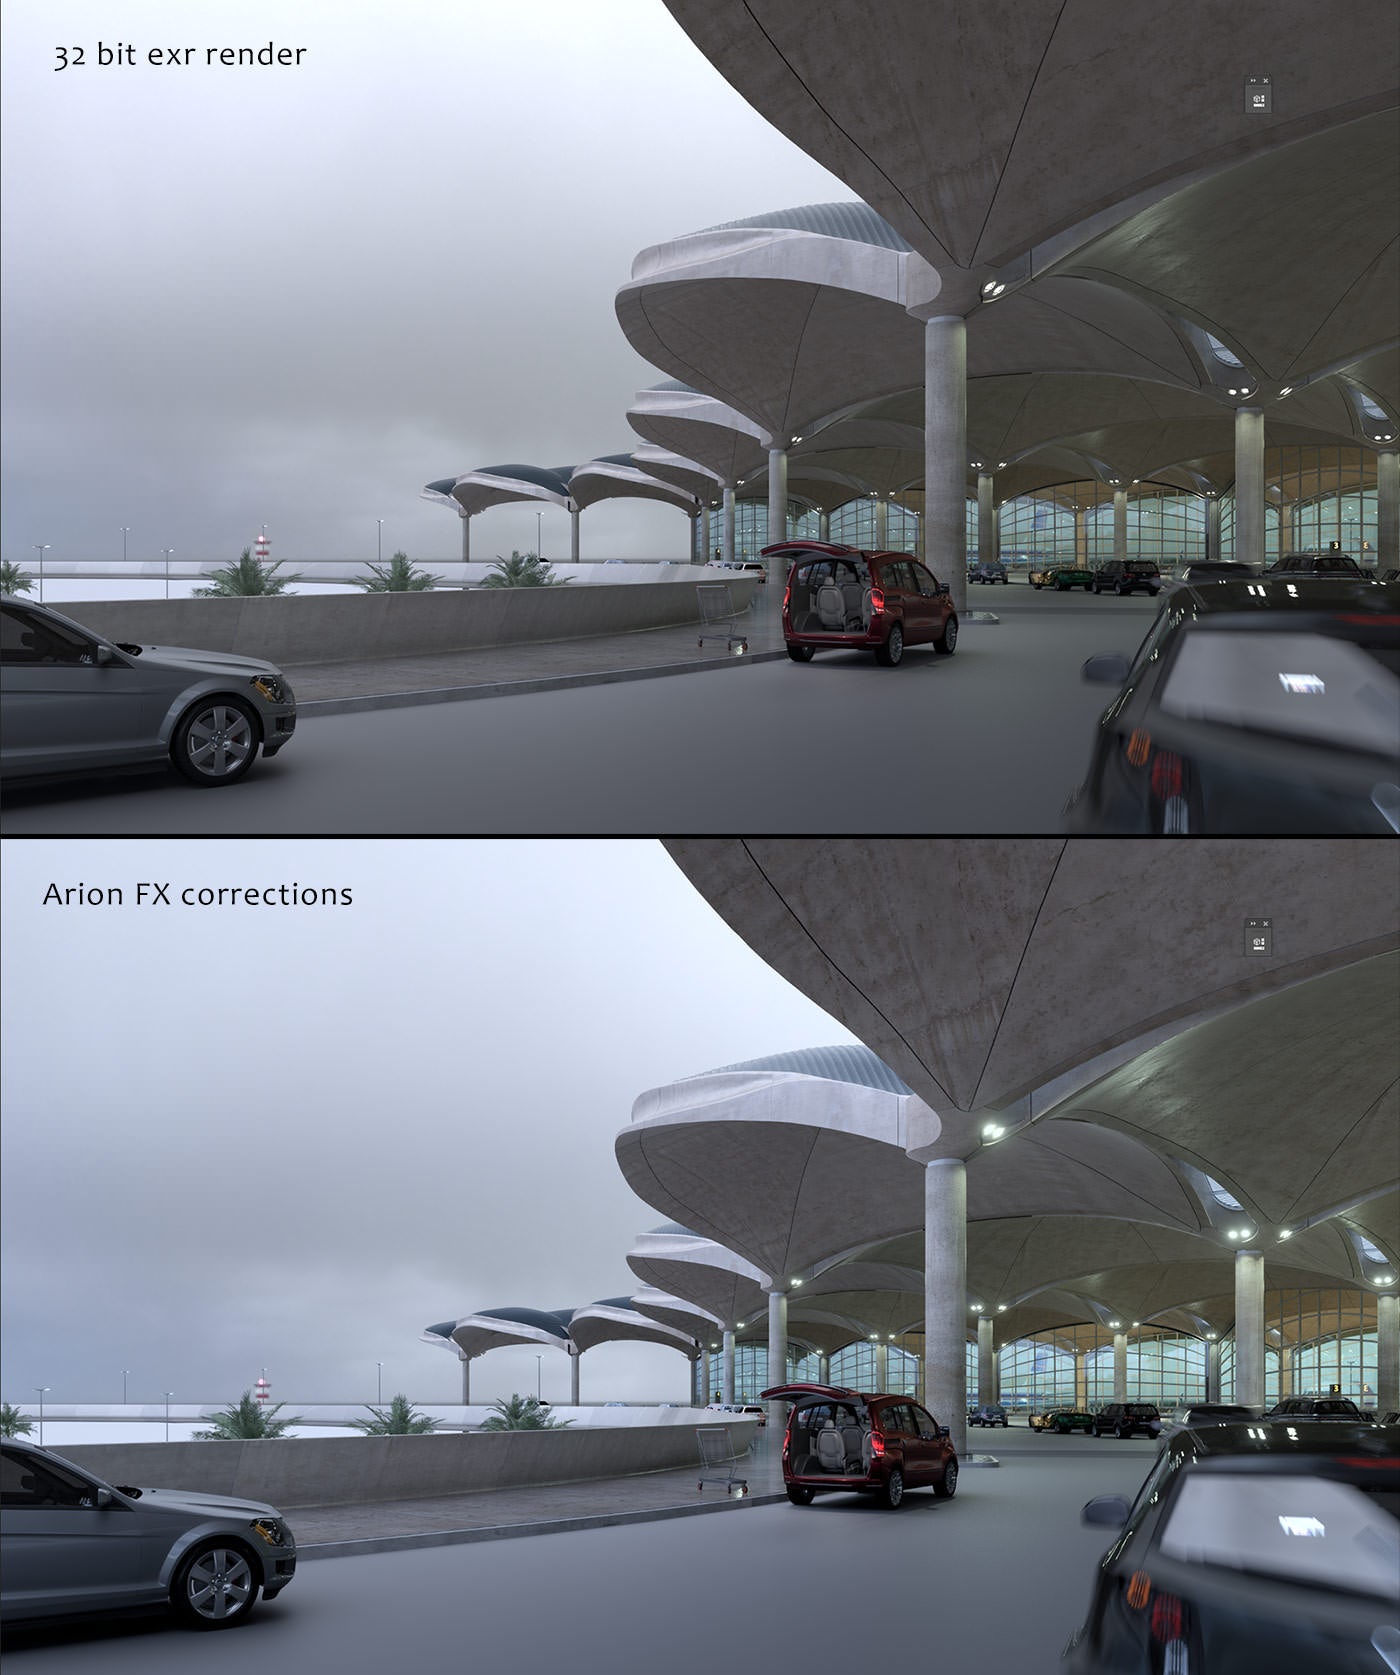
The raw rendering was prepared for post-production and tone mapping. I saved it as 32-bit EXR file and made initial corrections with Arion FX. Usually, I use Arion for main corrections and also for bloom effect.
The Composition
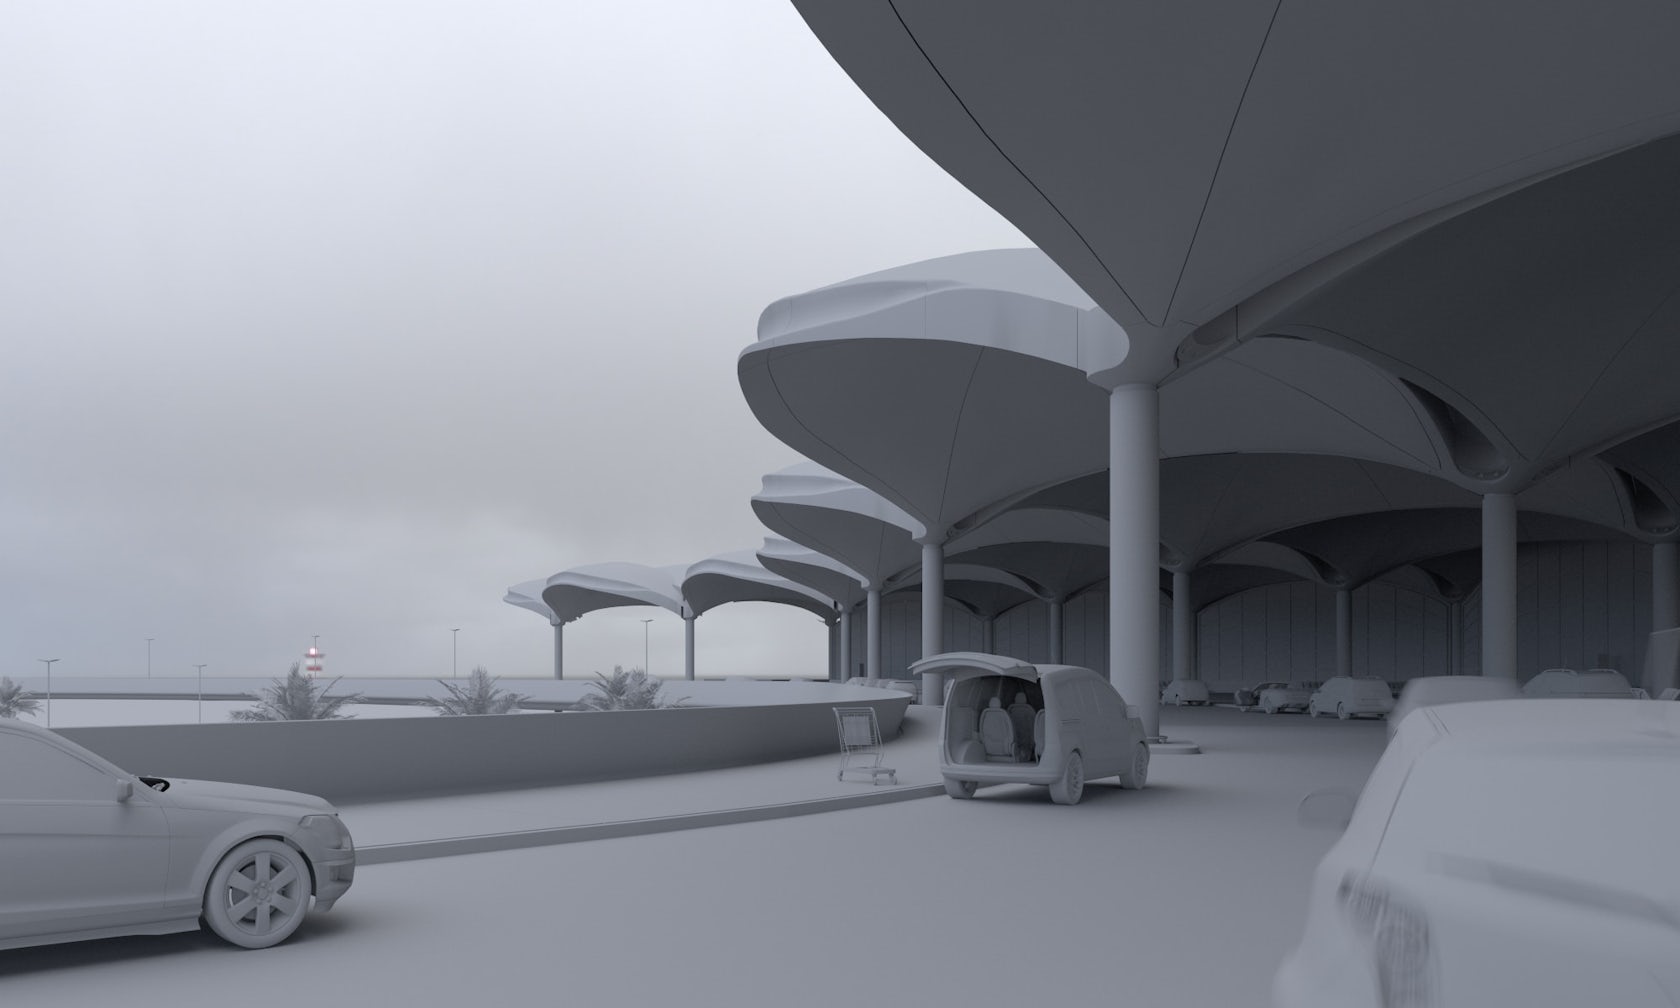
From the beginning, I had a ready main concept for this image, but of course, a lot of elements can be determined during the whole creation process. I decided to show the beautiful roofing shapes and monumental architecture but also, I wanted to show the open outside space to make a field for the rain effect. It needed to get the right balance in the final composition consistent with my ideas.
A camera is a basic tool which we use to show the architecture. For me, one of the initial questions is how to set the focal length. How deep I should distort the building shapes by using wide angle focal length or if I should avoid it and use more close to standard values or even a telelens.
I set the camera focal length to 28mm for two reasons. In the real world with a full frame camera, 28mm is quite a nice wide angle setup. Firstly, I don’t need to distort the original organic roofing shapes because they are attractive in their own form. Secondly, to make a dynamic composition, a wide angle helped a lot and helped to emphasize the roof forms in the top right part of the image. 28mm focal length was right to keep a good balance between those assumptions. In this way, I achieved nice roofing shapes and also could show enough outside space.
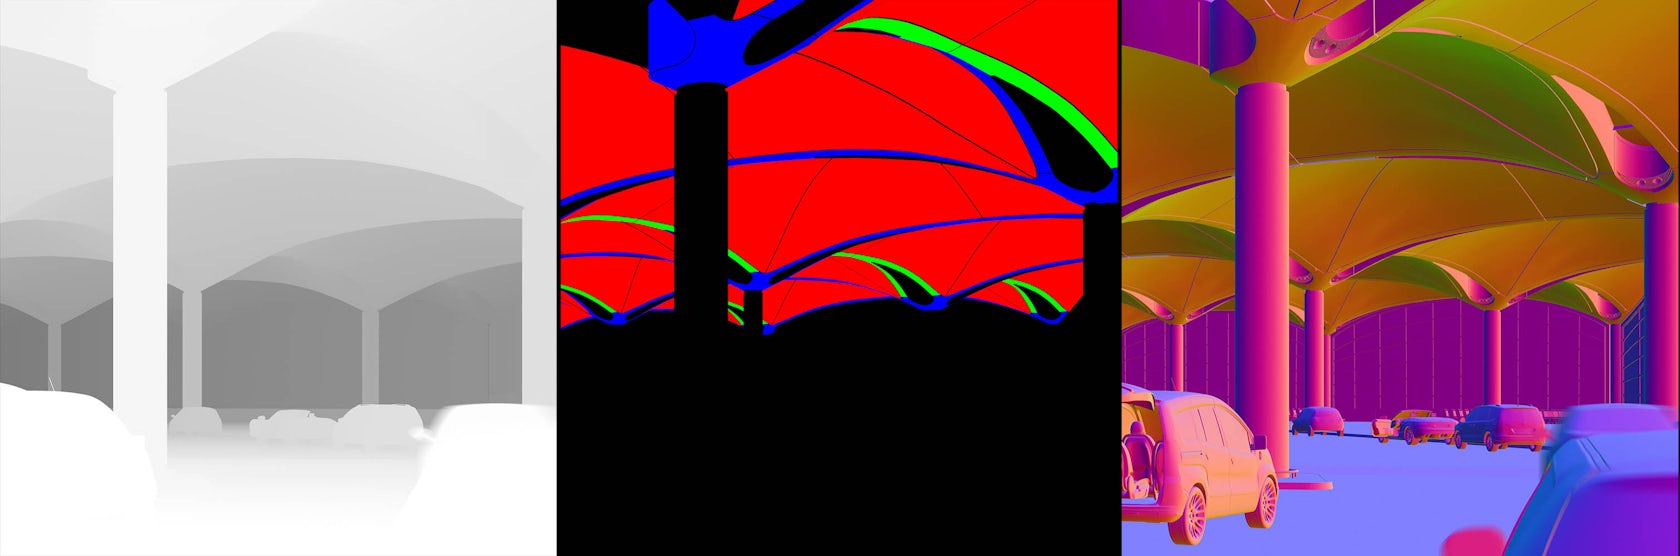
I divided the main composition to a few areas and tried to predict the colors and details for them. First is the main cold color mood which gives the biggest influence on the entire image.
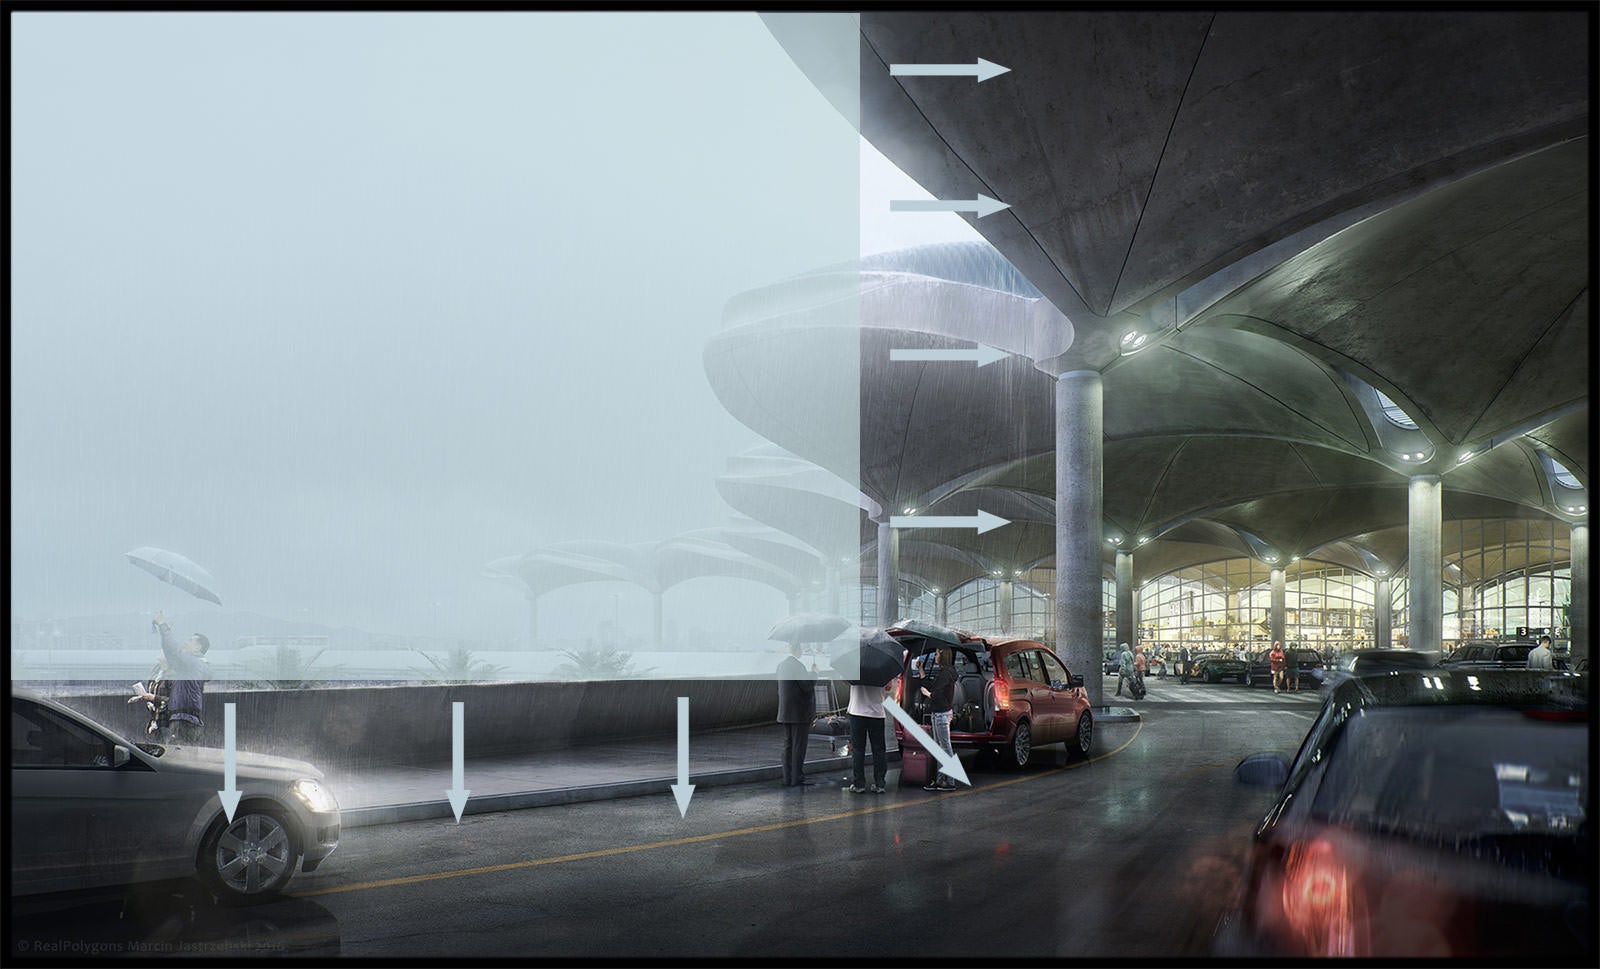
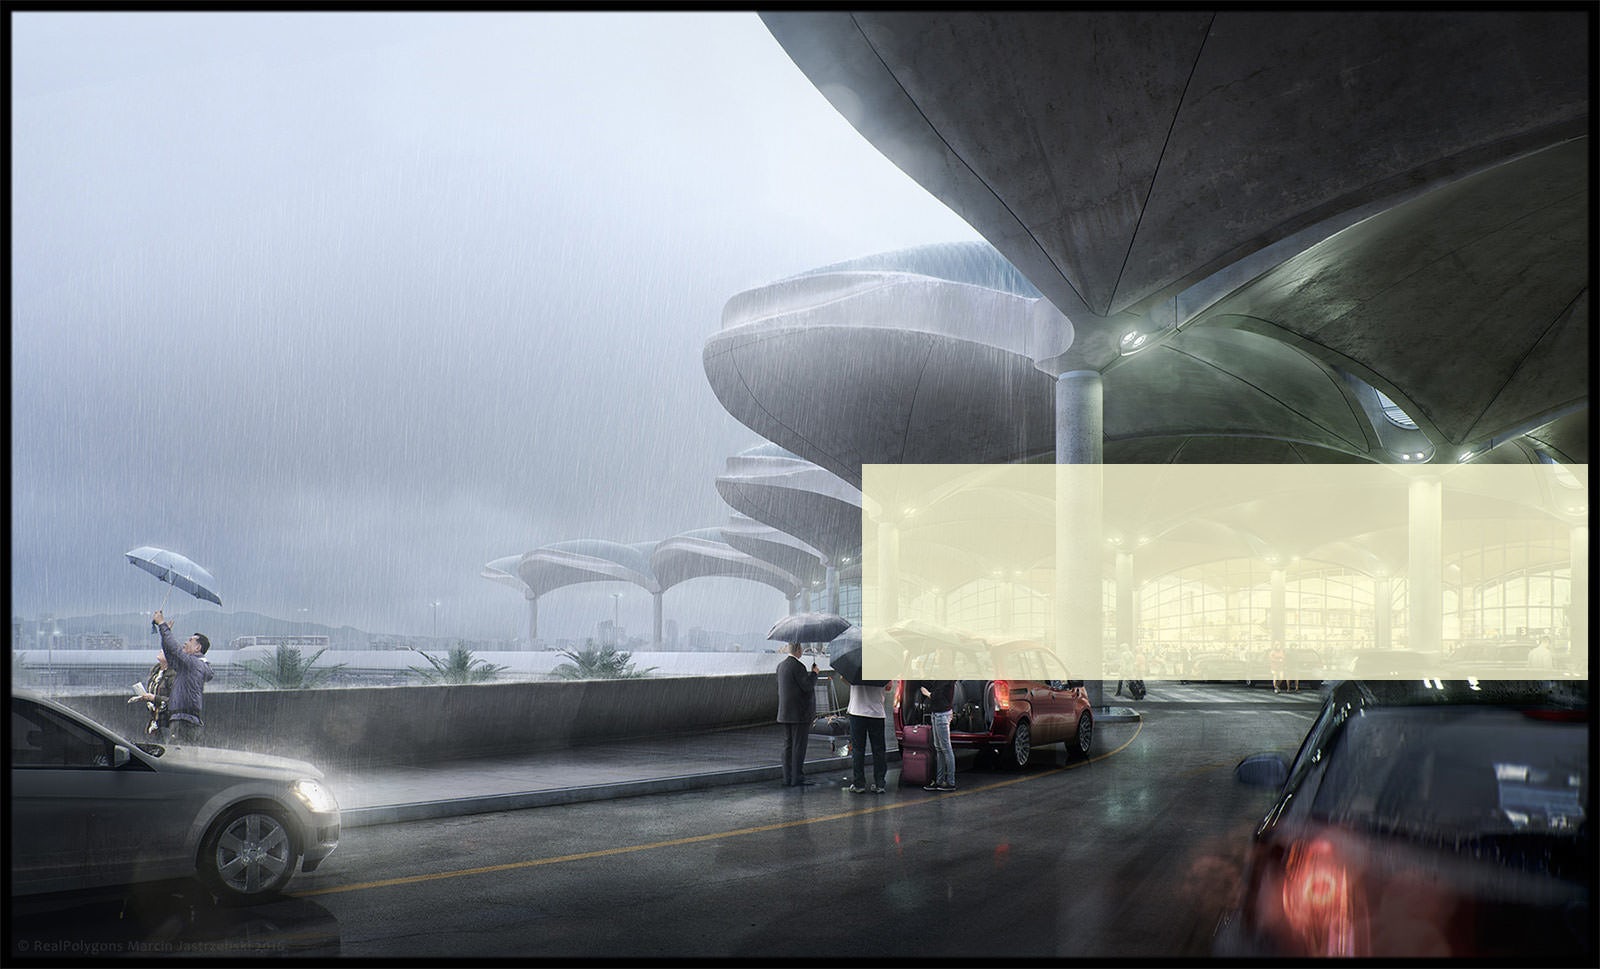
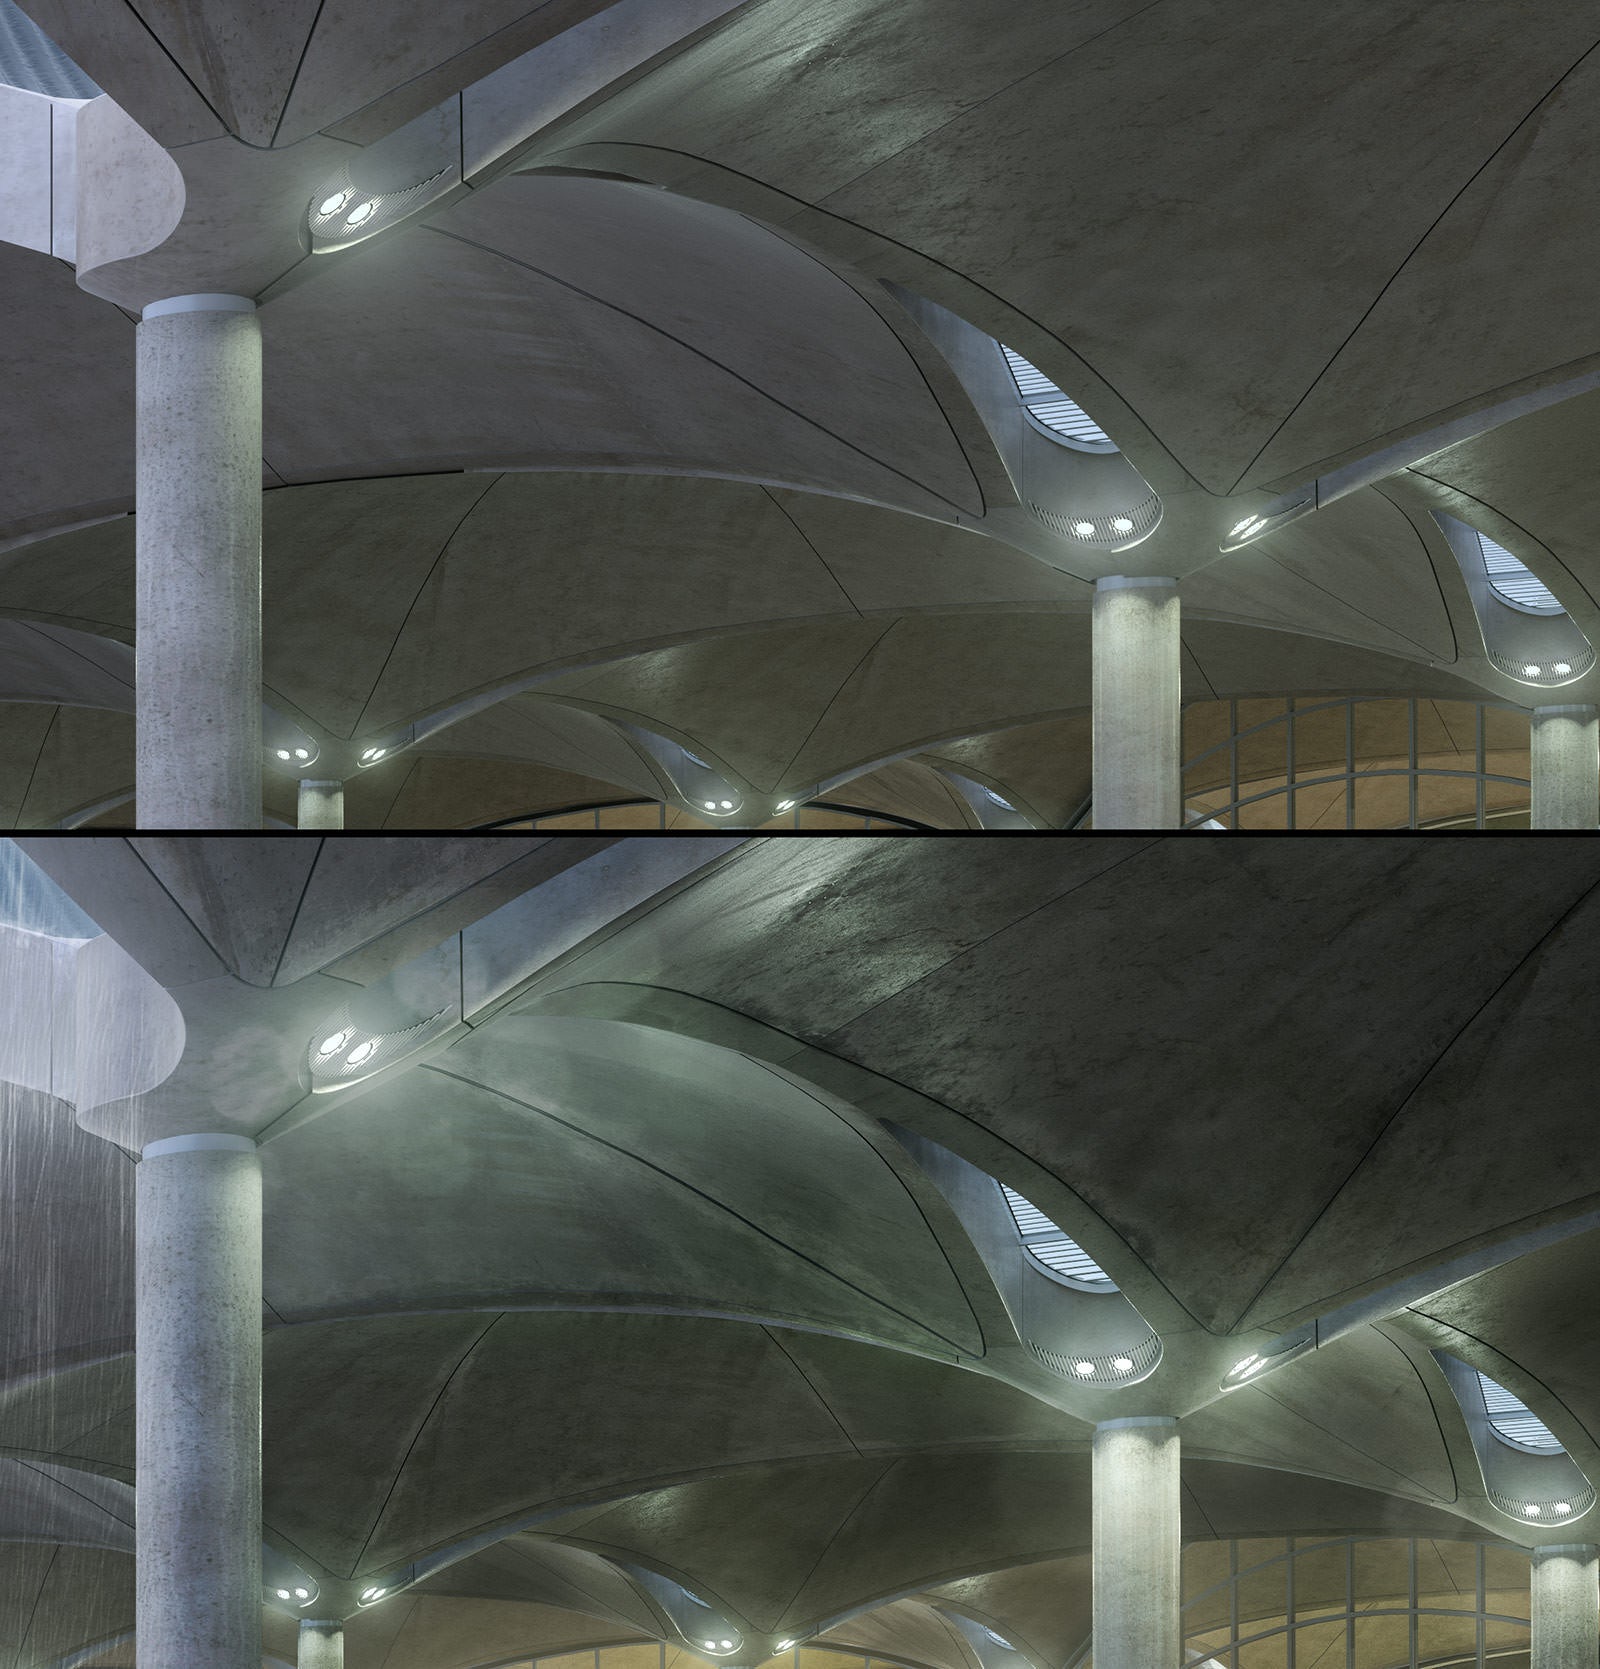
The second is a light gradient under the roofing. It ensures nice light effect but also, following the darkness in the depth of the image ensures good conditions to emphasize the interior light.
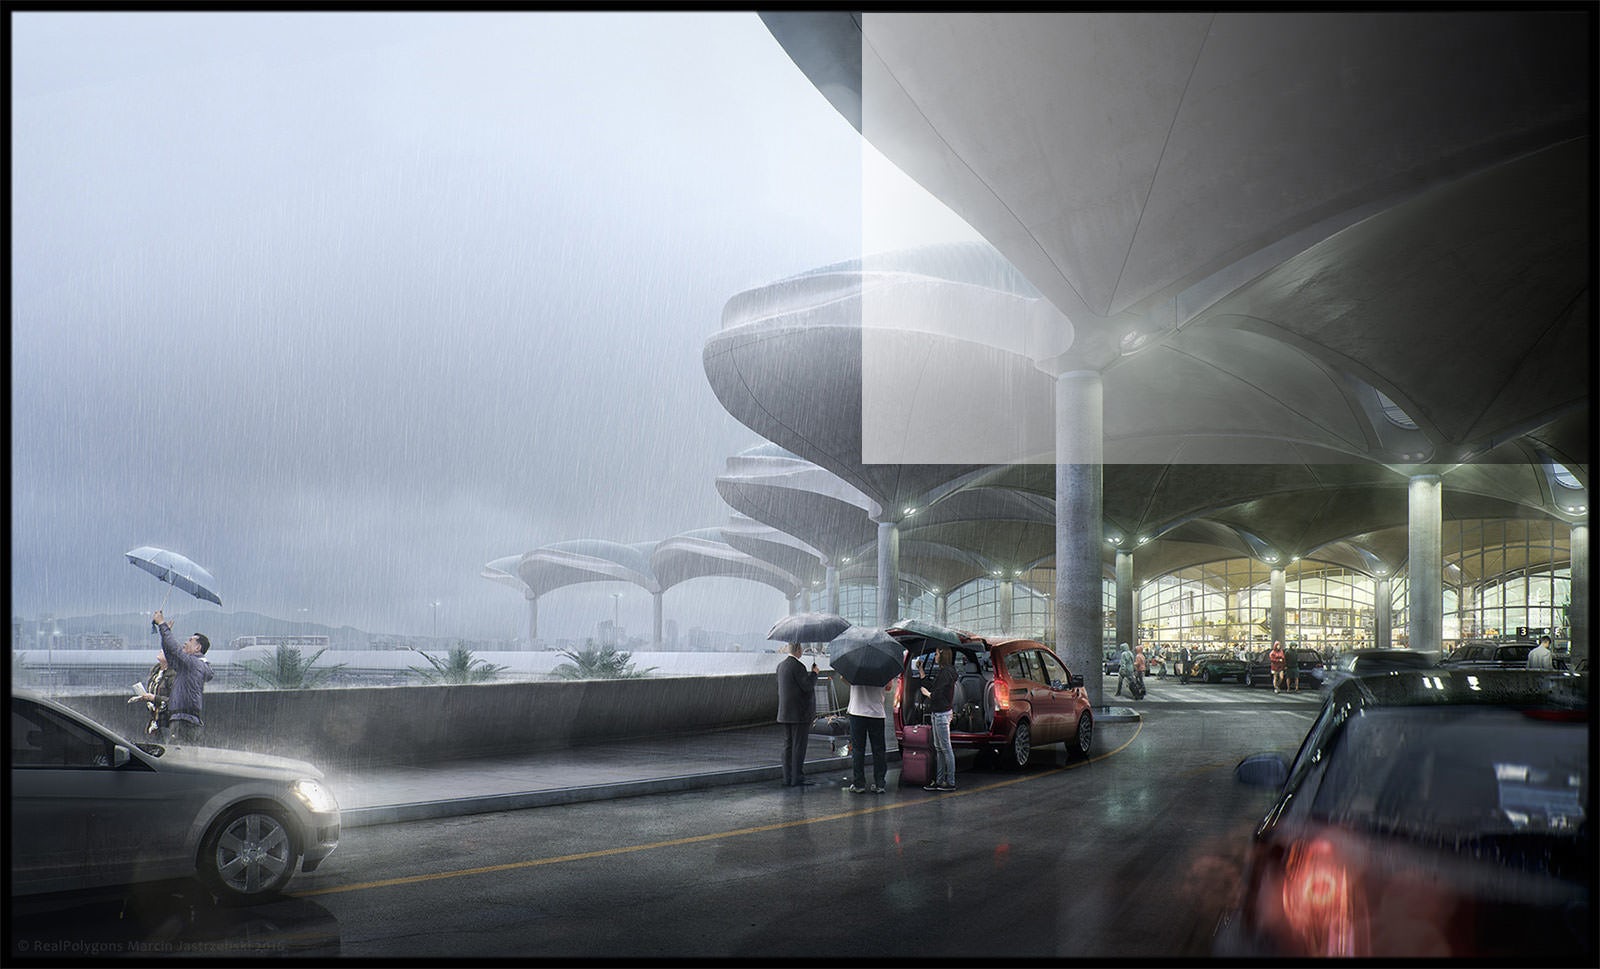
The interior space covers a small area of the whole image but for me, it’s important too. After all, it’s an airport! I used warm light for this part as an opposite to the cold main part. The small warm light part of the view focuses our attention quite effectively and enough by this way.
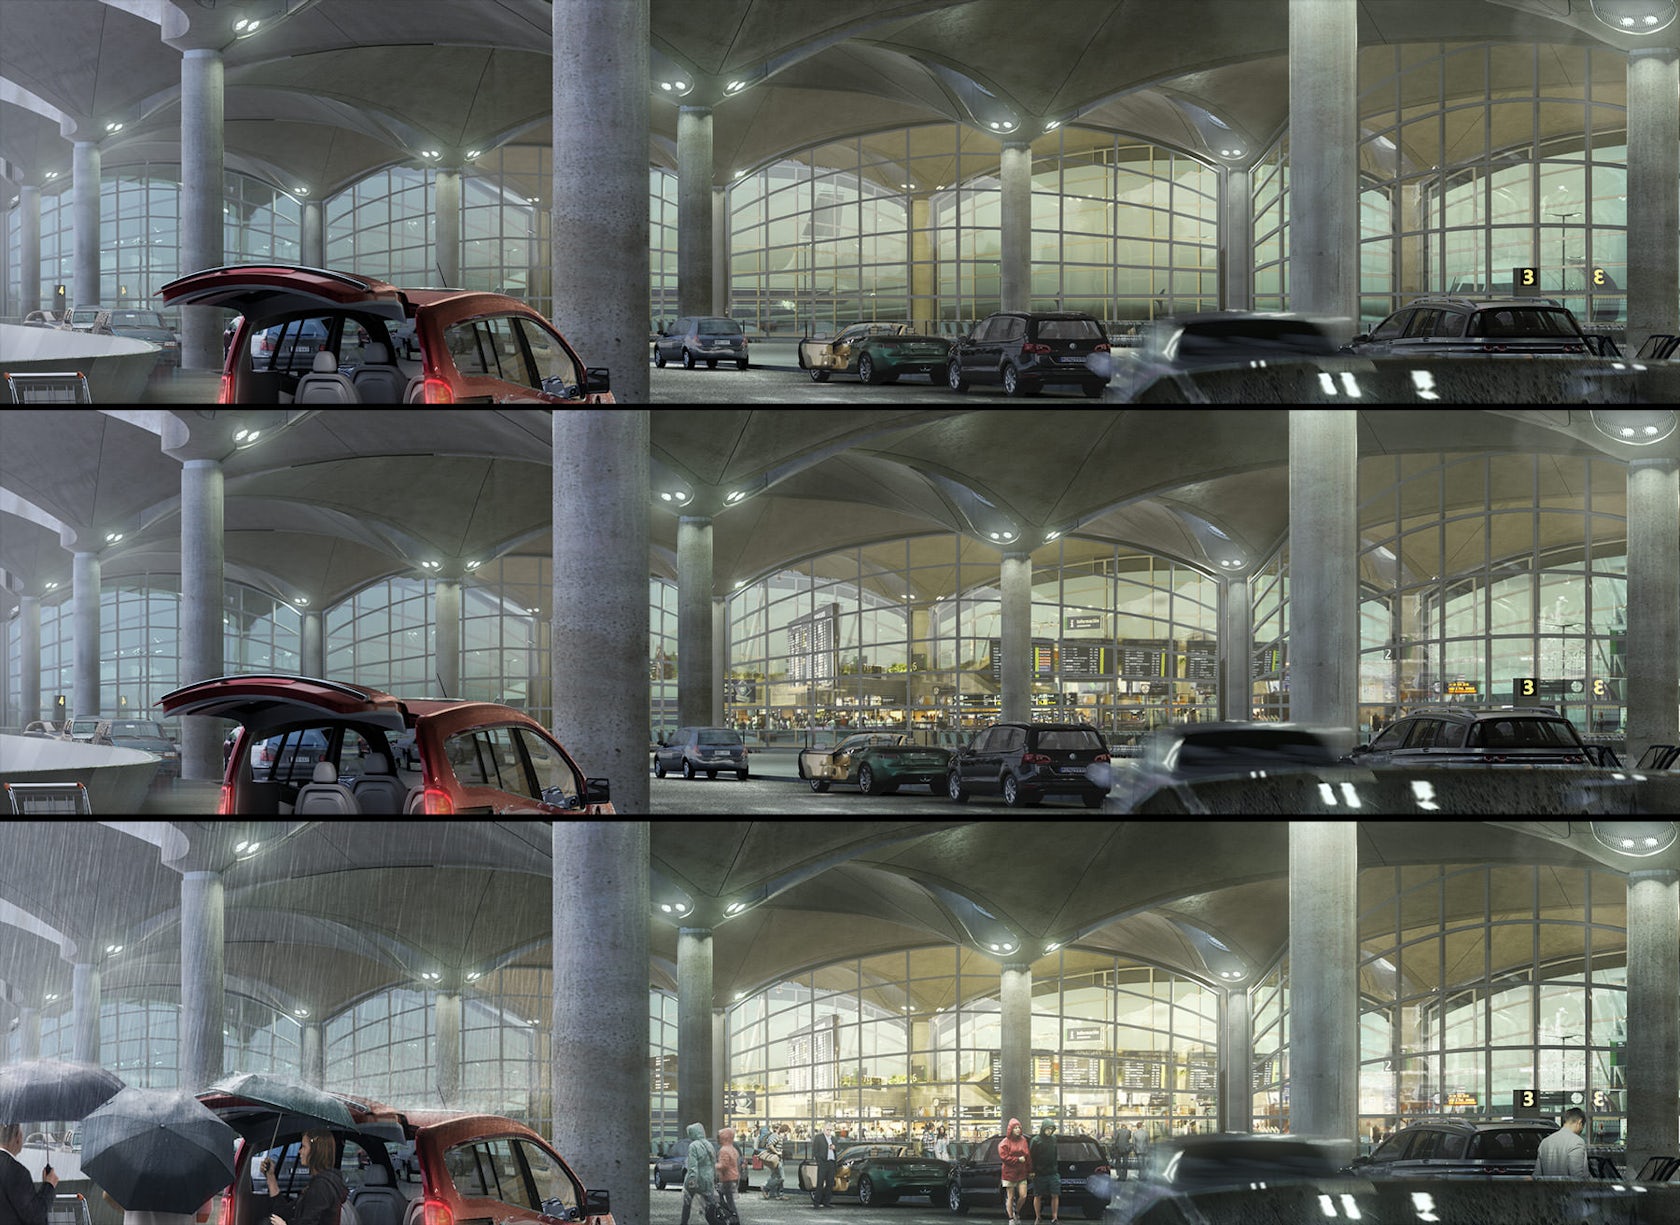
Without overloading the composition, I added additional elements like cars and people carefully. The most important point are the people located beside the red car. I avoided the central position (in most cases it’s a composition mistake) and located them close to one of the important composition points which are consistent with basic photography rules.
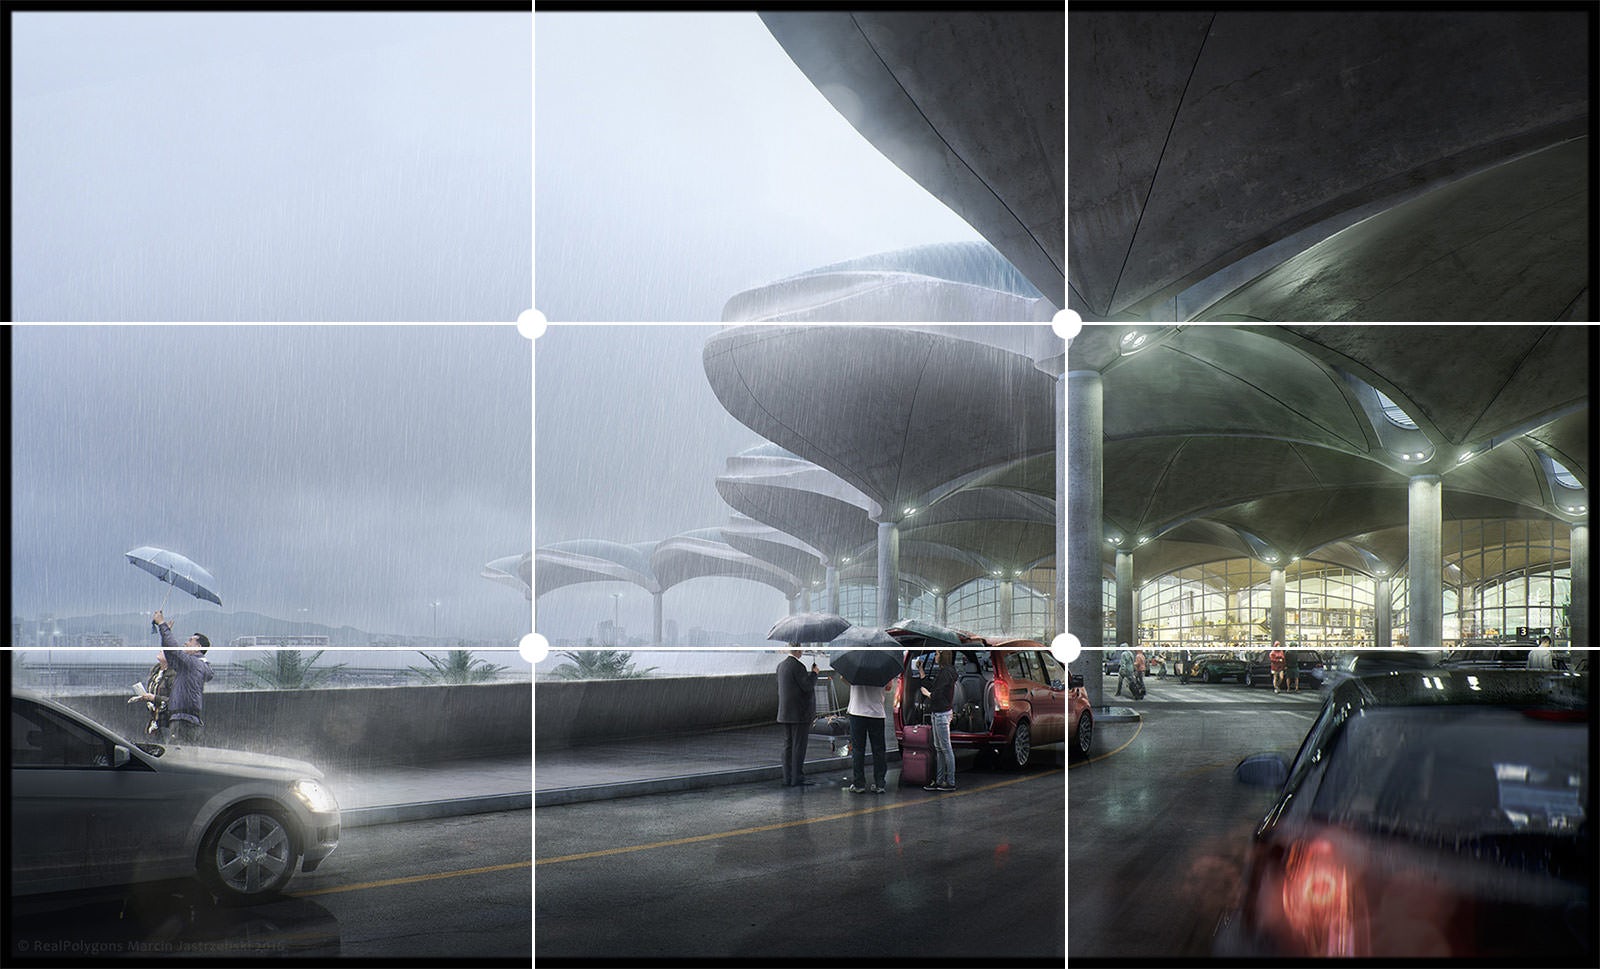
The composition is connected mainly by three cars. It’s enough for the view. I was careful not to over burn the car lights. Bright light would have focused our attention too much.
In my opinion, dividing entire compositions into a few areas helps us keep the clear and distinct final effect. It means that we can focus on main aspects of the view and move step by step to a more detailed final image without losing the main concept among a lot of creative decisions.
The Colors
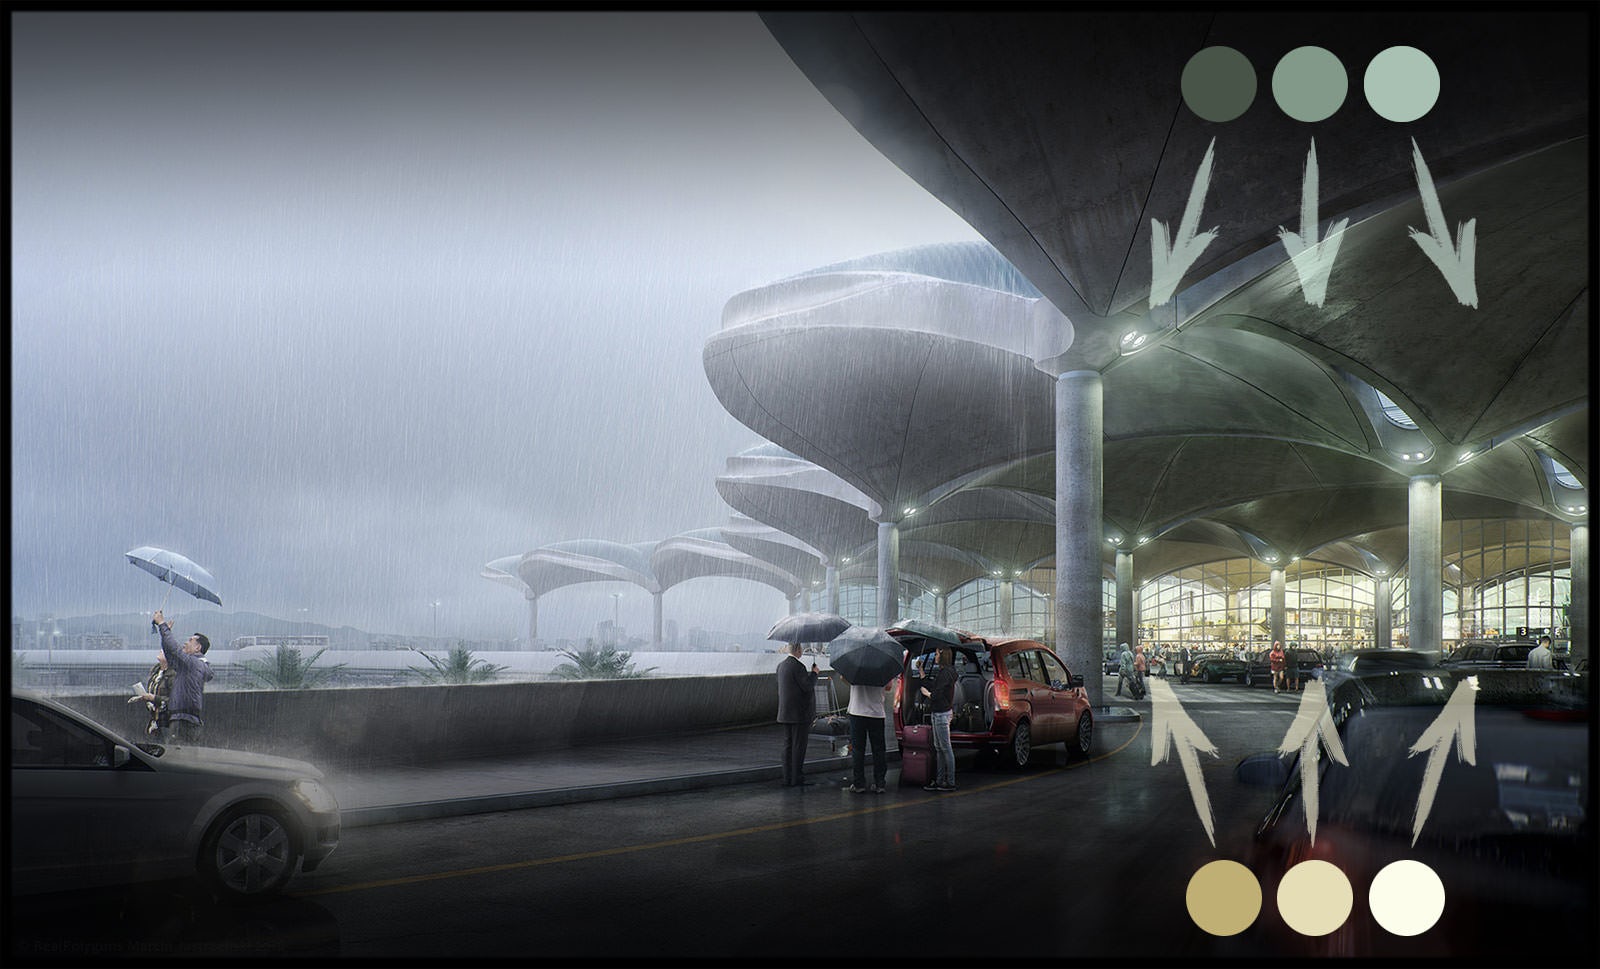
Besides the composition, the colors are also extremely important. The starting point was to set the camera’s white balance value to 5500k. It gave me a basic cold mood. The cloudy almost gray HDRI environment image helped too. These factors aside, I decided to add artificial lights located under the roofing and warm interior light. In this case, I imagined how the colors of the image could look like and added the lights which would be consistent with that.
The following images explain the main color concept, starting with artificial lights — warm bright interior and a little aquamarine for roofing reflectors:
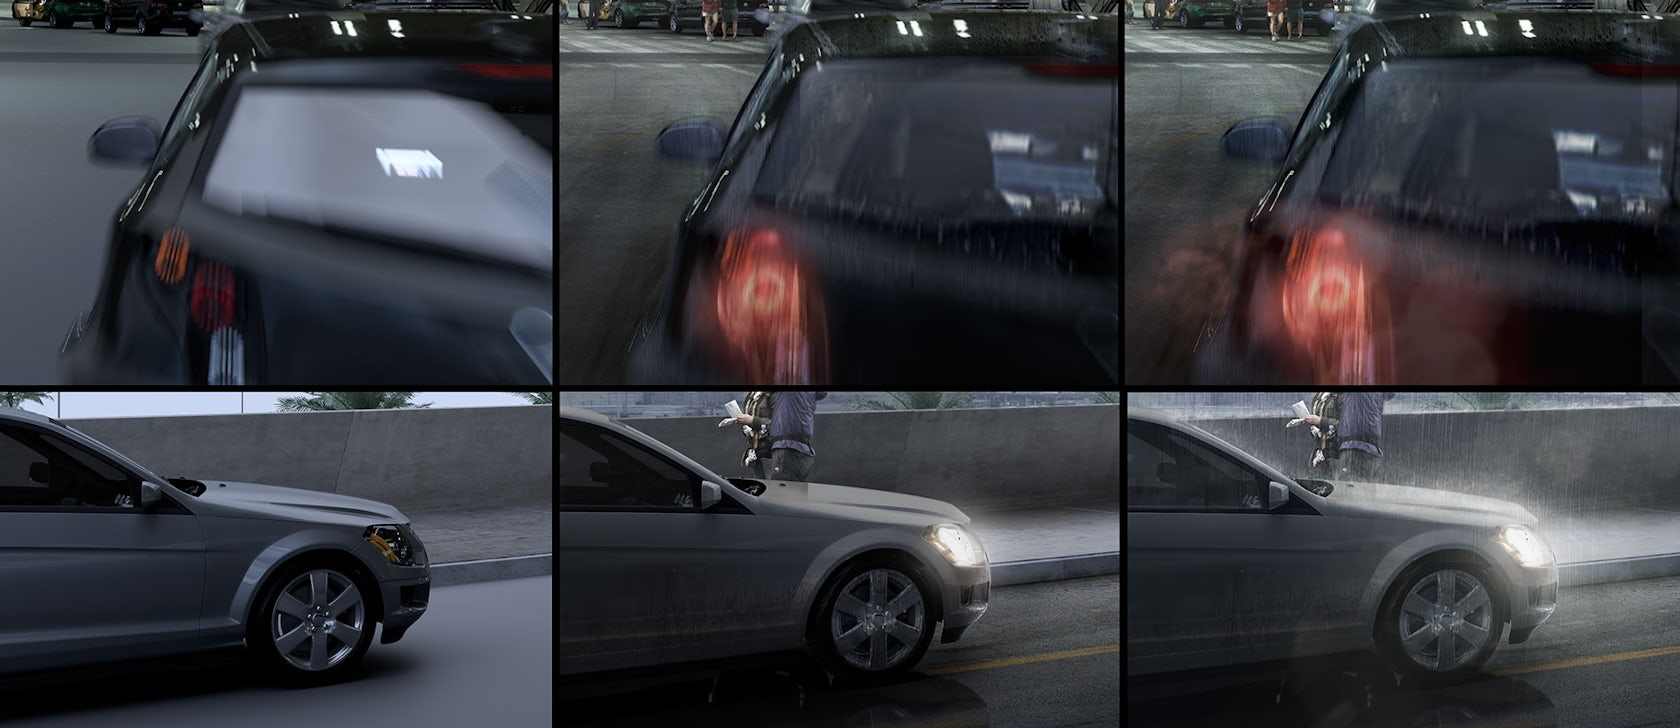
I modified some simply rendered car lights with reference photographs and made them not too bright, as I mentioned before:
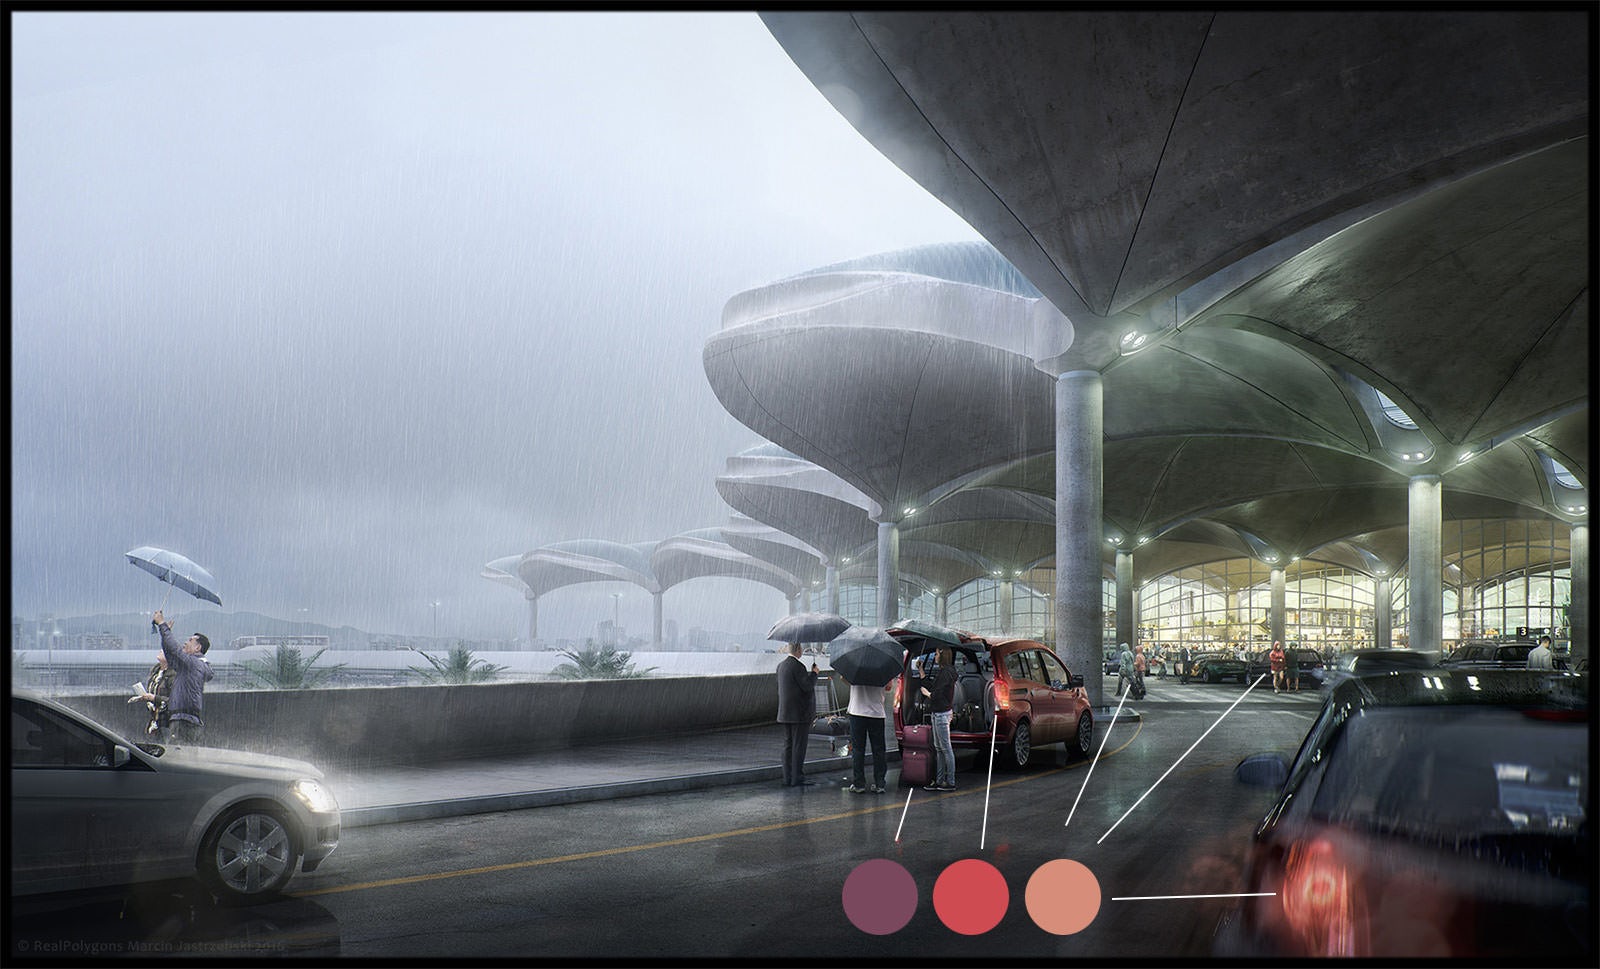
Here is the entire color palette scheme for this image. There are four main groups:
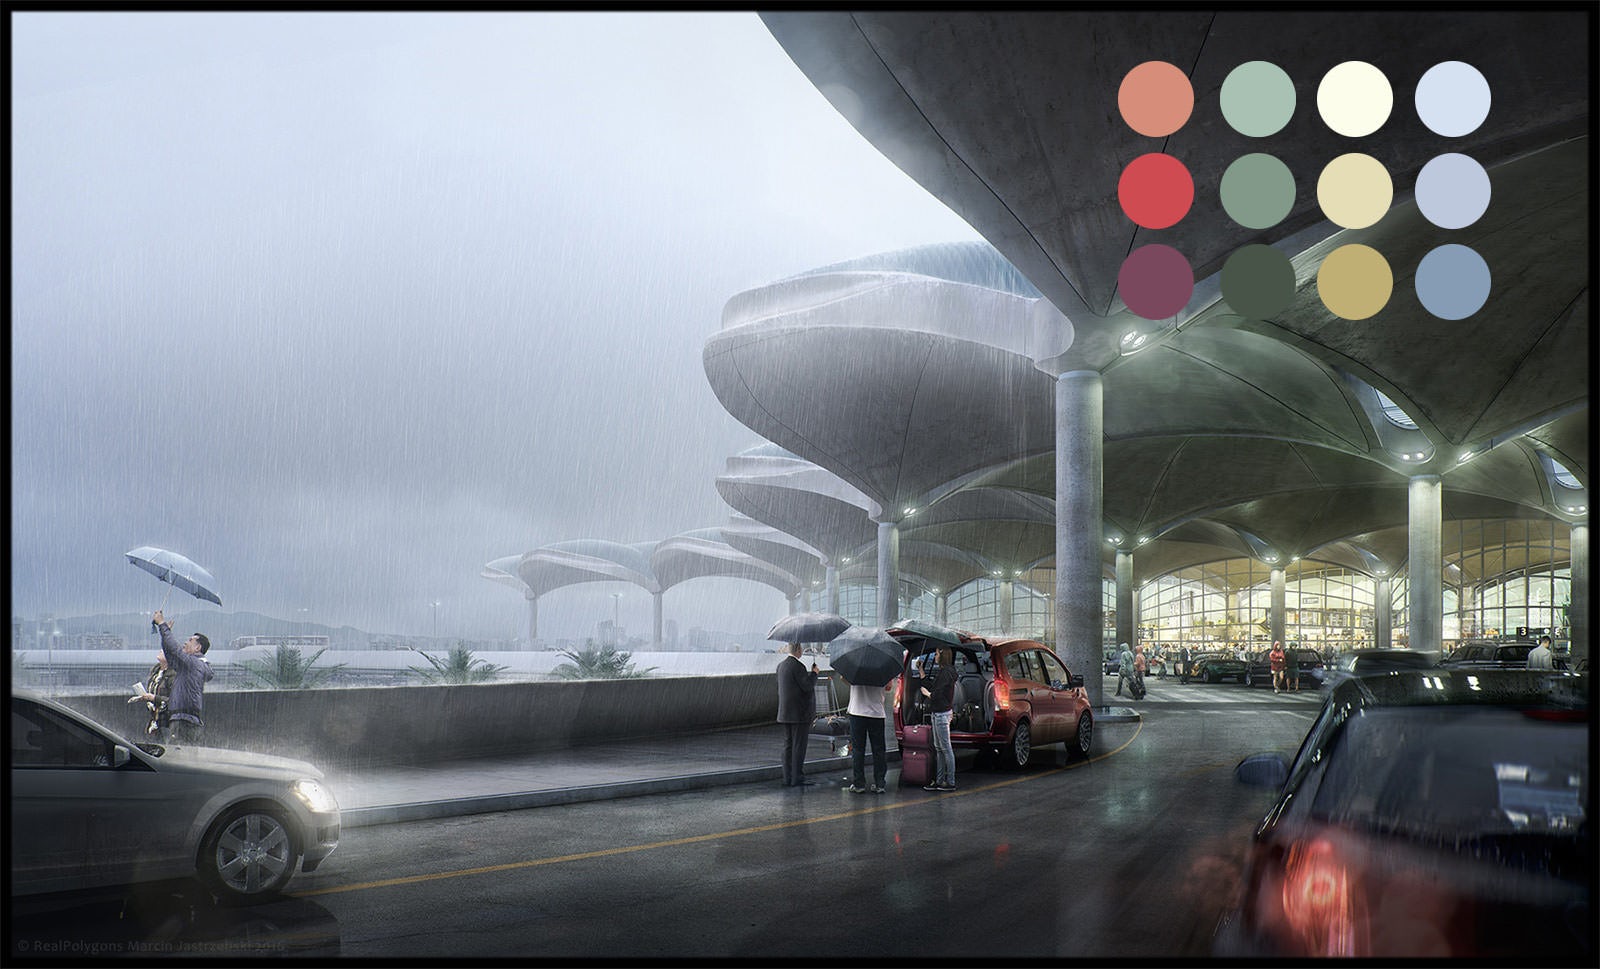
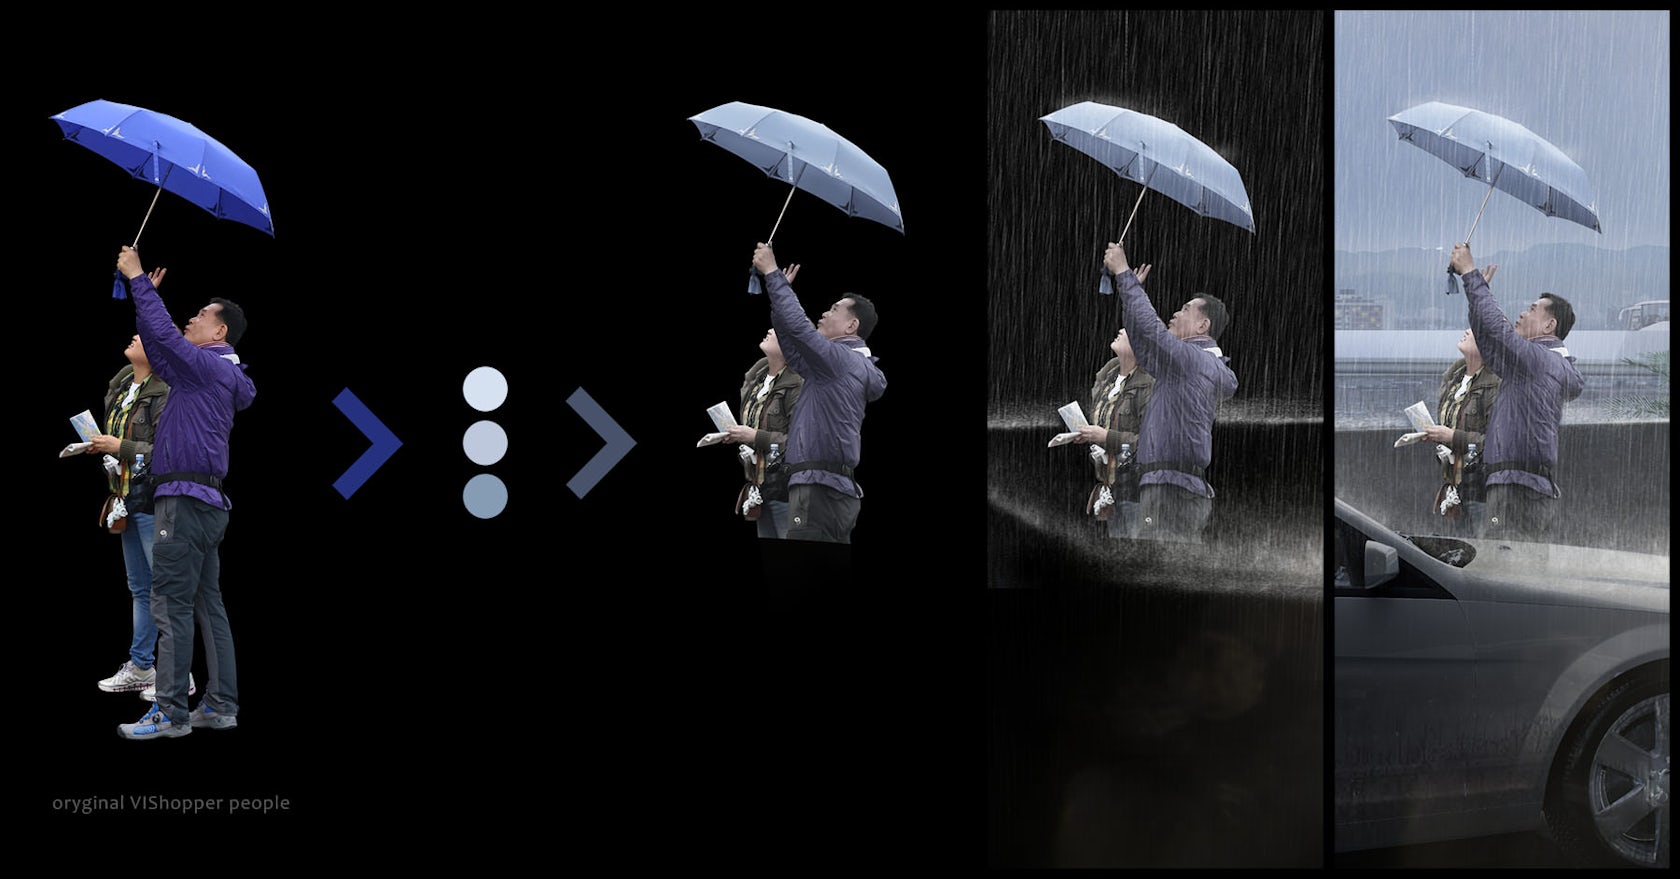
During the work in the post-production stage, I made all additional elements (like people) consistent with the mentioned colors palette. The image below shows typical additional element correction.
I corrected the colors with the help of masks. I also changed the shades of rendered cars and many parts of the building, pavement, walls, and street.
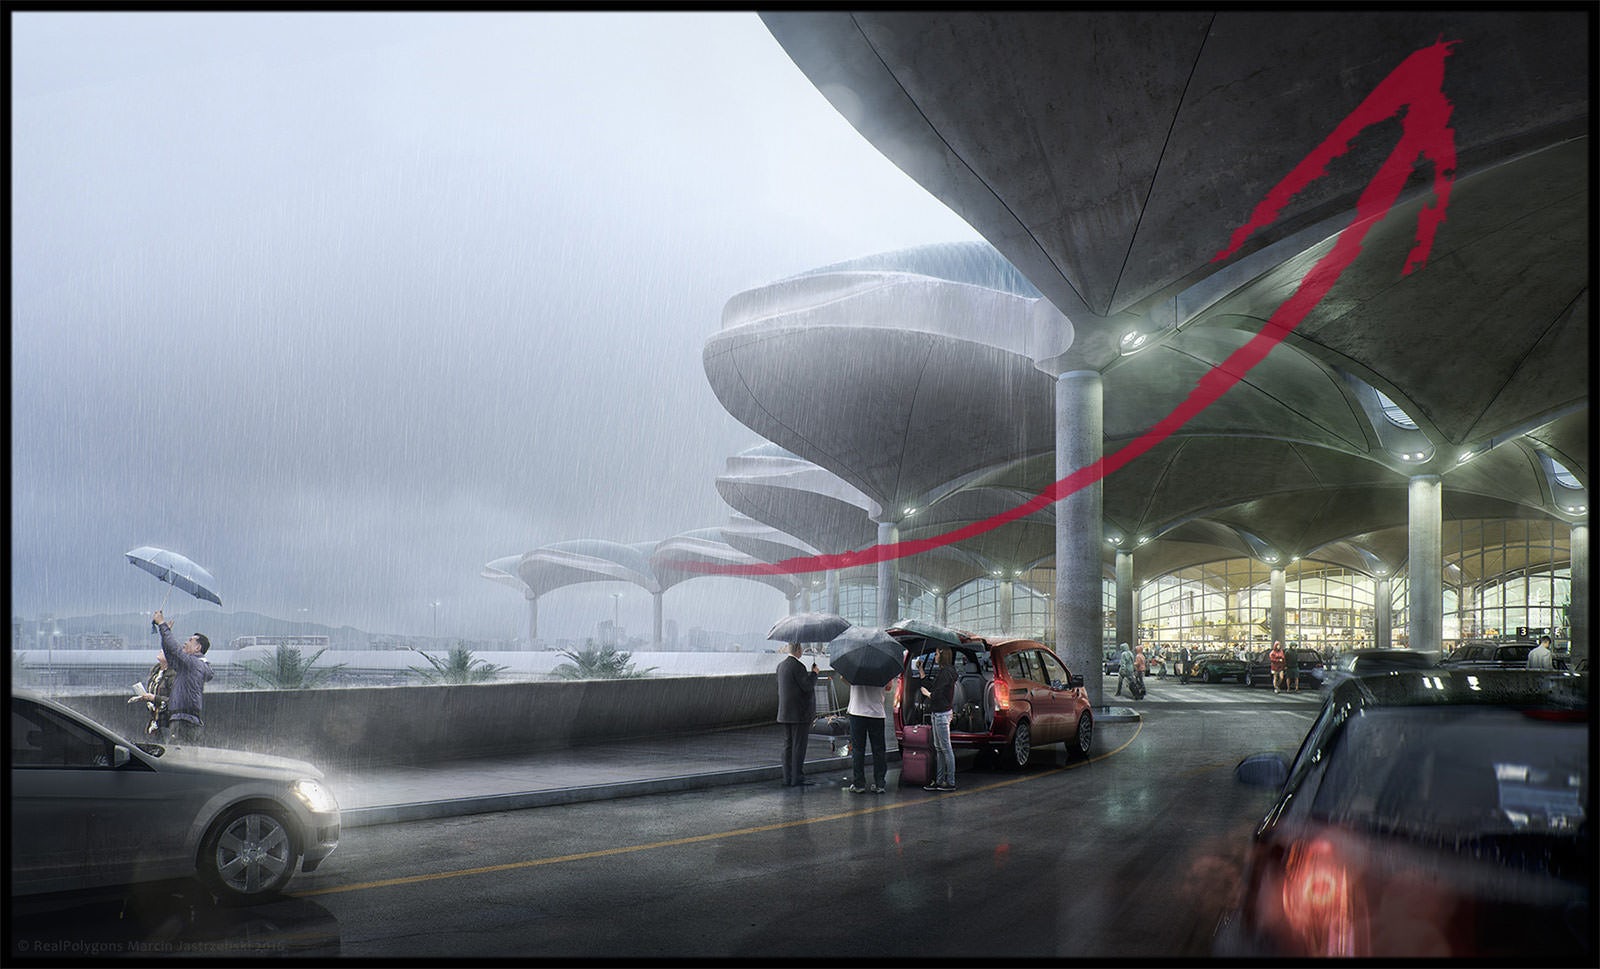
I added people (assets from VIShopper in this case) in the left corner, acting as the ones looking at the sky … It’s an airport, but putting an airplane in the sky would be too much for this composition. A subtle hint can do the trick too — after all, who didn’t look up to the sky on arriving at an airport?!
Post Production
To control the wet effects for crucial surfaces, I made two versions of them and rendered separately. I rendered a dry version of the ground surfaces and a high reflective wet version with additional reflection pass. It gave me full control to create the right effects related to parts of the image that are under the roofing and those that are outside.
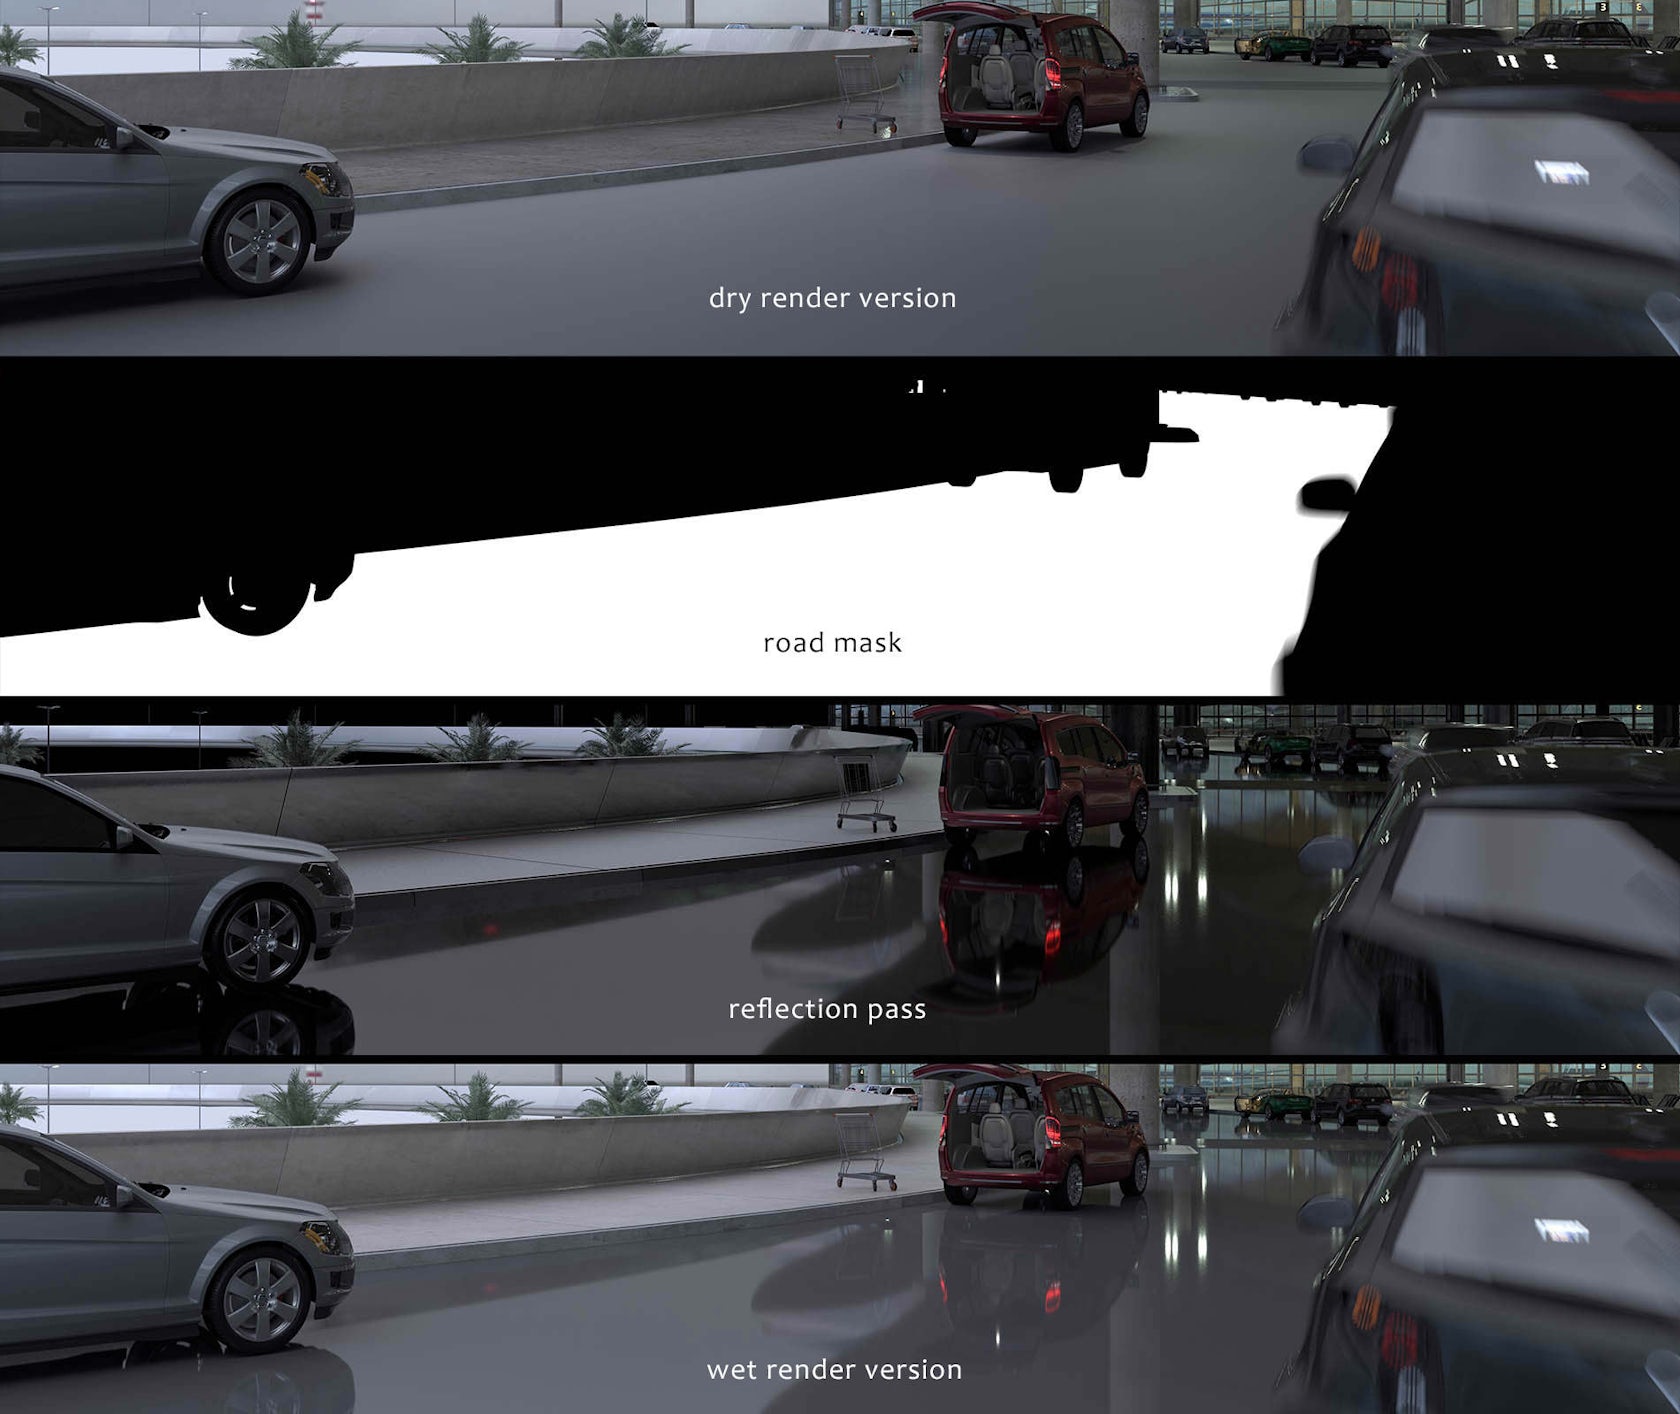
For example, I created a mask between the road’s dry and wet versions and painted cars trails. The visible part of the road is under the roofing but I created an idea that the cars may carry a rain water from outside on their tires. This effect disappears into the deep of the image. I also added the road mark lines in photoshop.
Mask for road reflections car tires trails:
The interior hall details were added in Photoshop, mixing different photographs of similar interior spaces. Finally, I added a bloom effect to this part:
The aquamarine color of the roofing reflectors light was important to the entire image look. Besides the car lights in the lower level (white on the left and red on the right) these lights were great to emphasize the overall rainy mood.
I added the entire background space in Photoshop. This was a quick and effective way to achieve this, avoiding building a large scale scene space with 3D objects. Due to the rainy weather, it was quite easy because of the addition a strong fog effect, which I made by using the Z-Depth channels.
I rendered two different Z-Depth passes with Corona Renderer. One covered the space from camera to the far distance, and the second limited to the middle distance to far background. It allowed editing more flexible a fog effect for large-scale scenes renders.
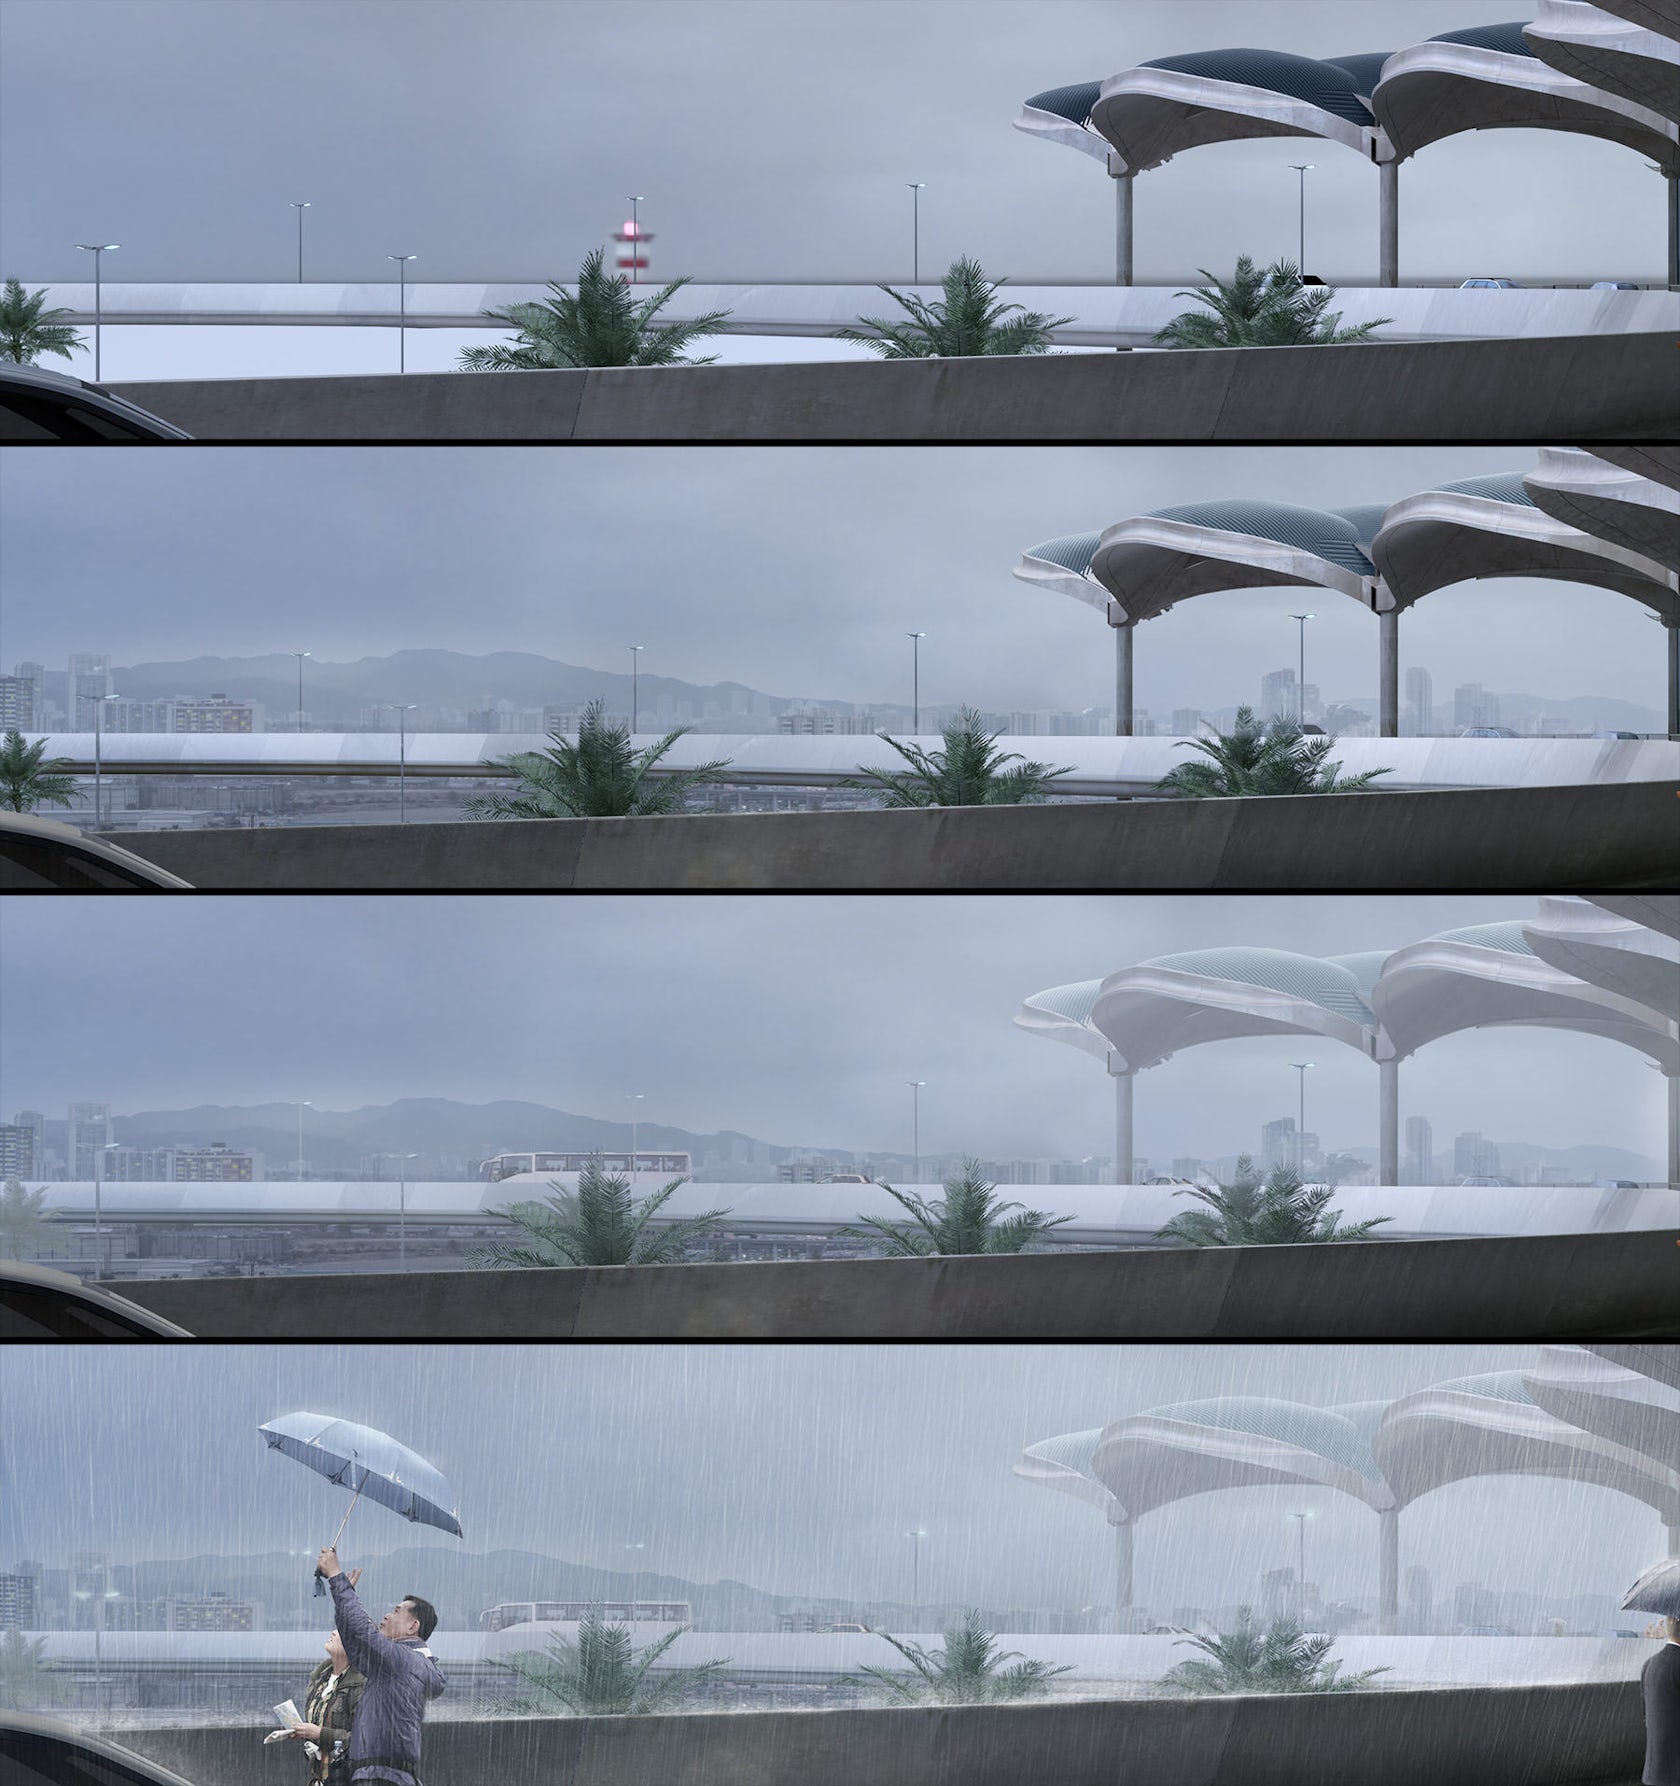
I made the rain using photoshop brushes, painting on different layers and setting gradients for various levels of visibility. Special brushes were used for this to get the right look.
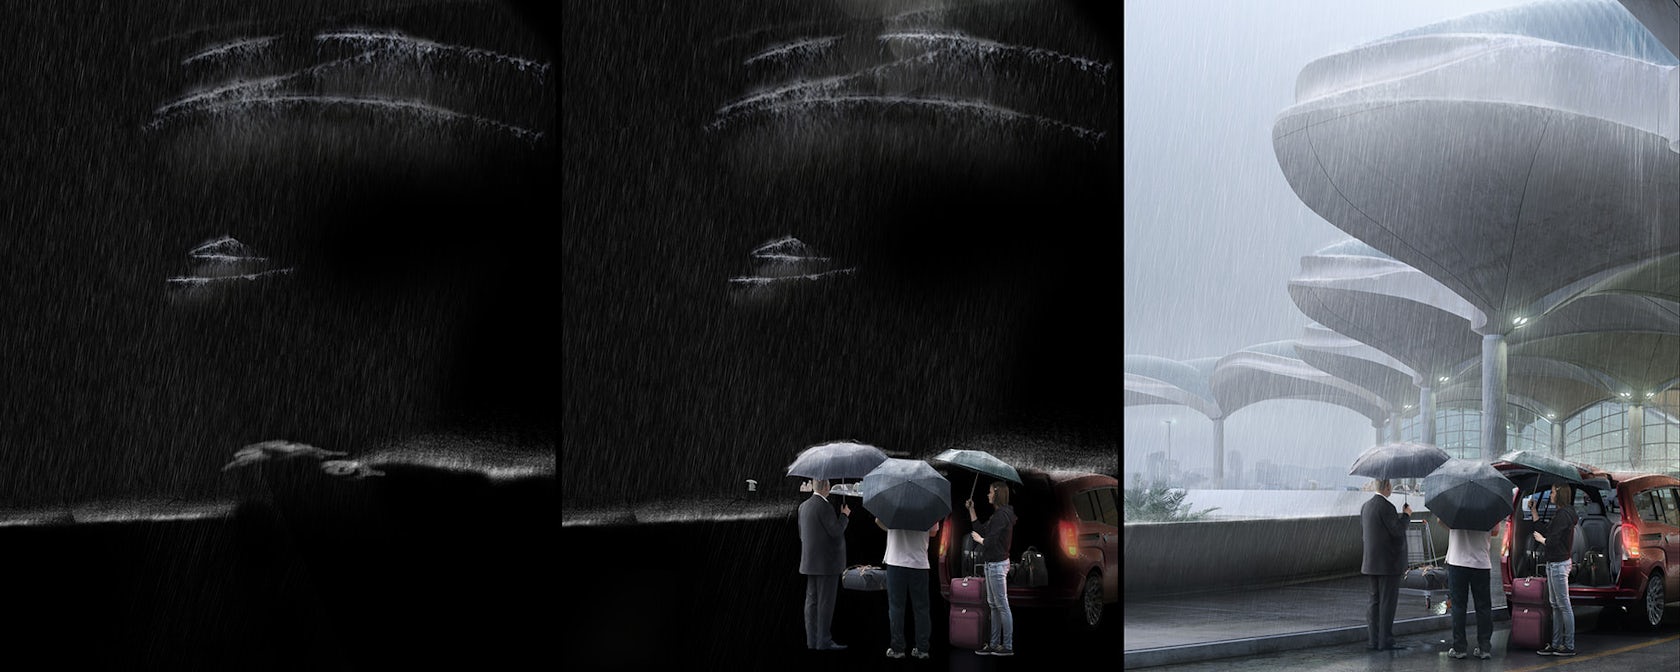
Cars in the first level are very visible in details and it was necessary to make them affected by the rain. Therefore, I replaced rendered reflectors with photographs and added wet and dirty details on the cars.
Finally, I made a little color correction to the final image in Lightroom, and after that in Red Giant Looks plugin for After Effects. It was mainly the bloom effect vignette, especially for the bottom part of the image and right side of the roofing, and chromatic aberration.
That’s all!
I really enjoyed working on this image and I hope that you enjoyed reading the making-of.
Marcin Jastrzebski
Check out these other amazing how-to features from our “Art of Rendering” series:
How to Create “Lugano Lake House” Using SketchUp, V-Ray and Photoshop
How to Create “House on the Lake” Using Corona Renderer
How to Create “Arrival” Using SketchUp, V-Ray and Photoshop
How “Cliff House” Was Brought to Life Using V-Ray and Photoshop
How to Create “Hotel 114” Using Cinema 4D
Be sure to check out Ronen Bekerman’s best renderings of the week and his in-depth guides to all things ArchViz.
Architizer is building tech tools to help power your practice: Click here to sign up now. Are you a manufacturer looking to connect with architects? Click here.


