Michael LaValley is an N.Y.-state registered architect, career strategist and the blogging entrepreneur behind Evolving Architect. Michael is launching a new SketchUp Training course for aspiring architects. click here for more information on how to sign up.
SketchUp is one of the most versatile programs out there for 3D modeling. This post is part of an ongoing series that will provide you with a closer look into its inner workings and teach you a few new tricks along the way so that you can maximize your efficiency and enjoy working in SketchUp.
As creatives, we look for the best ways to convey our ideas to the world. Half the battle is the presentation of what we develop so that our idea isn’t lost in the process. When it comes to rendering in SketchUp, you have to work within its parameters in order to present your ideas well. Let’s go through the basic steps of how to export your images from SketchUp.
Setting Up Scenes
The first thing you need to understand are the views or what SketchUp calls ‘Scenes.’ Because SketchUp is inherently a one-window experience where you do everything from modeling to editing within a single viewport, Scenes allows you to save your position as well as other attributes so that you can return the camera to a fixed moment.
Go to the Windows menu at the top of the program and select the Scenes tray. From here, you can set views using the “+” sign. The “–” sign will allow you to delete Scenes. The rotational arrow symbol will allow you to update Scenes if you make any changes you wish to keep.
The best way to think of these Scenes are as cameras you’ve placed within the model space that will ultimately take the pictures of the model you’re creating. It’s important to set these up as early as possible in your process so that you can check back to them often and adjust the design to meet your intended affect.
Using the Camera Tools
In order to develop a captivating scene, you need to use the camera tools that are at your disposal. Most views you’ll see in renderings are taken from the first-person vantage point at eye level.
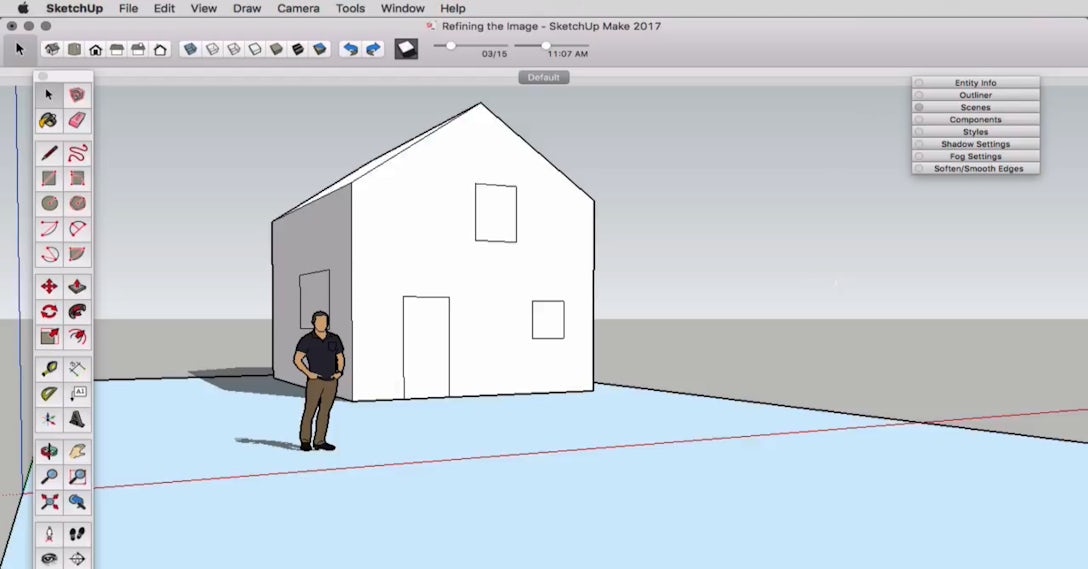
Position Camera: As such, we can start by using the “Position Camera” tool. Use this by clicking the tool icon that looks like a little man standing over a pair of crosshairs. Next, click to a ground surface in your model where you anticipate the ‘feet’ of the person to go. SketchUp will fill in the blanks and automatically position the camera at that location, 5 feet 6 inches above the floor.
Walk: Next, you can move the camera around while maintaining that same eye level by using the Walk tool. Click the tool icon that looks like two feet. From there, click in the center of your view and drag the mouse around. You’ll notice that the camera is moving forward along the path that you drag the cursor. The difference between this and a simple zoom is that the Walk tool keeps the camera’s vertical position at the same height it started at. This is the closest way to experience your model from a person’s vantage point.
Look Around: To further refine your view, you can use the Look Around tool. To activate it, click the icon that looks like an eye. To move the camera’s view but maintain its position, click and drag the eye with the mouse. The camera will remain in a fixed location, simulating someone standing still but moving their head around to see.
Refining the Image
Now that you understand the concept of Scenes and how to use the various camera tools, you can set a Scene that you like and begin to populate the image with other information.
After you’ve set your Scene, go to the Shadow Settings tray to add shadows to your view. Click the cube icon that has a shadow on it to toggle the shadows in your model on and off. You can use the tray’s options to determine the exact day and time of year that you want the shadows to represent.
After you’ve established a setting that you’re happy with, just go back to the Scenes tray and use the update toggle to make your settings permanently part of your view. Note: This will overwrite what you had before. If you don’t want to overwrite the previous view, simply click the “+” again in order to set up a second view.
It’s not atypical for a model to have a default view where all of the extra settings are turned off and a primary view where all presentation settings remain on. Working without a lot of the extra settings will help maintain a steady workflow and keep from overburdening your computer.
Exporting the Image
Now that everything is ready to go, let’s export the final image.
To start, go to File > Export > 2D Graphic. You’ll see a typical save window popup. Choose the desired format and then click on the Options button next to the format toggle.
By default, SketchUp will want to export your actual screen as is. What I would recommend instead is to use about a 4,000-pixel width while leaving the aspect ratio intact. In other words, only change the width and not the height so that the overall image doesn’t stretch in unexpected ways. This way, you’ll know that you’re getting the same image that you settled on.
After that, set the resolution to 300 pixels/inch, always leave the Anti-alias box checked and make the quality toggle go as high as it will let you.
Note that a few of these options may be different from one image format to the next. The main idea here, though, is to keep the aspect ratio the same while increasing the image quality so that your overall image maintains the qualities you desired while yielding the best product possible.
The process is fairly straightforward from there. Click “OK,” then choose a name for the exported image and a location for where you want to save it to.
Present Your Work
Now that you have an exported image, you could further explore your image options in postproduction with Adobe Photoshop, or you could present the image as it was exported from SketchUp.
If you weren’t happy with the final export from SketchUp, you can go back and adjust some settings on the fly and export it again. Sharing what you’ve created with the world in a quick and efficient way — that’s the simple beauty of SketchUp.
Now, take it to the next level in postproduction: Read Alex Hogrefe’s guide “How to Bring Your SketchUp Model to Life Using Nothing but Photoshop.”
Check out the first two articles in our “SketchUp Guide” series here:
The Top 10 Essential Tools to Master in SketchUp First
3 Modeling Tips to Dramatically Save You Time
Architizer’s Tech Directory is a database of tech tools for architects — from the latest generative design and AI to rendering and visualization, 3D modeling, project management and many more. Explore the complete library of categories here.
This article originally appeared on Evolving Architect.


