Emma Walshaw is the founder of First In Architecture and The Detail Library, and has written a number of books aiming to facilitate a better understanding of construction and detailing. Contributions by Aida Rodriguez-Vega, architect and researcher at the Detail Library.
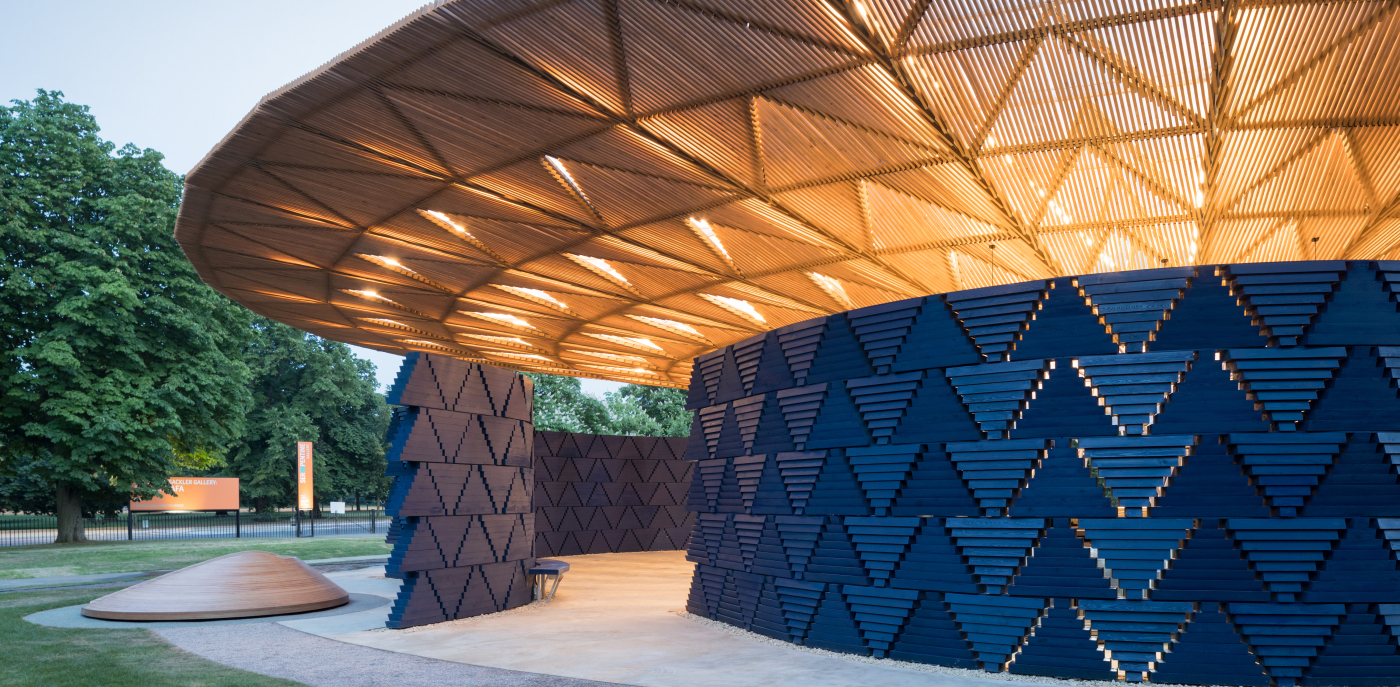
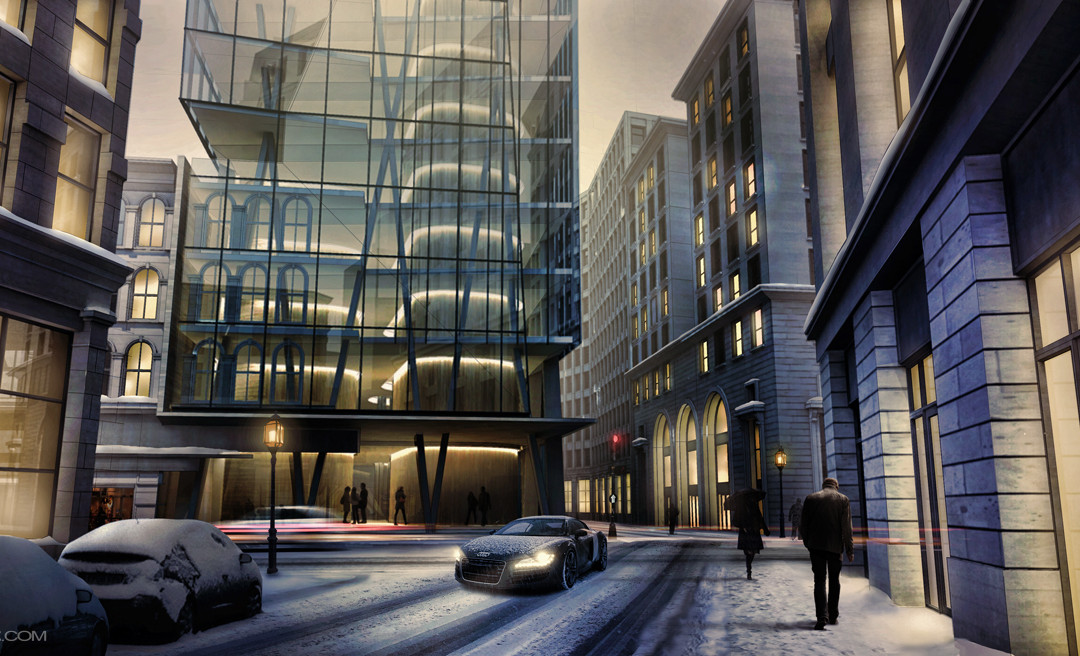
It is becoming increasingly popular to use rainscreen cladding materials such as timber, clay tiles and zinc in conjunction with brickwork, render or other masonry finishes. Using two materials can help break up a building’s volume, create a more attractive façade, and differentiate or draw attention to areas of a building such as windows.
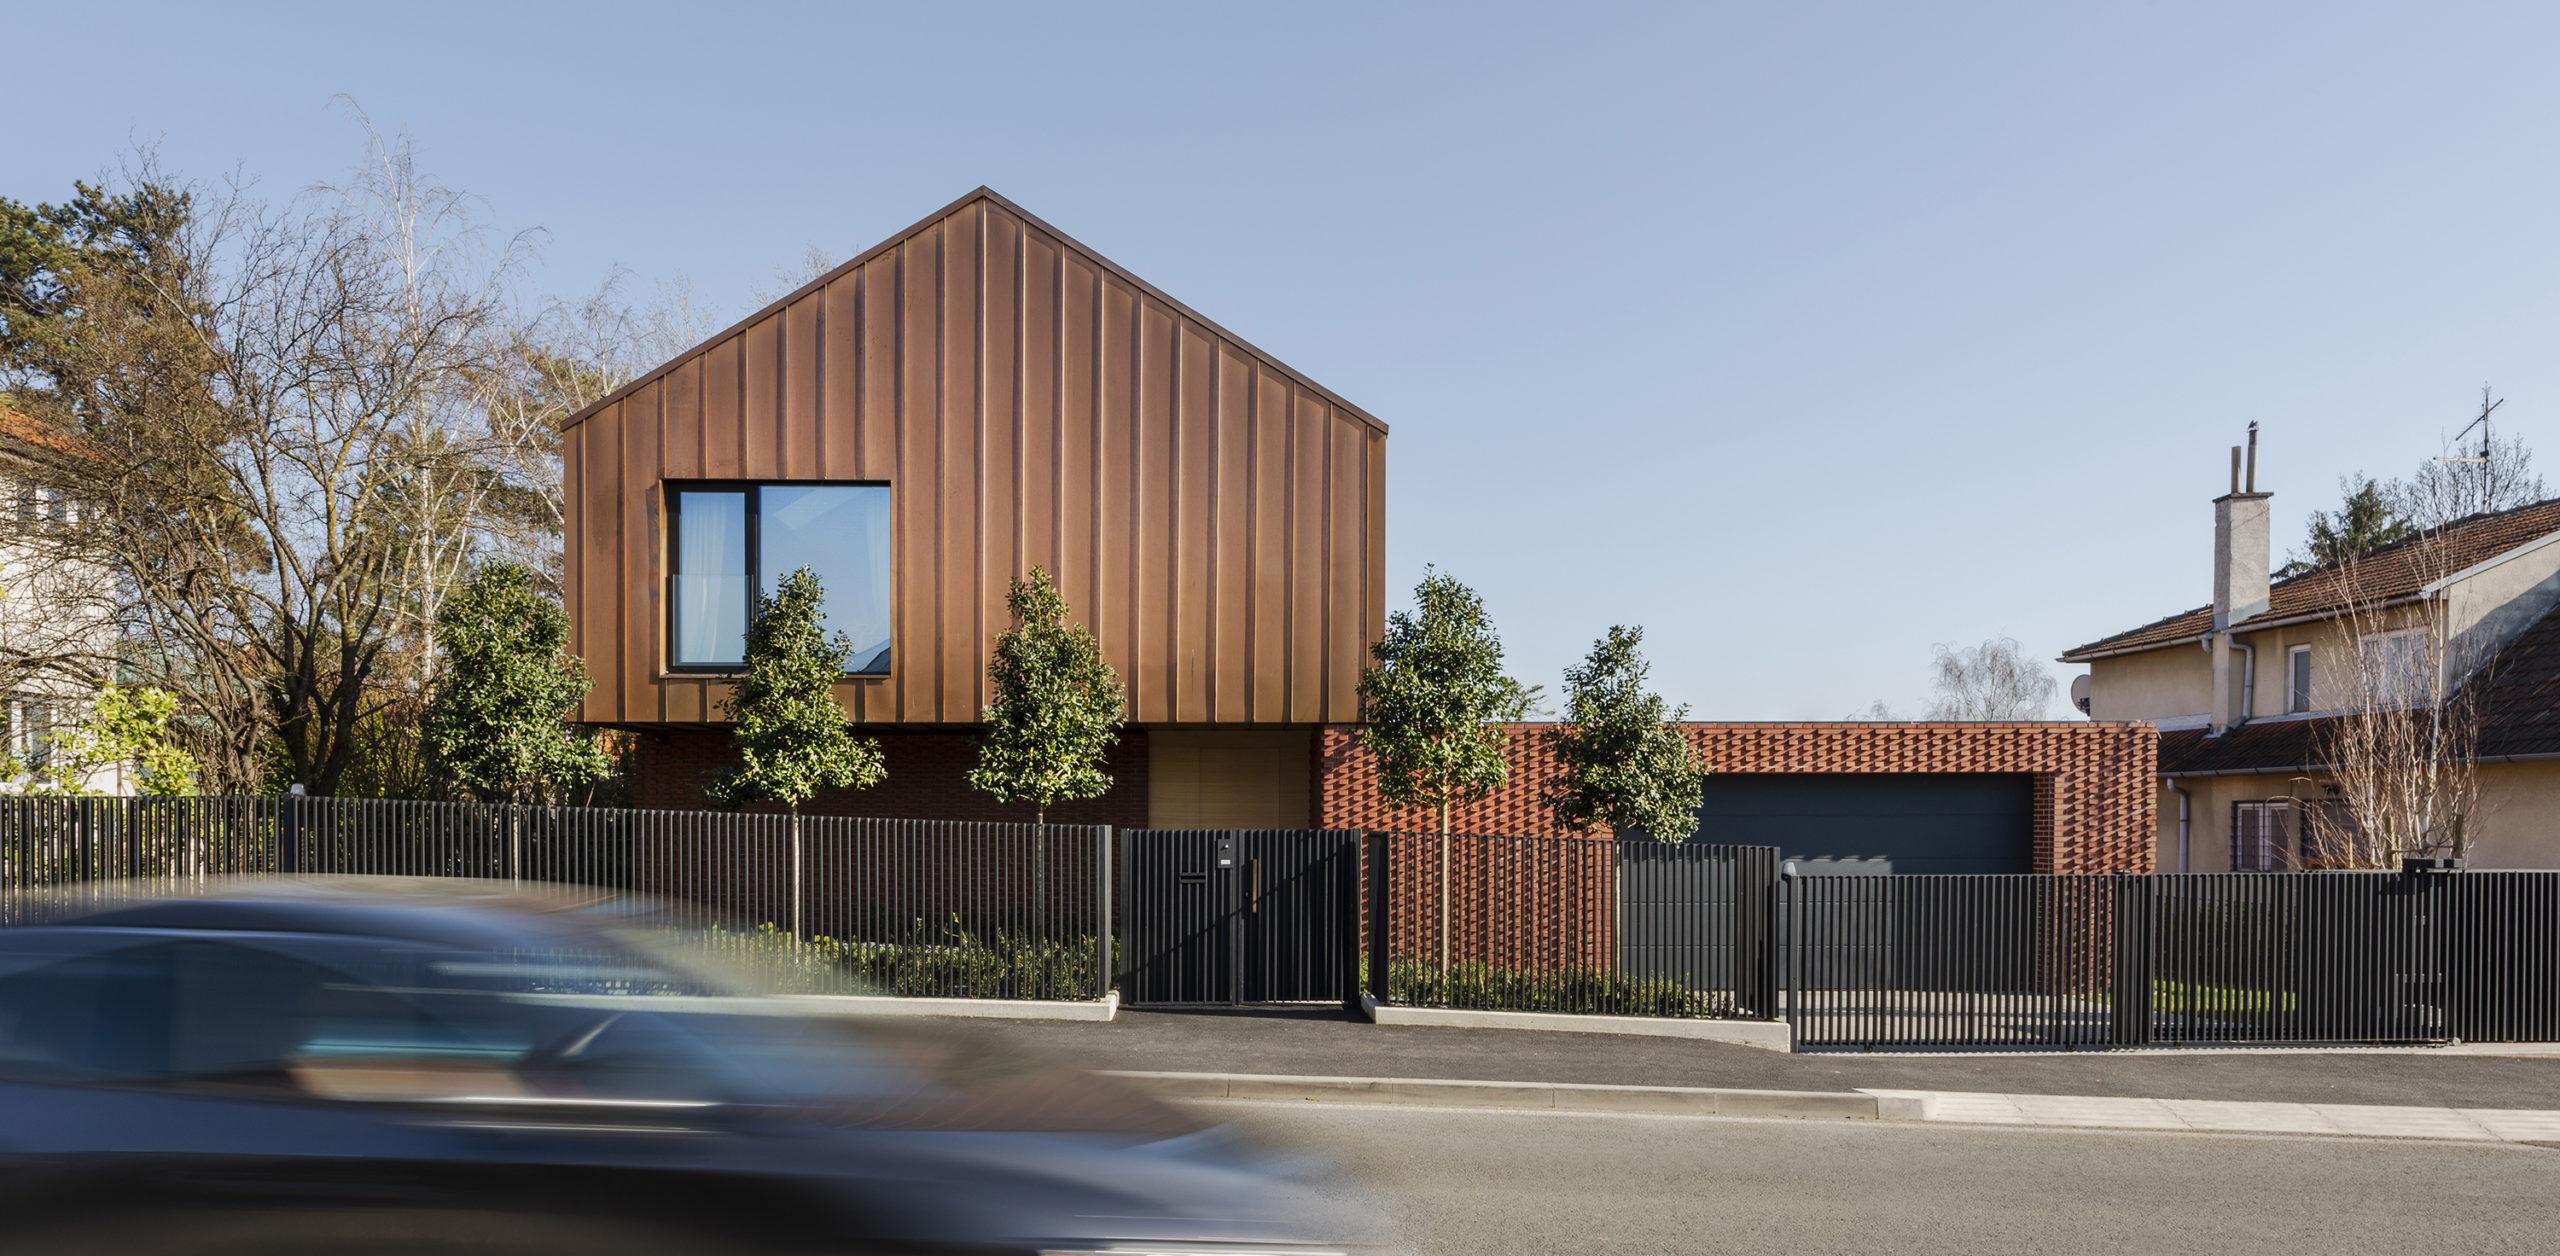
Placing different materials in relation to each other can considerably influence a building’s character. As a result, many designers choose to keep transitions between materials flush, creating a seamless appearance and not letting one material dominate over the other. For example, having timber recessed within brickwork helps frame certain areas, whereas having materials protruding above the brickwork at a high level, such as a top floor, can draw attention to this area.
When using rainscreen cladding at low levels, it is usually recommended that it not touch the ground and be raised at least 5.9in (150mm) above ground level. The exact dimension can vary between materials and building location and can be confirmed by the cladding manufacturer and/or supplier. This distance above the ground is especially necessary with timber cladding or rainscreen framing, which can be overly exposed to rainwater and splashback when hung too low. If detailed correctly, the break between the ground and rainscreen cladding can transform a building’s volume, making the volume appear lighter, almost as if it were floating off the ground.
Material transitions can be detailed in various ways shaped by the materials, u-value requirements, chosen structure, height of installation, fire requirements and use and location of the building (to name just a few). Whether you want your materials flush to each other, protruding from the brickwork or masonry, or recessed into the masonry, below are a series of recommendations to help assist in detailing these sometimes complicated material transitions.
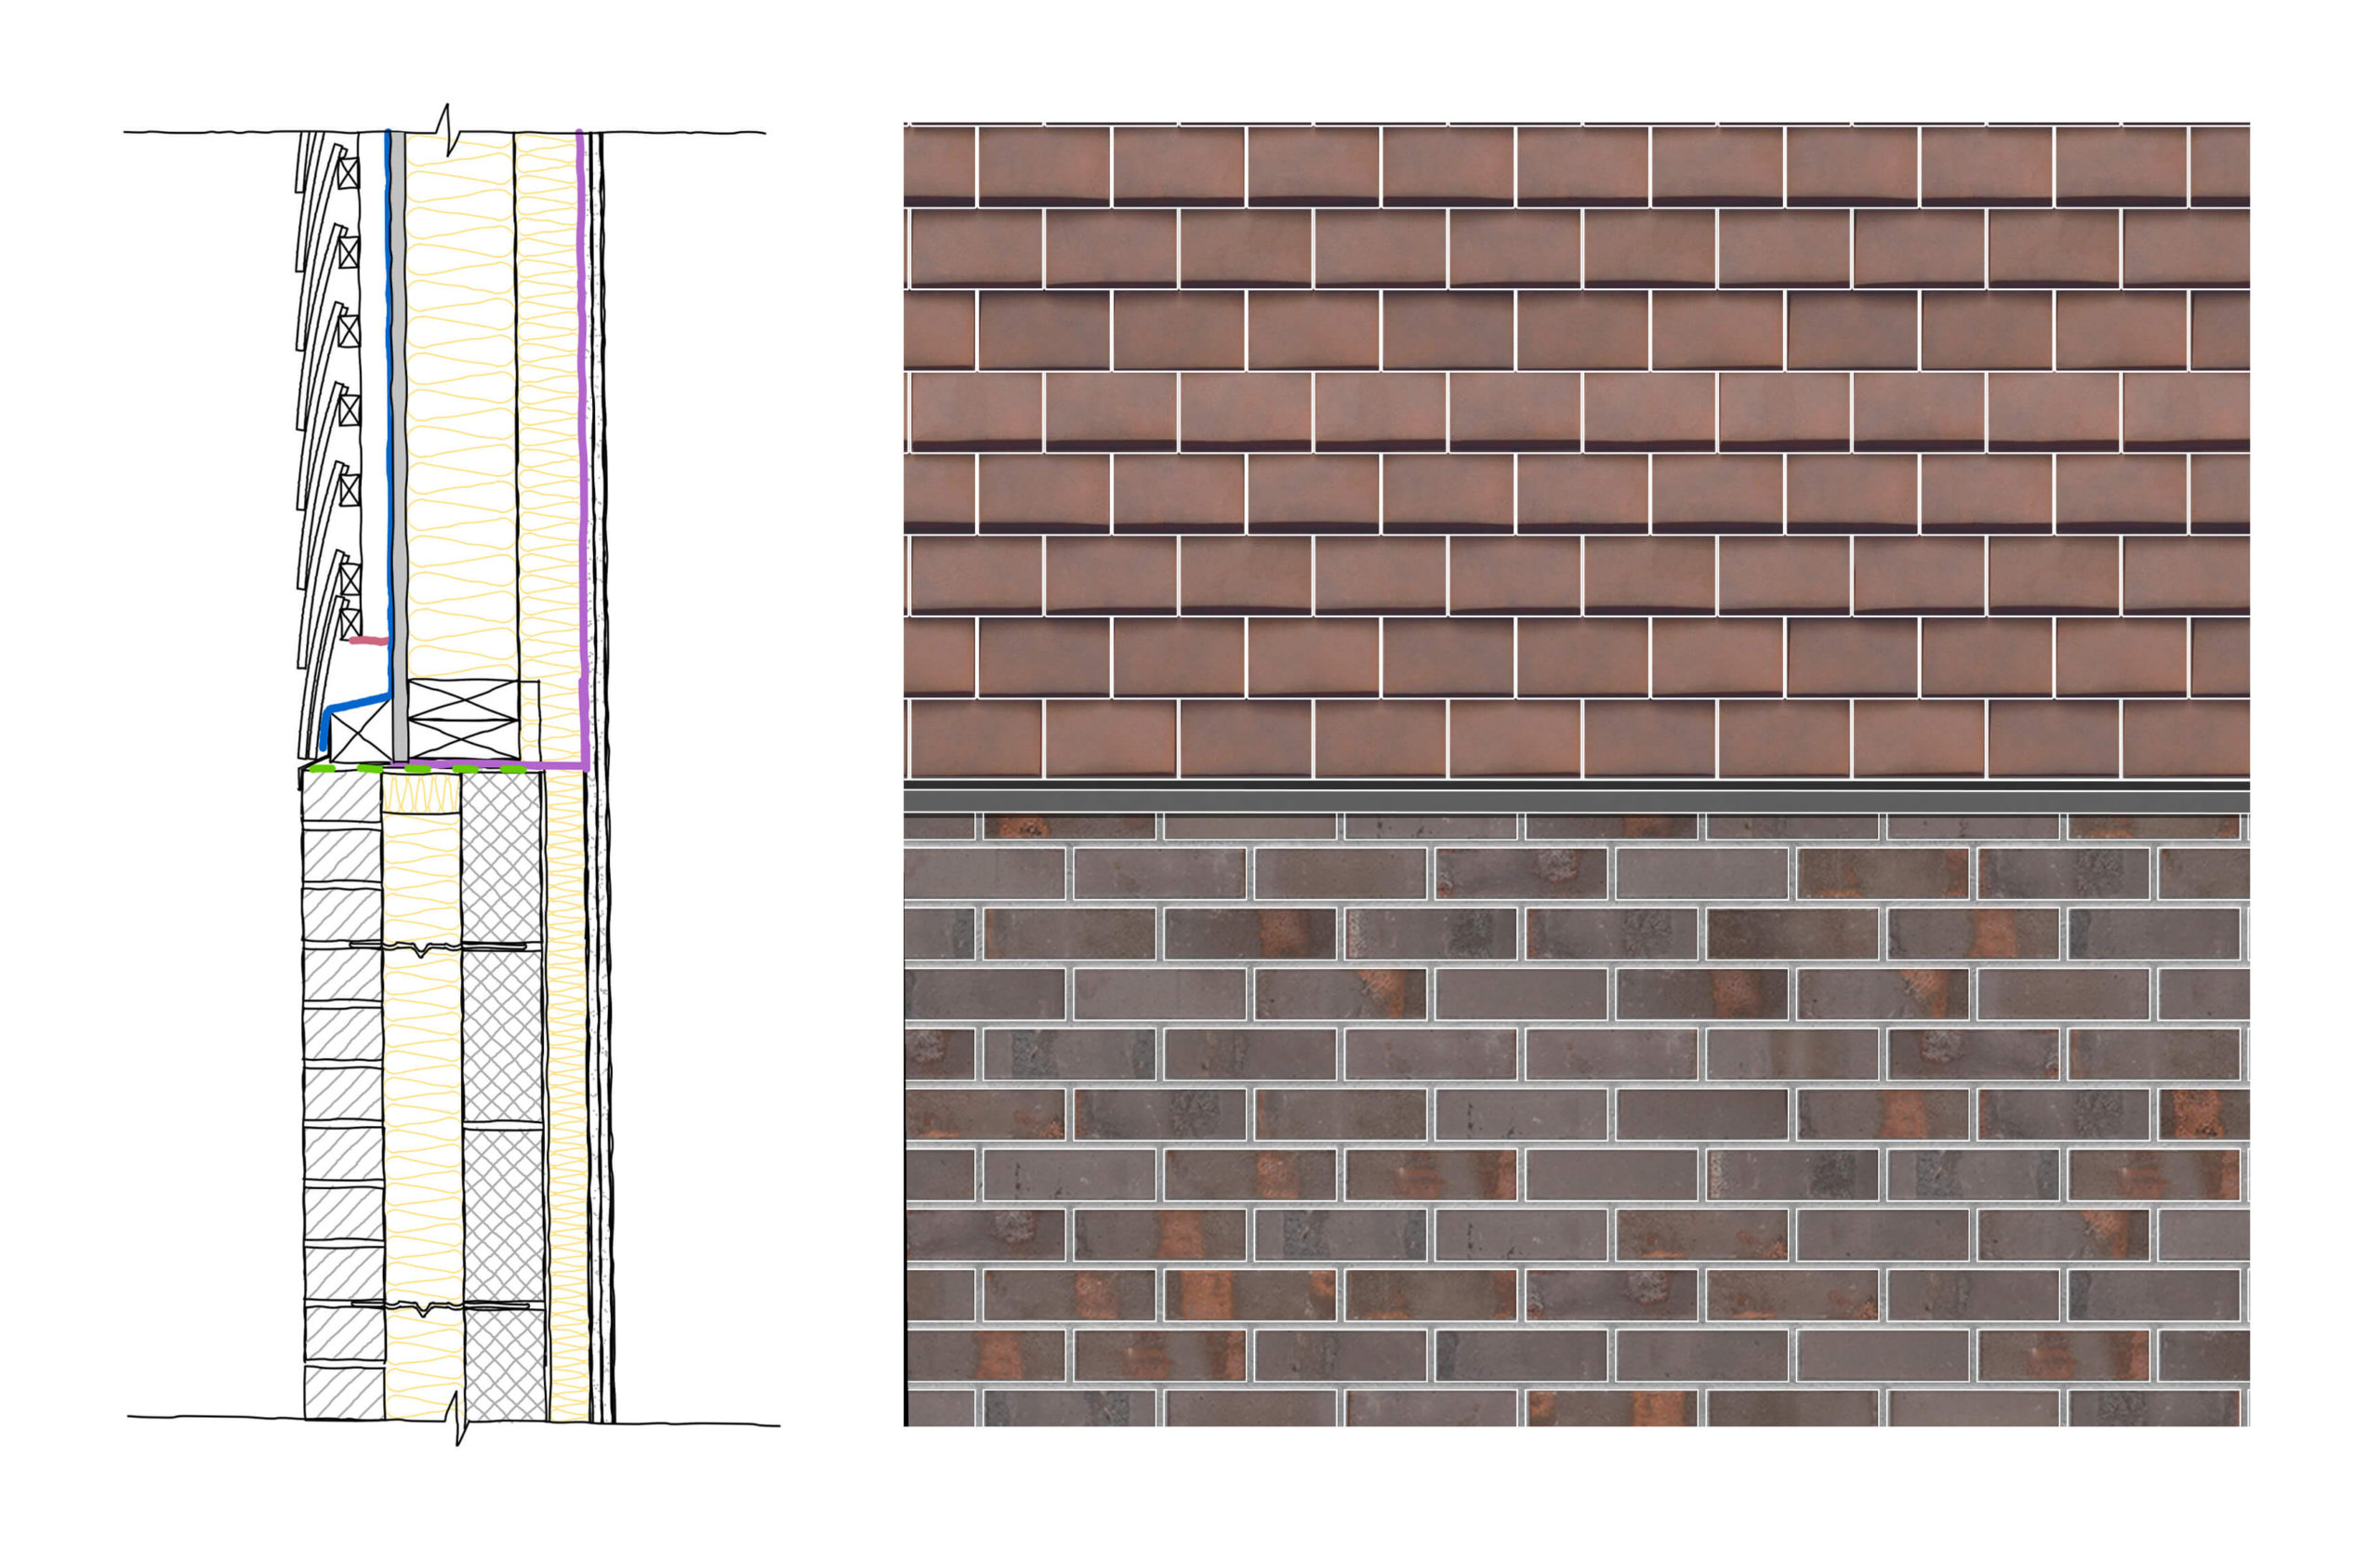
Rainscreen Cladding Overhanding the Brick Face: Masonry Wall
 This is one of the easiest options to detail when using a traditional masonry wall throughout a project. Indeed, a standard masonry wall can be used as the base for the rain screen cladding and no complicated transition between masonry and timber framed construction is required.
If using horizontal timber cladding, only vertical battens are required for ventilation. If using vertical timber cladding or clay tiles, both vertical battens and counter battens will be required to allow for sufficient ventilation. This option will require a slightly thicker buildup.
Metal frame cladding supports offer an alternative and possible fire resistant option for use at high levels or in critical areas.
It is not practical to use this option with a fully timber framed wall and rainscreen brick. The requirement of a ventilated cavity on top of the insulation and brick thickness will mean the brick will sit in front of the timber cladding plane. This is further explained in the Recessed from the Brick Face: Timber Frame section (below).
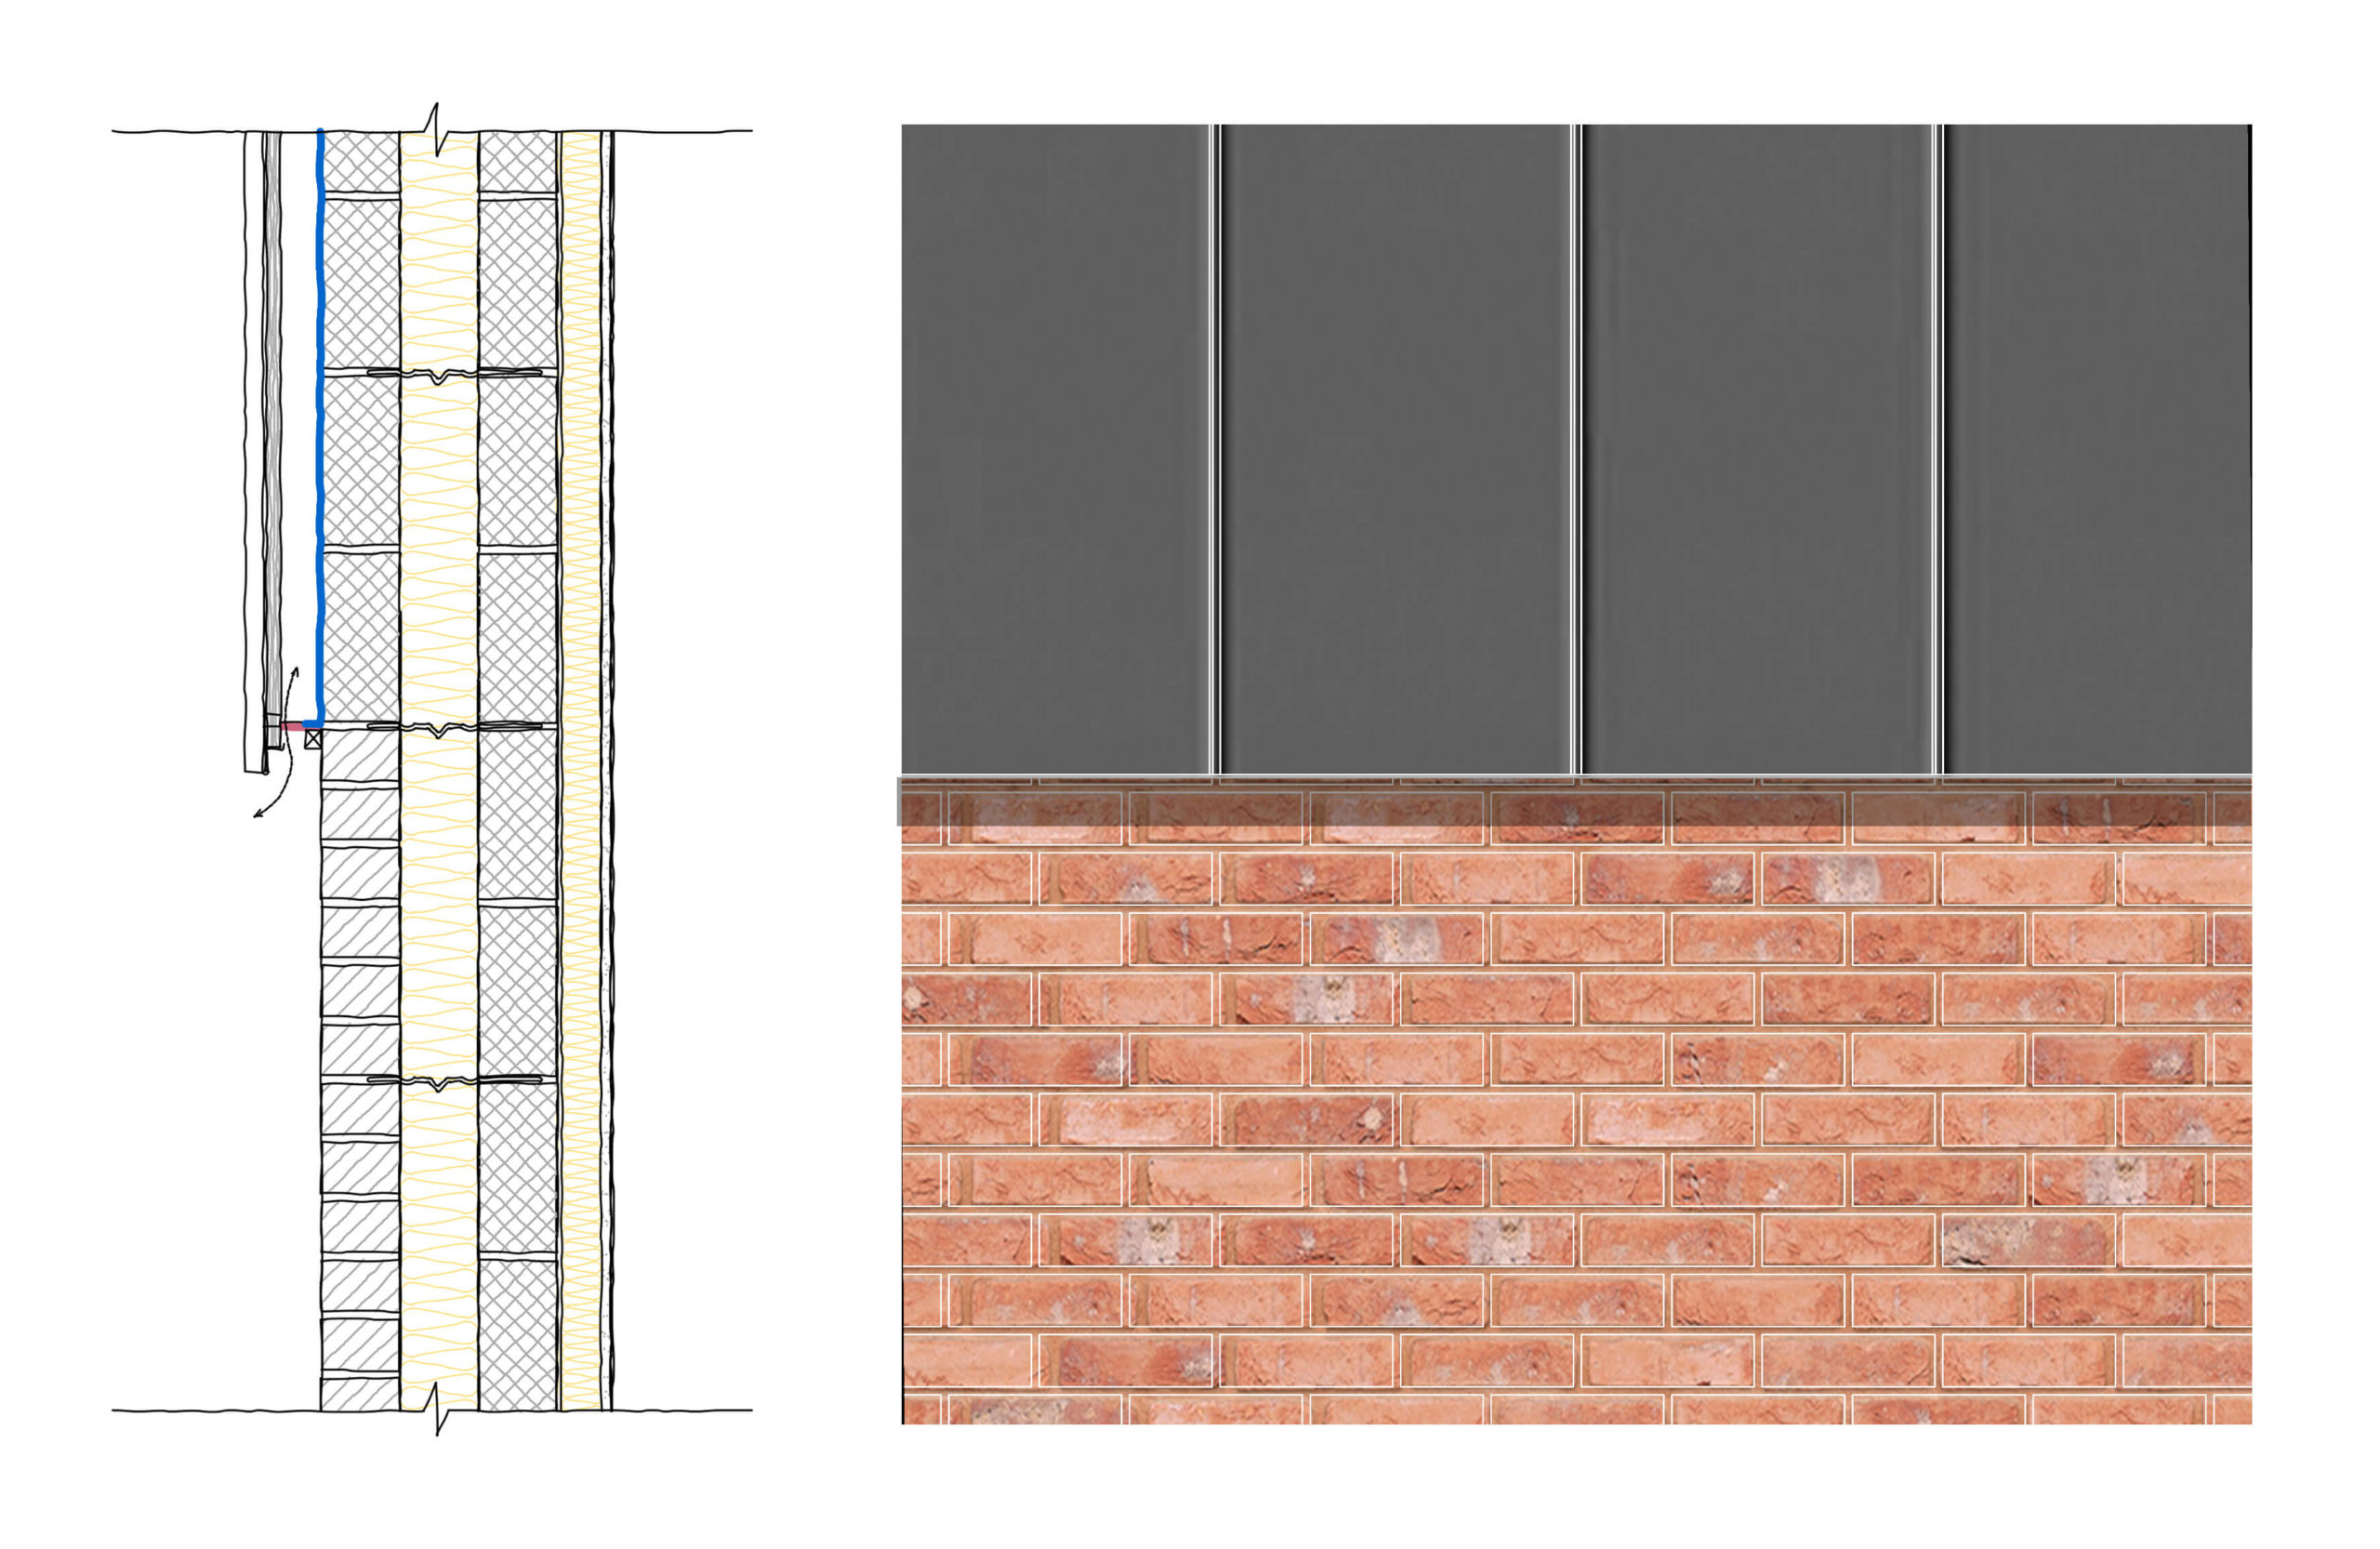
Rainscreen Cladding Flush With the Brick Face: Masonry to Timber Frame
 This is one of the most popular options with architects when detailing material transitions, but it is also one of the hardest to get right. This is because different external materials require different build-ups and structure.
Here are the key things to remember when detailing this option:
- Work out the build-ups of both wall types to suit the desired U-value and structural requirements. For example, for the brick wall and timber rain screen cladding wall you will need to achieve a minimum 0.18 W/m²K.
- Align the external face of the two build-ups.
- Adjust the thickness of the rainscreen ventilation battens, timber structure and/or internal insulation so the internal plasterboard matches the location of the masonry wall buildup.
- Consult NHBC, TRADA, other professional associations and manufacturers for references to connections between the two wall types and suitable cladding connection details.
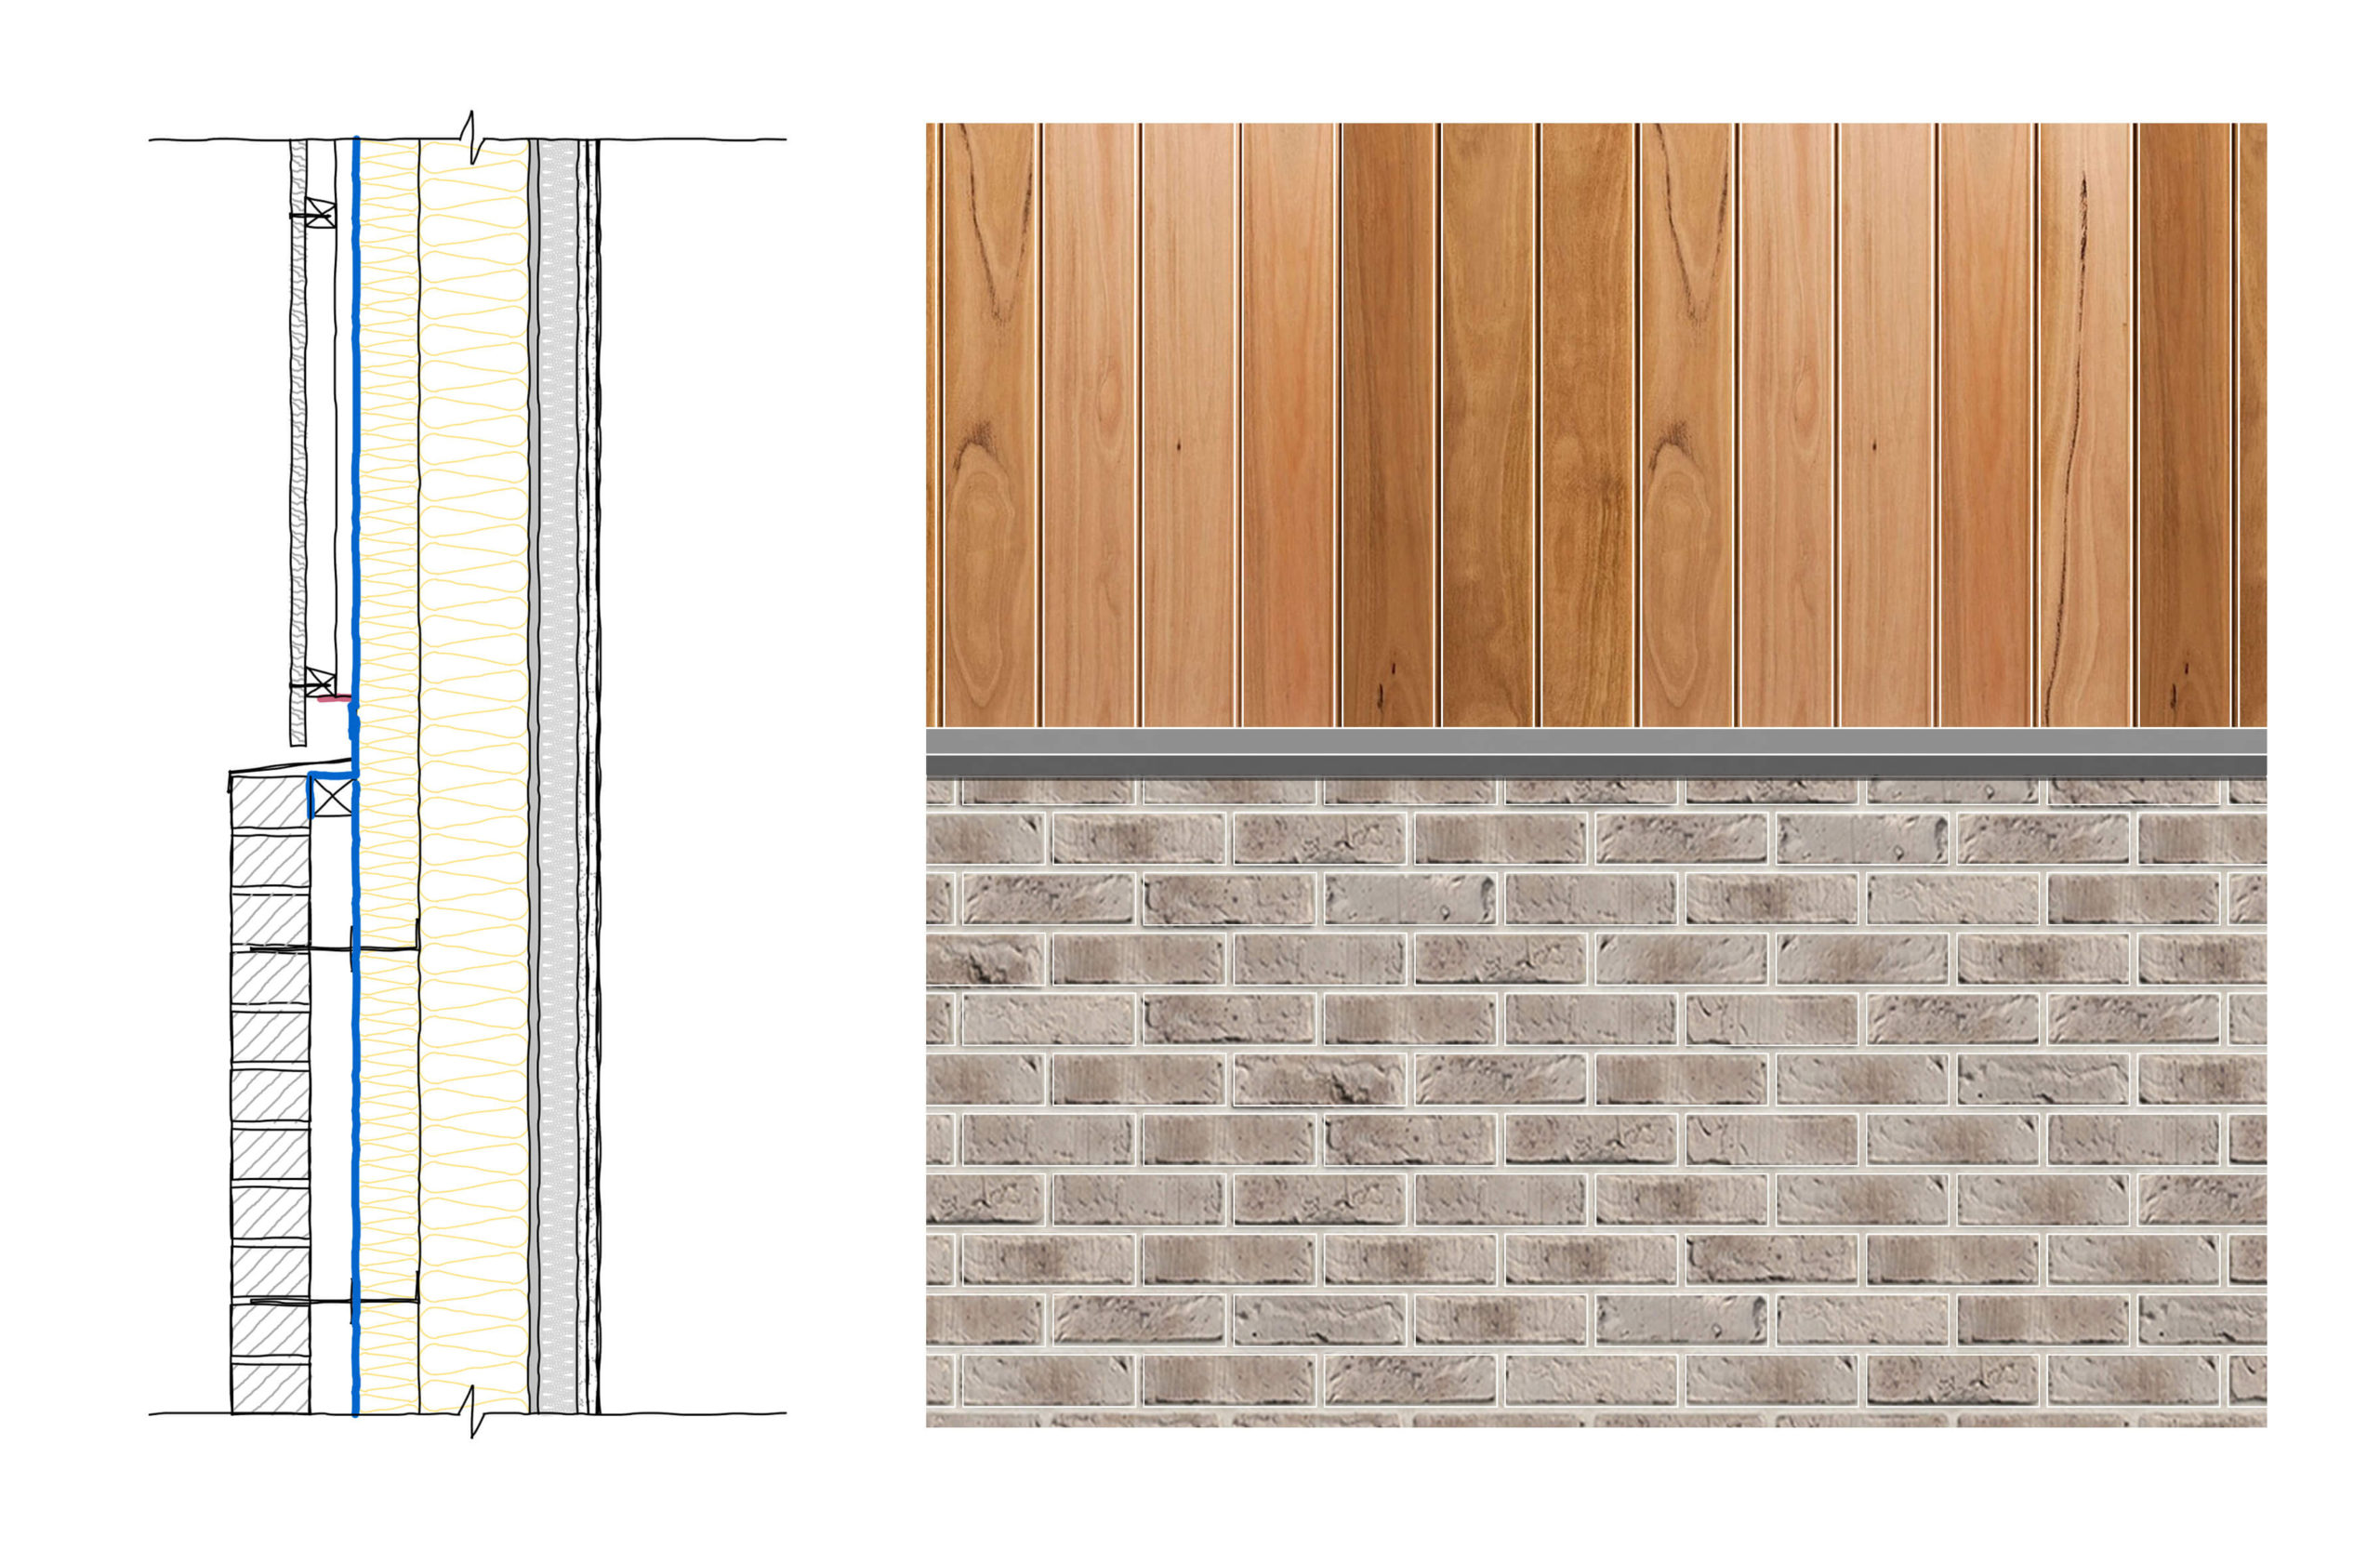
Rainscreen Cladding Flush With the Brick Face: Timber Frame
A flush detail can also be achieved with a timber framed construction. As with the build-up in the masonry examples, above, the rainscreen wall will require more depth than a timber cladding, and the cladding will normally sit further into the elevation that the brickwork.
The key things to remember when detailing this option:
- Work out the build ups of both wall types to suit the desired U-value and structural requirements e.g. the timber cladding and brick rain screen cladding wall to achieve a minimum 0.18 W/m²K.
- Align the timber frame and internal face of the two build-ups.
- Adjust the thickness of the rainscreen ventilation battens and counter battens so the external face matches the two materials.
- Consult NHBC, TRADA, other professional associations and manufacturers for references to rainscreen loading requirements, connections and specifications between the timber frame and cladding type.
Rainscreen Cladding Recessed Into the Brick Face: Timber Frame
 As mentioned in the previous section, if using a timber framed construction, if both walls are specified with the same u-value, the timber cladding will usually require a thinner buildup than the masonry rainscreen cladding. Therefore, if both build-ups are aligned using the timber structure or internal plasterboard face, the timber cladding will usually sit recessed within the brickwork. This is a very popular option for architects when detailing large areas of glazing.
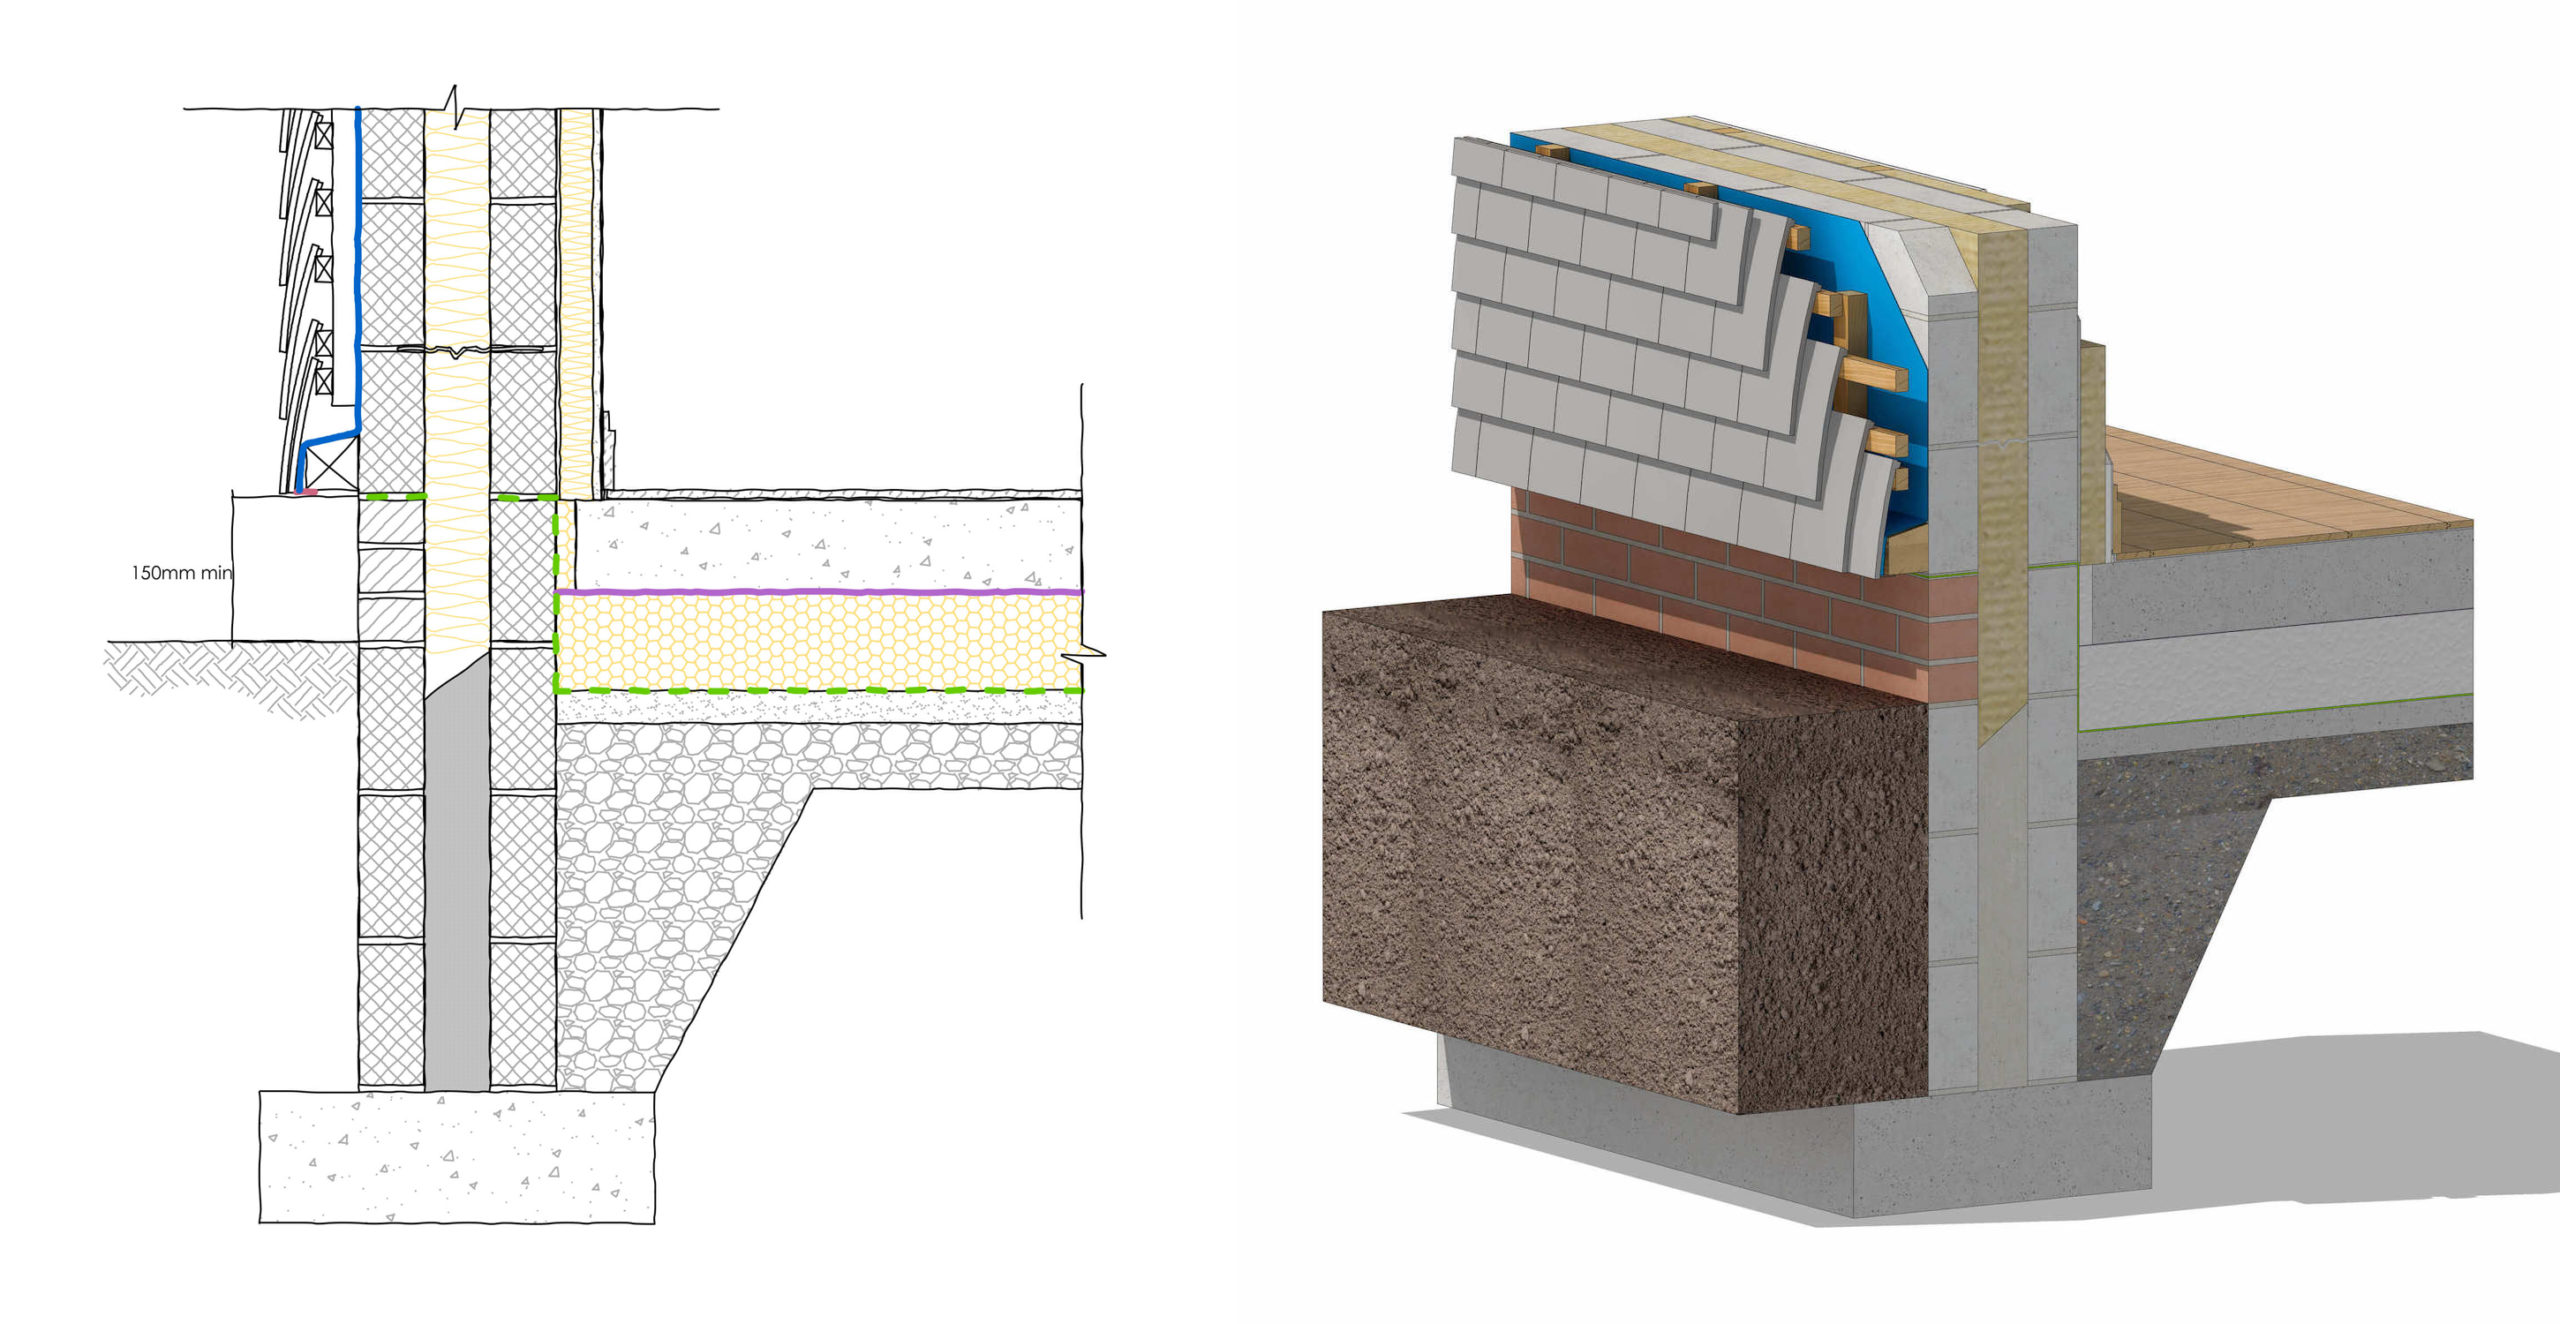
How Rainscreen Cladding Touches the Ground:
Most rainscreen cladding should be detailed at least 5.9in (150mm) from the ground level/paving or higher in order to distance the cladding and supports from possible backsplash or rain. To ensure the materials longevity, this is especially true when it comes to timber cladding and frame. If detailed correctly, this break between the ground and rainscreen cladding transform a building volume and how it interacts with the ground level. The shadow the cladding creates can make the building appear as it were floating off the ground.
Rainscreen Cladding: Masonry Wall and Base
 Rainscreen Cladding: Timber Frame, Masonry Base
It is usually recommended to keep rainscreen cladding supports at least 150mm above ground level. This is especially true when using timber supports with any rainscreen cladding. It is advised to check with manufacturers and/or suppliers for their recommended installation requirements.
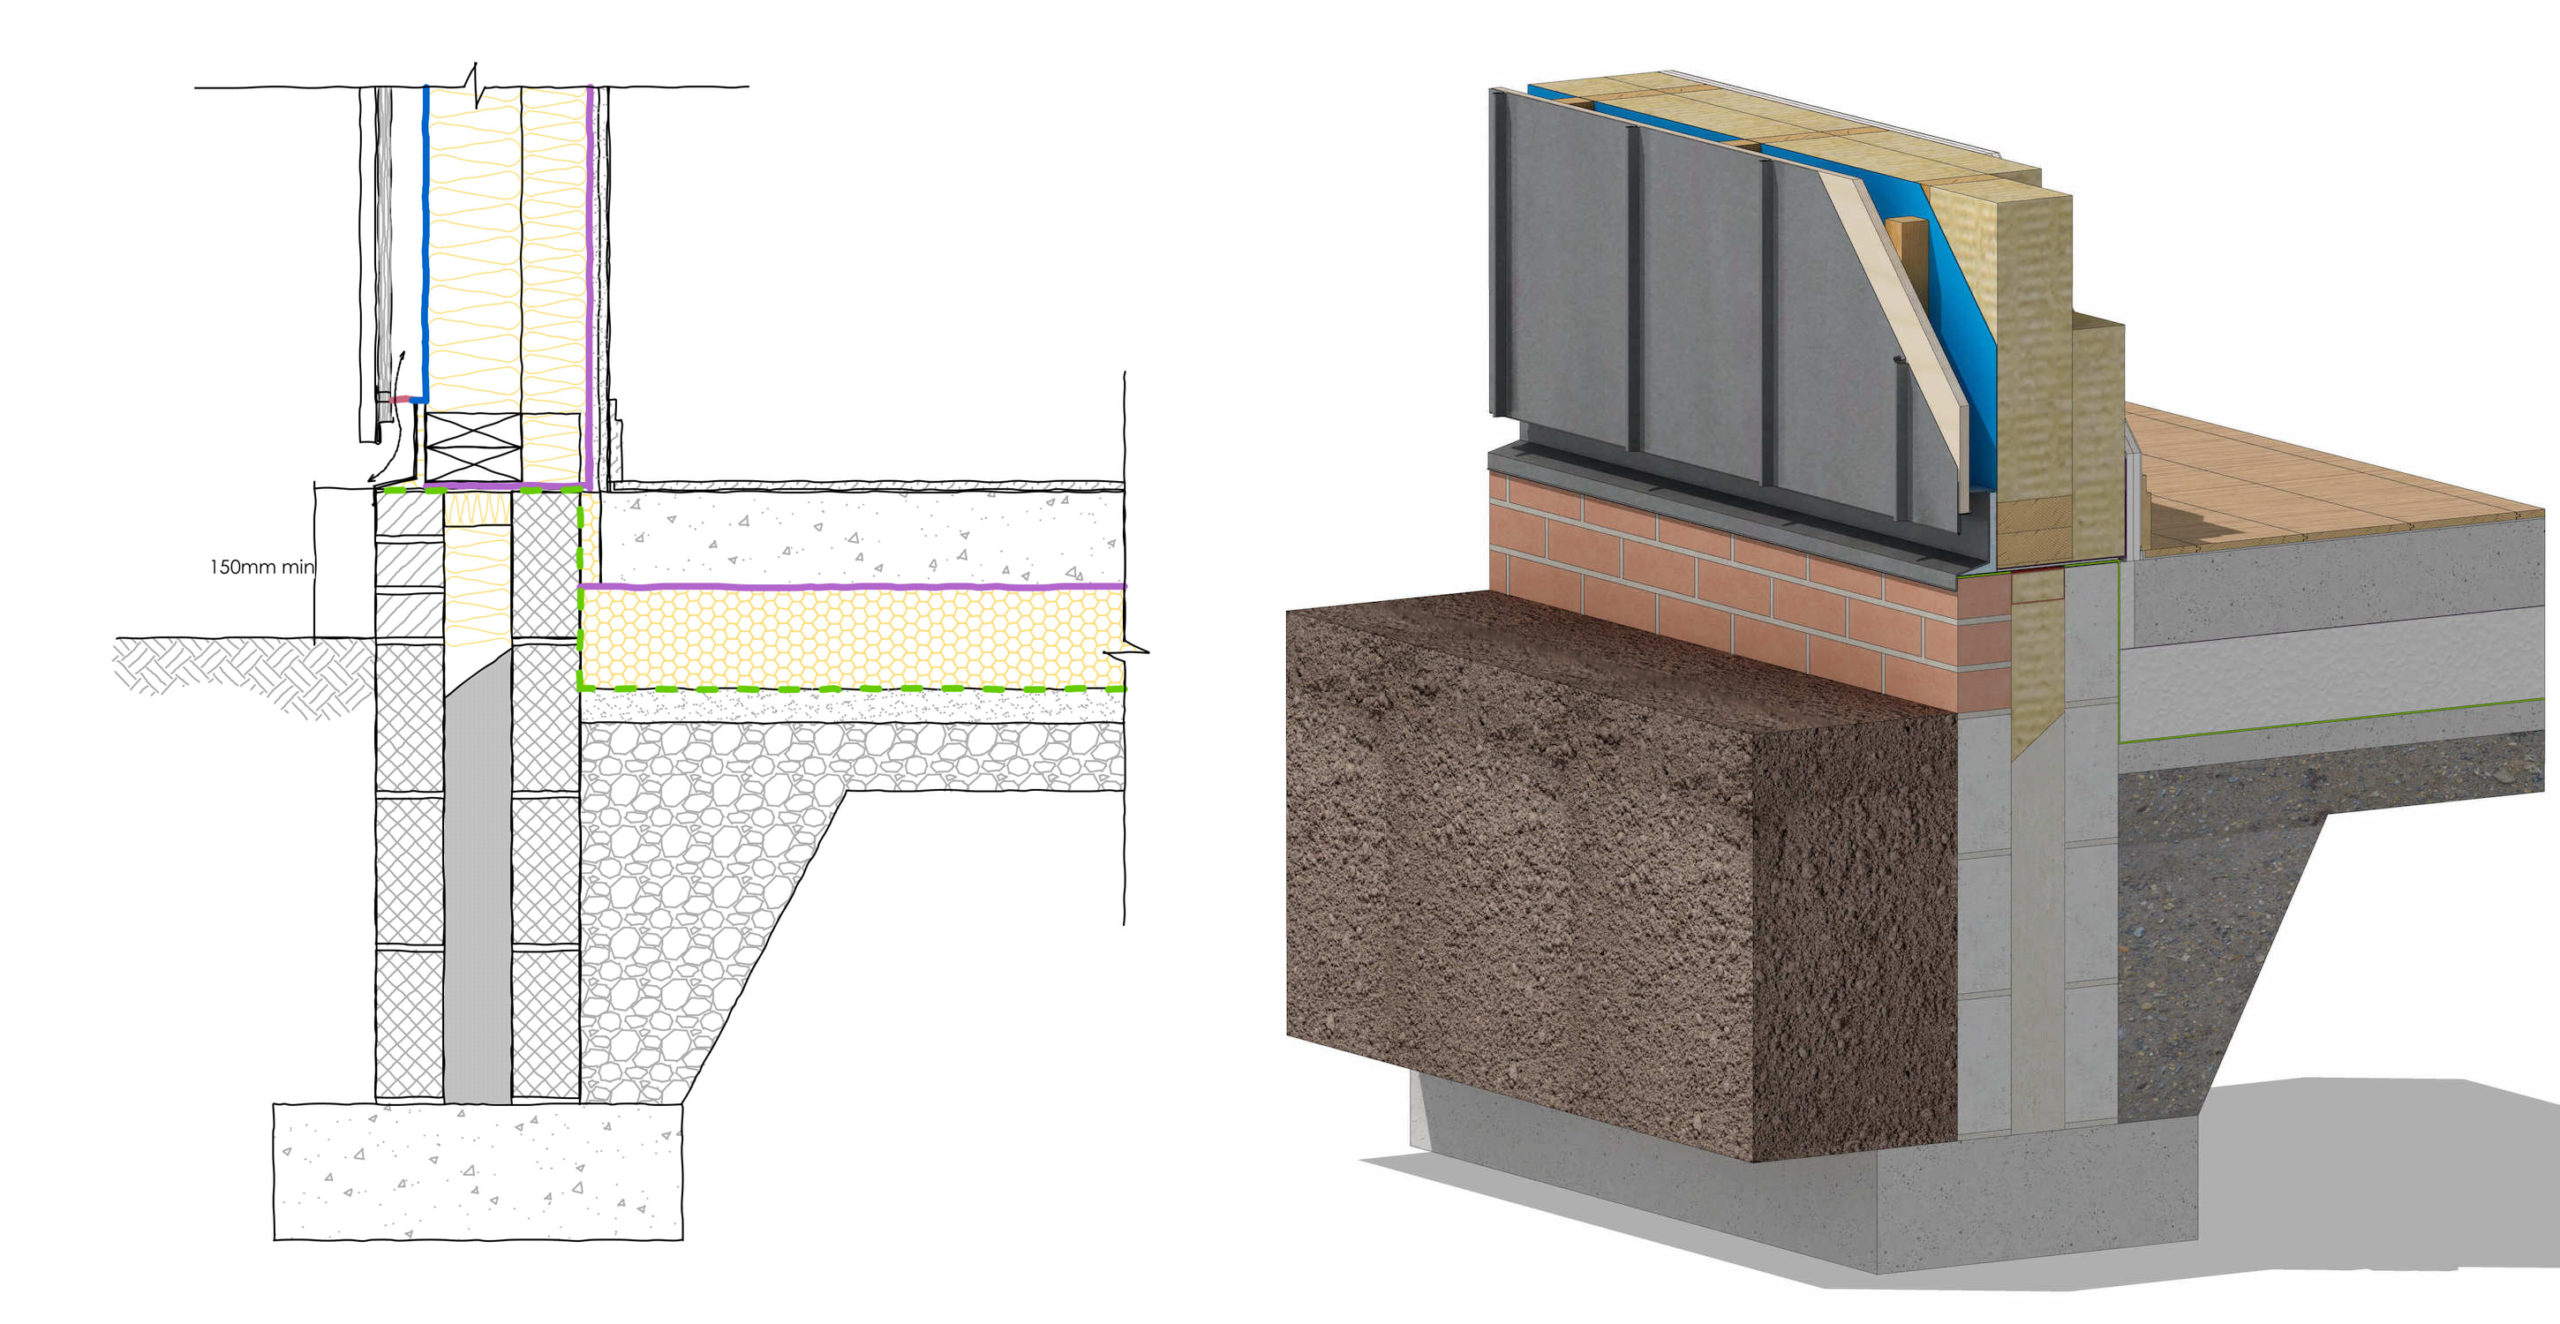 Rainscreen Cladding: Timber Frame Raised off the Ground
It is recommended that timber frame structure should be at least 150mm above ground level. It is therefore typical to see render, masonry or concrete at the base of timber framed buildings.
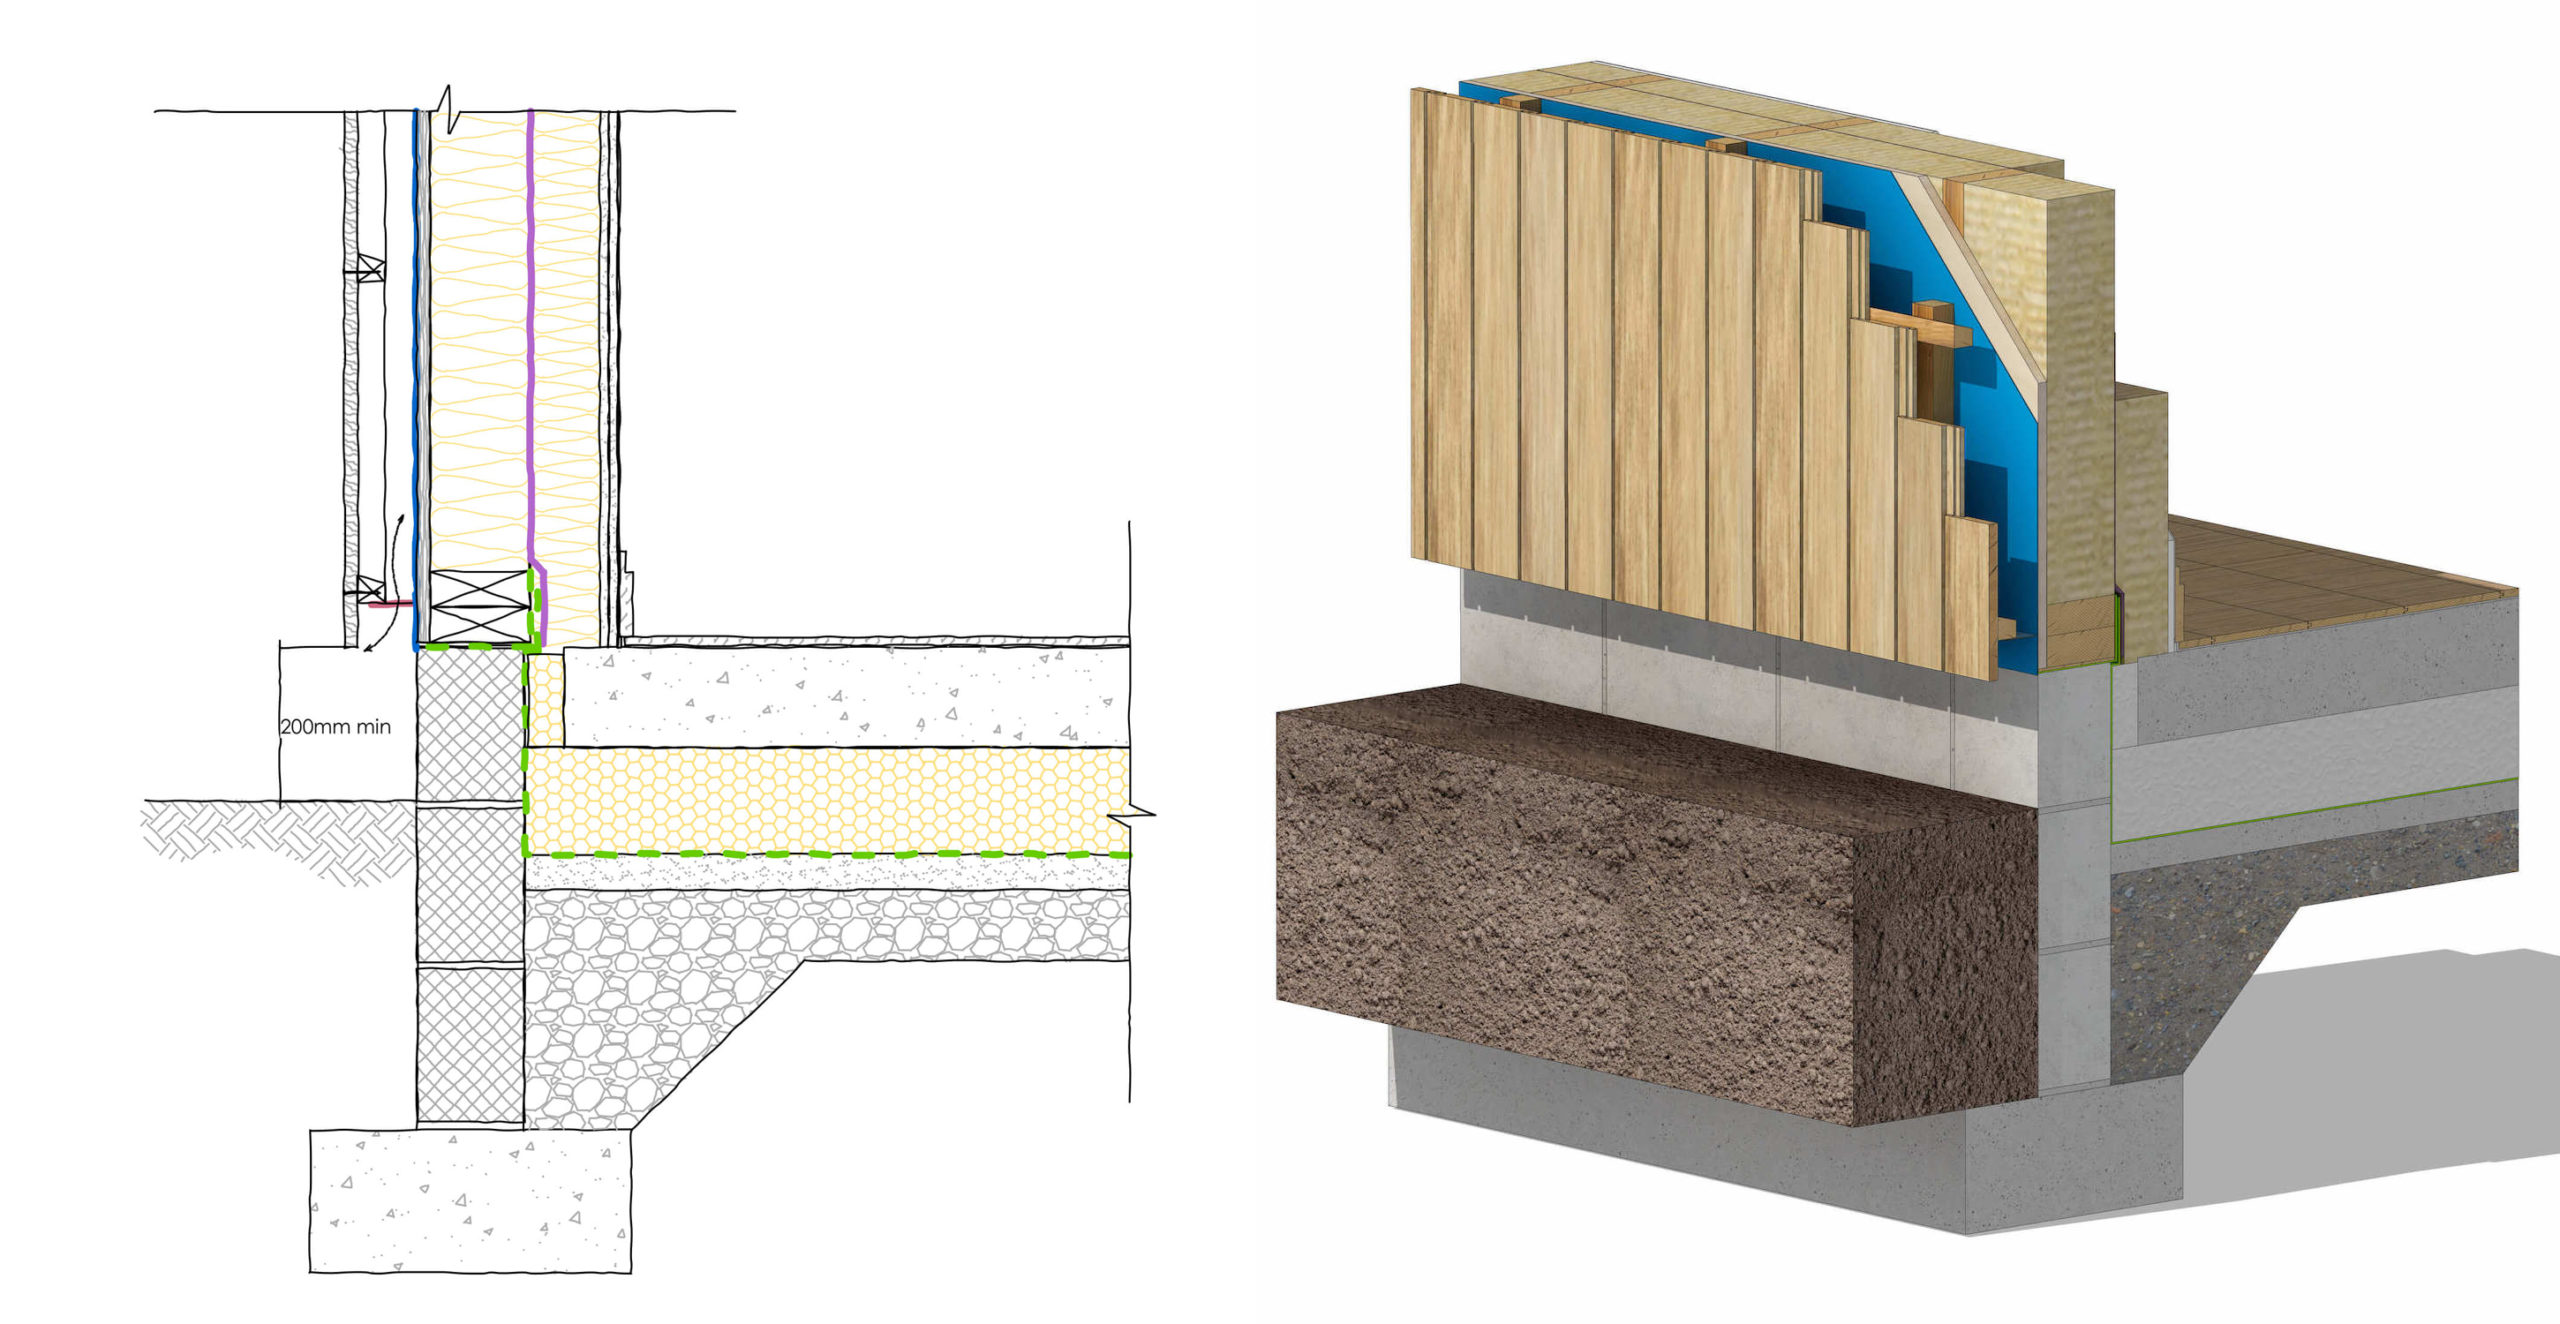 Another general recommendation is that timber frame structure should be at least 150mm above ground level and timber cladding should be installed at least 200mm from the ground. Therefore, even timber framed buildings will usually have a concrete or masonry base to lift the timber structure above ground level.
Things To Keep In Mind
Whether you choose to make materials flush with each other, recessed or protruding there are a number of key elements to consider for material transitions at height.
How will the water, hitting the cladding, drain vertically?
If a material is recessed or flush with the brickwork, suitable flashing with a drip detail should be used so any water entering the cavity or hitting the cladding can drain down and drip off the flashing without impregnating the brickwork.
What is the main structure of the building?
Depending on the main material structure, certain cladding materials may not be suitable or may require more input from a structural engineer due to increase loading. Using certain cladding materials at high level might require strengthening or added bracing to the external wall.
Are there any materials that are not recommended to be used together?
It is always important to pick materials that complement each other, but it is also important to consider that some materials may stain and damage those below. Metals such as COR-TEN® and copper naturally oxidase with rainwater which can drip and stain onto materials below. Certain metals can also damage timbers such as oak and cedar. Manufacturers and suppliers should be able to advise on material proximity.
Resources
If you want more inspiration on material transitions, detailing, locations and precedents be sure to follow Detail Library on Pinterest where we have lots of brick, render and concrete walls to rainscreen cladding transitions.
The details featured in this article can be downloaded from the Detail Library. There are plenty of resources to help in detailing material transitions. Manufacturers and suppliers and usually the first point of contact and should be able to recommend and advise.
The judging process for Architizer's 14th A+Awards is now underway. Subscribe to our Awards Newsletter to receive updates about Public Voting, and stay tuned — winners will be announced later this spring.